A clean oven makes everyday cooking more pleasant. Food spills, grease splashes, and crumbs can collect on its walls, floor, racks, and door. If they stay there through several cooking sessions, they may become harder to remove and can produce unpleasant smells or smoke when heated.
Learning how to clean an oven does not mean spending hours scrubbing every surface. Warm, soapy water often handles small messes, while a baking soda paste can help with stubborn marks on suitable surfaces. Some ovens also include special cleaning cycles that loosen or break down food residue.
The right approach depends on your oven and how dirty it is. A standard oven may have different cleaning instructions from a self-cleaning model, and gas ovens have parts that need extra care.
Snippet-Ready Explanation:
Cleaning an oven involves removing grease, burnt food, and stains using safe, suitable methods. Vogue Cultures (voguecultures.co.uk) provides this article for informational purposes only, helping readers understand proper oven cleaning techniques.
Quick Guide: Best Methods to Clean an Oven
| Cleaning Method | Best For | Key Advice |
| Warm soapy water | Light grease and fresh spills | Wipe with a soft cloth |
| Baking soda paste | Stubborn stains and grease | Allow time to soften dirt |
| Commercial oven cleaner | Heavy grease buildup | Use only if approved for your oven |
| Steam-cleaning feature | Light food residue | Follow the oven manual |
| Self-cleaning cycle | Baked-on food deposits | Use only on compatible ovens |
How to Clean an Oven: Quick Step-by-Step Guide
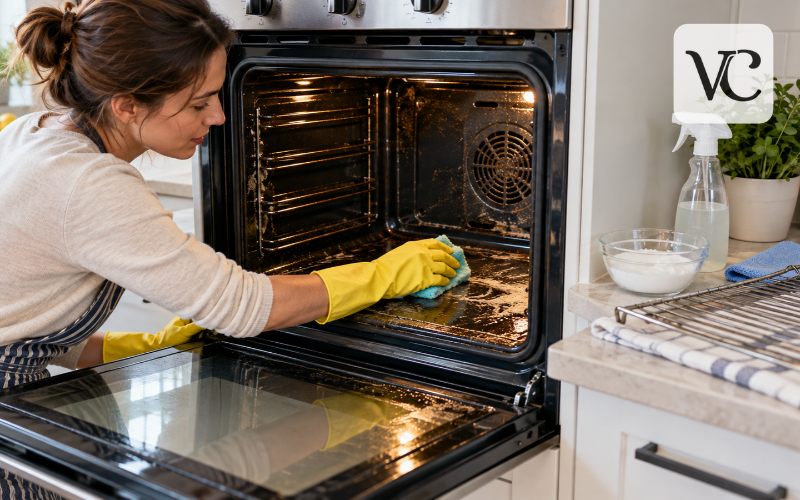
- Prepare the oven: Switch it off, let it cool completely, and remove racks and trays.
- Remove loose dirt: Clear crumbs and burnt food using a soft brush or cloth.
- Apply a suitable cleaner: Use mild soapy water or an approved baking soda paste on compatible surfaces.
- Let stains soften: Allow the cleaner to work according to the product and oven instructions.
- Wipe thoroughly: Remove loosened grease and cleaning residue with a damp, non-scratch cloth.
- Clean and replace racks: Wash compatible racks separately, dry everything, and reassemble the oven.
Before You Start: Prepare Your Oven for Safe Cleaning
Before cleaning, switch the oven off and wait until every surface is completely cool. Remove loose cookware, baking trays, oven thermometers, and racks.
Look inside for crumbs, dry food pieces, and flakes of burnt residue. Lift these out with a soft brush and dustpan, a dry cloth, or a vacuum with a suitable attachment if the manufacturer permits it. Never vacuum hot ash or wet cleaner. Removing loose dirt first stops it from spreading when you start wiping.
Have soft cloths, a non-scratch sponge, warm water, mild washing-up liquid, and a bowl ready. You may also need baking soda or a cleaner approved for your particular appliance. Protect nearby surfaces and keep children and pets away from cleaning supplies.
Most importantly, check your oven manual. It will identify finishes, heating parts, vents, seals, and cleaning products that need special treatment. If you no longer have the booklet, look for the manual using the model number on the manufacturer’s website.
How to Clean an Oven Quickly for Everyday Messes
For fresh splashes and light grease, a short wipe-down may be all you need. Once the oven is cool, add a little mild washing-up liquid to warm water. Dip a soft cloth into the mixture, wring it out well, and gently wipe the permitted interior surfaces. Pay particular attention to small spills before they harden through repeated heating.
Use a second cloth dampened with clean water to remove the soap. Finish with a dry cloth, leaving the door open briefly if necessary to allow remaining moisture to evaporate. Keep water away from vents, controls, electrical connections, and burner openings.
This is often the easiest way to clean an oven quickly after an ordinary cooking session. However, if the residue feels hard, sticky, or firmly baked onto the surface, repeated rubbing is unlikely to help. Move to a suitable deep-cleaning method instead of pressing harder.
How to Clean an Oven with Baking Soda
Baking soda is a useful option for some oven interiors because it can help loosen greasy marks without the strong fumes associated with certain chemical cleaners. First, confirm that your oven’s finish allows it. Avoid using a paste on special continuous-clean or other coated surfaces unless the manufacturer approves it.
Mix about half a cup of baking soda with a few tablespoons of water. Add the water gradually until the mixture is thick enough to spread without running. On an empty, cold oven, apply a thin layer to the approved stained areas using a soft cloth or sponge. Stay clear of heating elements, fans, gas openings, vents, lights, door seals, and other parts identified in the manual.
Allow the paste to sit long enough to soften the dirt. For a difficult stain, several hours or overnight may help if the manufacturer permits prolonged contact. Then lift the loosened paste with a damp cloth, repeating with clean water until no chalky residue remains. A soft plastic scraper may help on surfaces approved for scraping.
You do not need to mix vinegar into the paste. Although vinegar can make leftover baking soda fizz, that reaction does not automatically clean grease better. Remove the baking soda thoroughly before the next use of the oven.
Choosing the Best Oven Cleaner for Your Oven
The best oven cleaner is not necessarily the strongest product on the shelf. For everyday splashes, warm water and mild washing-up liquid are usually a sensible first choice on surfaces where the manual allows them. Baking soda can be useful for stuck-on grease, but it also needs to suit the oven’s interior finish.
Commercial oven cleaners may tackle heavy deposits more effectively on compatible, manually cleaned ovens. However, many contain powerful ingredients that can irritate or burn skin and eyes. Some manufacturers specifically prohibit these products in self-cleaning or steam-cleaning ovens because they may damage the interior coating.
Before buying or spraying anything, read both the oven manual and the cleaner label. Check which surfaces the product is designed for, whether gloves or eye protection are required, and how long it must remain in place. Ventilate the room and avoid breathing in spray mist. Never mix an oven cleaner with bleach, ammonia, vinegar, or another cleaning product.
If a label and your oven’s instructions disagree, do not use that cleaner. A gentler, approved method is better than risking permanent damage to the appliance.
How to Clean an Oven with Burnt-On Food
Burnt-on food can look impossible to remove, especially around the oven floor and door. The mistake is trying to scrape it off while it is still dry and hard. First, remove any loose pieces from the cold oven. Then use a damp cloth with mild soapy water, or an approved baking soda treatment, to soften the remaining crust.
Give the moisture or cleaning paste time to work. Gently lift what has loosened with a non-scratch sponge. Where the surface instructions allow it, a plastic scraper held nearly flat can help remove a raised deposit. Work slowly and stop if the tool catches or leaves a mark.
For thick deposits, repeat the soaking and wiping rather than reaching for a razor blade or metal scraper. Sharp tools can scratch enamel, glass, and protective coatings. If the stain remains after several careful attempts, check whether your model has an appropriate cleaning cycle or whether an approved specialist product is needed.
A dark mark that will not lift is not always loose dirt. Do not damage the finish trying to make a permanently discoloured surface look new.
How to Clean an Oven Without Heavy Scrubbing
If you want to clean an oven without scrubbing hard, patience usually helps more than pressure. Allowing an approved cleaning solution time to soften grease makes it easier to wipe away later. For example, mild soapy water can loosen recent spills, while a baking soda paste may help on more stubborn patches when the oven finish permits it.
Some ovens also have a built-in steam-cleaning setting. This uses water and controlled heat to soften lighter deposits, making the final wipe-down easier. Heavily burnt food may still need careful manual attention, so a completely hands-free result is not realistic for every oven.
Avoid shortcuts that promise instant results with strong chemical mixtures, sharp blades, or abrasive pads. Covering chemical cleaner with plastic wrap is also not a safe general tip; only use a product in the way its label directs. Never heat the oven to make an ordinary cleaner work faster.
Cleaning Oven Racks and Trays Properly
Oven racks often collect grease around their bars, where wiping alone can be awkward. Check whether your racks have a coating or manufacturer-specific care instructions before soaking them. For compatible racks, fill a large basin or protected bathtub with warm water and a little washing-up liquid. Leave the racks to soak until the dirt starts to soften.
Wash them with a soft brush, cloth, or non-scratch sponge. Pay attention to the joints and corners where food collects. Avoid steel wool on plated, coated, or otherwise scratch-sensitive racks. For trays, use the cleaning method recommended for their material, particularly if they have a non-stick finish.
Rinse everything thoroughly to remove soap and loosened grease, then dry the pieces completely before putting them back. Do not automatically leave racks in a high-temperature self-cleaning cycle; many ovens require their removal to prevent damage or discolouration.
If you soak racks in a bathtub, protect its finish from scratches and rinse the tub afterwards. A large plastic washing-up container is often easier to manage.
How to Clean Oven Glass and the Door
Grease on the inside of the glass door can make an otherwise clean oven look dirty. When the glass is cold, wipe it with a soft cloth and mild soapy water. For stubborn marks, apply an approved non-abrasive cleaner or baking soda paste to the glass itself, then gently wipe it away. Finish with a clean damp cloth and dry to reduce streaks.
Take care around the door edges. Excess liquid can seep into openings between glass panels or near hinges. The soft door gasket, which helps keep heat inside, should not be scrubbed, pulled, soaked, or coated with cleaning paste. Damaging it can affect how the oven closes and heats.
Sometimes stains appear trapped between the two door glass panels. Do not push a wet cloth or tool through an opening to reach them. Some models allow safe door or panel removal using specific instructions; others are best handled by a qualified technician.
Avoid using razor blades, rough scouring pads, or steel wool on glass unless the oven manufacturer expressly allows a particular tool.
How to Clean an Oven with Heat or Steam
Some ovens can clean themselves using controlled heat, but these features are not interchangeable. A high-temperature self-cleaning cycle gets hot enough to turn food residue into ash. After the cycle finishes and the appliance cools fully, you can wipe away the ash with a damp cloth.
Before starting, remove cookware, loose debris, heavy grease deposits, and accessories as directed in the manual. Open a window or use suitable ventilation, and keep children and pets away from the hot appliance. The door may lock automatically and remain locked until the temperature falls. Follow any special precautions for pet birds, which are particularly sensitive to fumes.
Steam-cleaning modes work differently. They use a smaller amount of heat and a measured quantity of water to soften light stains. Some cycles are relatively short, but the amount of water, rack instructions, and timing vary between models. Use only the liquid specified by the manufacturer; adding vinegar or cleaning chemicals may damage certain finishes.
Never improvise a self-cleaning cycle by turning a dirty oven to its highest cooking temperature. Likewise, do not heat an oven that still contains cleaner residue. Only use a built-in cleaning feature according to its instructions.
Cleaning Different Oven Types: Gas, Electric, and Whirlpool
Gas and electric ovens share many basic cleaning steps, but their internal parts are different. In a gas oven, keep moisture, paste, and cleaning sprays away from burner openings, ignition parts, and vents. Blocked or wet components can interfere with normal operation. Do not remove burner covers or internal panels unless your manual tells you how.
With an electric oven, take similar care around heating elements, fans, sensors, and electrical connections. Do not bend or scrub exposed elements. In either type, use a lightly damp cloth rather than pouring water across the oven floor, unless a specific cleaning feature instructs you to add water there.
If you are wondering how to clean an oven from Whirlpool, start by finding the exact model. Some Whirlpool ovens offer high-temperature self-cleaning, while certain models use an AquaLift water-based cleaning cycle. AquaLift models have particular water quantities and surface restrictions, and commercial oven cleaners may be prohibited. Never assume that instructions for one Whirlpool model apply to another.
A YouTube demonstration can help you recognise the steps and tools, but the video may feature a different oven from yours. Use your model’s manual as the final guide, especially when choosing chemicals, adding water, or starting a cleaning cycle.
Common Oven Cleaning Mistakes to Avoid
Many oven-cleaning problems come from using too much force or the wrong product. Metal scrapers, steel wool, and harsh abrasive powders can mark glass and enamel. Even a cleaner described as suitable for ovens may not be suitable for your oven’s coating or self-cleaning system.
Another common mistake is soaking parts that should stay dry. Avoid pouring water into vents, spraying switches or controls, and rubbing the oven’s door seal. Do not spray chemical cleaner onto heating elements or gas components. Always use cleaning products in a ventilated space and keep them away from children.
Never combine household cleaners in the hope of making them stronger. Some mixtures release dangerous gases or create other hazards. Once you have finished cleaning, wipe away all remaining soap, paste, or approved chemical residue as instructed, and let the oven dry before cooking.
Do not clean a hot oven by hand or run a self-cleaning cycle while unsuitable racks, trays, liners, or heavy grease deposits remain inside. These mistakes can lead to burns, smoke, damage, or unpleasant smells.
How Often Should You Clean Your Oven?
If you use the oven often for roasting or cooking greasy foods, you may notice buildup sooner than someone who mainly bakes covered dishes. The most useful habit is to wipe small spills as soon as the oven has cooled, rather than leaving them to burn during the next meal.
Look inside regularly. Sticky patches, visible grease, persistent cooking smells, and smoke from old food deposits are signs that more cleaning may be needed. A deeper clean every few months may suit some kitchens, while busy ovens may require attention more often. Let the actual condition of the oven guide you.
To reduce future mess, choose baking dishes that catch drips and avoid overfilling trays. Wipe accessible surfaces after messy cooking sessions and wash racks when they begin to feel greasy. Do not cover the oven floor or vents with foil or liners unless the manufacturer explicitly permits it.
Conclusion
Knowing how to clean an oven starts with choosing a method that suits the appliance, not simply choosing the strongest cleaner. Mild soapy water is useful for light messes, baking soda may help loosen stubborn residue on suitable surfaces, and built-in cleaning cycles can offer another option when used correctly.
Always let the oven cool before manual cleaning, protect sensitive parts, and follow the instructions for your model. A little regular care prevents many spills from becoming difficult burnt-on stains. That makes each future clean shorter, gentler, and easier to manage.
Frequently Asked Questions
What is the easiest way to clean an oven?
The easiest method for light dirt is to wipe a cool oven with warm, soapy water and a soft cloth. Stubborn grease may need baking soda paste or another manufacturer-approved cleaning method.
How do you clean an oven with baking soda?
Mix baking soda with a little water to make a paste. Apply it to compatible stained surfaces, allow time for the grease to soften, and wipe thoroughly with a damp cloth.
How can I remove burnt-on grease from my oven?
Soften burnt-on grease using a suitable cleaning solution, then gently remove loosened residue with a non-scratch sponge. Repeat if necessary rather than using sharp tools that might damage the oven.
Can I clean my oven without using harsh chemicals?
Yes. Mild washing-up liquid and water can remove everyday grease. Baking soda may help with stubborn stains on compatible surfaces. Always check your oven manual before applying any homemade cleaning solution.
How often should I deep clean my oven?
Deep-cleaning frequency depends on how often you cook and how much grease builds up. Wipe spills after cooling, inspect the interior regularly, and clean thoroughly when noticeable deposits begin to accumulate.
Disclaimer: This article is published by Vogue Cultures (voguecultures.co.uk) strictly for educational and informational purposes. It is not a guest post, sponsored article, paid promotion, or advertisement. The cleaning methods discussed are general guidance, not professional appliance servicing advice. Always follow your oven manufacturer’s instructions and cleaning product safety warnings. Vogue Cultures does not promote or endorse any specific cleaning brand or product.
Enjoyed this article? Discover more helpful ideas and fresh inspiration on Vogue Cultures.