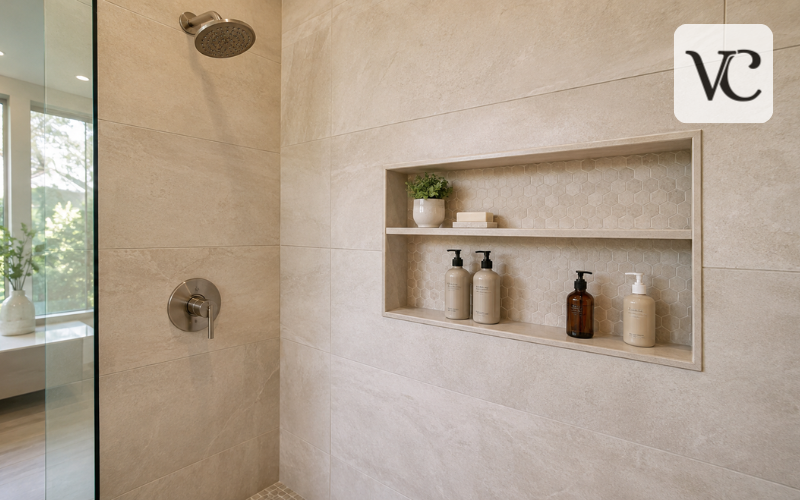
A tile shower niche is a recessed storage space built into a shower wall. Instead of adding a hanging caddy, corner basket, or shelf that projects into the shower, the niche uses space inside the wall to hold shampoo, conditioner, soap, razors, and other daily items.
The main advantage is simple: it provides useful storage without taking up shower space. A properly planned niche can also look like a natural part of the tile design rather than an accessory added later. Prefabricated niches and custom-built niches are both widely used. A custom niche is formed within the wall and waterproofed as part of the shower system, while a prefabricated niche arrives as a ready-made component designed to fit into the wall.
Good results depend on more than choosing attractive tile. Size, position, bottle height, framing, waterproofing, drainage, tile layout, shelves, and finished edges should all be considered before installation begins.
There are also tile-free options now available for people who want recessed storage without covering the niche itself in tile. This gives homeowners more freedom to choose a niche that suits the bathroom, budget, and installation method.
Snippet-Ready Definition:
A tile shower niche is a recessed storage space built into a shower wall and finished with tile, providing convenient space for shampoo, soap, and other toiletries without adding bulky shelves or hanging caddies.
Quick Guide: Tile Shower Niche
| Feature | Quick Guidance |
| Purpose | Recessed storage for shampoo, soap, razors, and shower products |
| Common Size | Around 12 × 24 inches is popular, but sizes vary by wall and storage needs |
| Depth | Depends on wall construction and the niche system being used |
| Placement | Position at a comfortable reaching height for regular users |
| Shelf Style | Single opening, divided shelf, vertical, horizontal, or multi-compartment |
| Tile Design | Match the shower wall for a seamless look or use contrasting tile as an accent |
| Waterproofing | Must connect properly with the shower’s waterproofing system |
| Drainage | Tiled surfaces should be designed to avoid standing water according to the chosen system |
| Edge Finish | Bullnose tile, mitered edges, or suitable tile profiles can create a clean finish |
Simple Steps for Planning a Tile Shower Niche
- Measure your shower products so tall shampoo and pump bottles will fit comfortably.
- Choose the niche location based on comfortable reach, shower controls, and spray direction.
- Check inside the wall for studs, plumbing, wiring, and other obstacles.
- Select the niche type—custom-built, prefabricated tile-ready, or a finished no-tile option.
- Plan the tile layout before installation to reduce awkward cuts and narrow tile pieces.
- Waterproof carefully and follow the instructions for the chosen shower system.
- Finish the edges neatly with suitable trim, bullnose tile, or another compatible method.
Tile Shower Niche Sizes, Depth, and Proportions
There is no single size that every tile shower niche must follow. The right dimensions depend on the shower wall, framing, products you need to store, and the overall design.
A compact niche may be enough for soap and a few bottles. A taller version can create separate upper and lower storage areas, while a wide horizontal niche can provide space for several people. The important measurement is the finished interior space, not simply the rough opening in the wall.
Depth is also controlled by the wall construction. A niche installed in a typical framed wall cannot simply be made deeper without considering what lies behind it. The backer, waterproofing, mortar, and tile can also reduce the usable finished space.
Prefabricated niches demonstrate how much sizing can vary. Tile Redi currently lists Redi Niche models in widths from 12 to 48 inches and heights from 6 to 42 inches, with several shelf configurations. Its current models are listed at 4 inches deep.
Before choosing dimensions, measure your tallest pump bottle and consider how many products normally remain in the shower. A beautiful niche that cannot hold everyday bottles is not practical.
Shower Niche Height and the Best Placement
The best shower niche height is the height that feels comfortable for the people using the shower. There is no universal placement that works equally well in every bathroom.
For most projects, the goal is to place frequently used bottles where they can be reached without bending too far or stretching upward. If children and adults share the shower, a taller niche with storage at different levels can be more useful than one small compartment.
Placement should also work with the shower controls, showerhead, bench, glass panel, and tile pattern. Moving a niche slightly higher or lower may produce cleaner tile cuts and a more balanced appearance.
Where practical, it can also help to avoid putting the niche directly in the strongest path of shower spray. This does not remove the need for waterproofing, but it may reduce the amount of water hitting bottles and collecting around them.
The wall itself ultimately decides what is possible. Stud locations and hidden pipes or wiring may require a change from the original position, which is why the cavity should be checked before the design is finalized.
Tile Shower Niche Shelf Options and Storage Layouts
A simple niche can have one open compartment, but adding a tile shower niche shelf often makes the same wall space more useful.
For example, the lower section may provide enough height for large shampoo bottles while a smaller upper section holds soap, razors, and shorter containers. This avoids wasting vertical space above small products.
Vertical niches work well when wall width is limited. Horizontal niches provide a longer storage surface and can create a strong visual line across a larger shower. Double and multi-compartment designs can help couples or families keep products organized.
Prefabricated systems also provide different shelf arrangements. Tile Redi currently offers single, double, triple, and quadruple configurations rather than limiting buyers to one format.
Before fixing the shelf height, place the products you actually use next to a tape measure. Remember to allow extra room above pumps so they can be pressed easily. Planning around real objects is usually more successful than selecting shelf spacing only because it looks balanced on a drawing.
Tile Shower Niche Ideas: Blended, Contrasting, and Statement Designs
Some of the most effective tile shower niche ideas are also the simplest. Continuing the same wall tile through the back and sides of the niche can make the storage area feel calm and integrated. This approach works especially well in bathrooms where a clean, minimal appearance is the goal.
A contrasting niche has the opposite effect. Mosaics, penny tile, herringbone patterns, glass tile, or a different color can turn a small storage area into a design feature. Because the niche covers a limited area, it offers a way to use a stronger pattern without applying it to the whole shower.
Other shower niche ideas include a long horizontal niche that follows the lines of large-format wall tile, a tall vertical niche with a shelf, or a small decorative niche placed where it naturally fits the tile layout.
Tile scale matters too. Small mosaics produce many grout lines and more visual detail. Large pieces can create a quieter appearance but may require careful cutting to fit neatly around a small niche. Planning the tile pattern before installation helps avoid thin strips and awkward cuts at the edges.
Choosing the Best Tile for a Shower Niche
Porcelain and ceramic tile are common choices because they are available in many sizes, finishes, and styles. Mosaics can fit small surfaces and add texture, while glass can create a brighter decorative feature. Natural stone offers a distinctive appearance but usually requires more attention to care and maintenance.
The best choice should work with both the niche dimensions and the main shower tile. If a niche is only slightly wider than a large tile, poor planning can leave narrow pieces around its edges. A tile layout that is considered early can produce cleaner proportions and fewer distracting cuts.
Maintenance should also influence the decision. A mosaic niche has more grout joints than one covered with larger pieces, so there are more lines to clean. Natural stone can also require sealing and suitable cleaning products. Daltile, for example, recommends sealing natural stone for stain protection and provides additional maintenance guidance for stone used in showers.
Matching the niche to the surrounding wall usually creates a quieter look. Contrasting tile works better when the goal is to make the niche a deliberate focal point.
Waterproofing and Drainage Details That Matter
Waterproofing is one of the most important parts of a tile shower niche. Tile and grout are the visible finish, but the system behind them must protect the wall from moisture.
A site-built niche needs to be constructed with materials suitable for the shower and connected correctly to the waterproofing used on the surrounding wall. Prefabricated waterproof niches simplify some of these details because the box and corners are already formed. Schluter, for example, produces prefabricated KERDI-BOARD niches designed to integrate with its shower waterproofing system.
For a tiled site-built niche, the bottom surface is commonly formed so water can move outward rather than being trapped against the back. However, the exact requirement depends on the niche system. Some manufactured products are designed differently. Schluter specifically states that its tile-free DESIGN-NICHE is not sloped and that the shower-floor slope requirement does not apply to that product.
That is why generic rules should never replace the instructions supplied with a specific waterproofing system. Corners, seams, fasteners, and transitions must all be treated according to the manufacturer’s directions.
Framing, Studs, Plumbing, and Wall Conditions
A tile niche occupies space inside a wall, so the condition of that wall should be checked before installation begins.
Studs determine where many prefabricated niches can be supported. Schluter’s KERDI-BOARD-SN instructions, for example, call for the niche to be supported at its sides by studs or other suitable wall framing.
The wall may also contain water lines, a shower valve, electrical wiring, ducts, or other services. Exterior walls require additional thought because insulation and moisture-control details may occupy the same space intended for the niche.
A wide horizontal niche can be more complicated because it may cross one or more studs. Framing should not simply be cut away to make the opening fit. Whether a framing member can be modified depends on the wall and building construction, so structural changes may require professional evaluation.
This is another reason to plan the niche before finalizing the tile pattern. First determine what the wall can safely accommodate; then adjust the dimensions and tile layout around that reality.
Tile Edges, Corners, and a Clean Finished Look
The outer edge of a tile niche deserves as much attention as the tile inside it. Many tiles do not have a finished decorative edge, which can leave an unattractive exposed side if the detail is not planned in advance.
One solution is bullnose tile with a finished edge. Another is mitering suitable tile pieces so two finished faces meet at the corner. Metal or other purpose-made tile profiles can also cover and protect exposed edges. Schluter’s JOLLY, for example, is designed as an edge-protection and finishing profile for outside corners and wall-tile edges.
Profiles can either blend with the tile or coordinate with shower fixtures such as brushed metal, black, brass-toned, or other finishes. The right choice depends on the overall bathroom design.
Edge details should be selected before tiling starts. Tile thickness affects which profile fits correctly, and mitered or bullnose layouts can change the dimensions of surrounding cuts. Planning early prevents the niche border from looking like an afterthought.
Prefabricated vs. Custom-Built Tile Shower Niches
A prefabricated niche arrives as a formed unit, while a custom-built niche is created on site within the wall.
Prefabricated models can simplify planning because their dimensions are already known and many are designed as part of a waterproof shower system. This can reduce the number of complicated corners that must be formed manually. They are especially useful when an available size works well with the studs and tile layout.
A custom niche offers more freedom. Its height, width, shelf position, and proportions can be adjusted to work with large-format tiles, unusual walls, or a specific design. That flexibility can also mean more framing, cutting, waterproofing, and labor.
Neither method is automatically better. A prefabricated box may be the simpler choice for a straightforward shower, while a carefully built custom niche may suit a design where exact alignment is important.
The best choice is the one that works with the wall construction, storage needs, waterproofing system, and finished tile—not simply the option that looks easiest before the wall is opened.
Tile Redi Shower Niche and Other Ready-to-Tile Options
A Tile Redi shower niche is one example of a prefabricated niche intended to be installed in the wall and then covered with tile.
Tile Redi currently describes its Redi Niche range as one-piece waterproof recessed shelving made from HIPS material. Current products are offered in single, double, triple, and quadruple arrangements and in several vertical and horizontal sizes. The company lists widths from 12 to 48 inches, heights from 6 to 42 inches, and a 4-inch depth across the current range.
For example, one current double model measures 17 inches wide by 25 inches high by 4 inches deep.
Other manufacturers offer their own tile-ready waterproof niches, so homeowners are not limited to one brand. What matters is treating each product as its own system. Fastening, sealing seams, mortar selection, and waterproof connections can differ between manufacturers.
Always use the installation instructions supplied with the exact model instead of assuming that instructions from another prefabricated niche will also apply.
Tile Shower Niche DIY: What the Project Really Involves
A tile shower niche DIY project may look simple, but it combines several jobs that need to work together.
The process begins with deciding the niche size and position, locating studs and hidden services, and planning the tile pattern. The wall opening is then created and the prefabricated niche or custom framing is installed. Waterproofing must connect correctly with the surrounding shower system before the tile is set and the edges are finished.
For prefabricated products, installation steps can be very specific. Schluter’s KERDI-BOARD-SN instructions address wall preparation, framing support, fastening, and waterproofing connections, while Tile Redi provides its own installation requirements.
A DIY installer should avoid mixing unrelated products or improvising around waterproofing details unless the manufacturers confirm compatibility.
Professional help is sensible when the desired niche conflicts with plumbing, electrical work, or important framing, or when the installer is not confident about waterproofing. A small error hidden behind finished tile can be much harder to correct later than a visible cosmetic mistake.
No-Tile Shower Niche Alternatives and Mistakes to Avoid
A no tile shower niche provides recessed storage without requiring tile on the inside surfaces. One current example is Schluter’s DESIGN-NICHE, a prefabricated powder-coated aluminum unit designed for showers and other wet areas. Schluter describes it as fully waterproof and specifically designed to be installed without tile inside the niche.
This type can create a clean, modern appearance and reduce the number of small tile pieces and grout joints inside the storage area. It still must be correctly connected to the surrounding wall system according to its installation instructions.
Whether choosing tiled or tile-free storage, several mistakes are worth avoiding. Poor waterproofing is the most serious. Other problems include choosing a compartment that is too short for bottles, placing the niche where it is uncomfortable to reach, ignoring the wall framing, failing to plan exposed tile edges, or allowing the niche to disrupt the surrounding tile pattern.
Drainage should also follow the specific niche design rather than a one-rule-fits-all approach. Industry guidance has long emphasized reading the complete instructions because some prefabricated niches include a predetermined bottom slope, while other products are intentionally designed differently.
Conclusion
A successful tile shower niche combines storage, design, and careful construction. Size should reflect the products that will actually be stored. Height should suit the people using the shower. The location must work with studs, plumbing, controls, and the surrounding tile pattern.
Tile choice matters, but waterproofing and installation details matter even more. Whether you select a custom niche, a ready-to-tile prefabricated model, a tile shower niche shelf, or a modern tile-free option, the product should be installed as part of a complete wet-area system rather than treated as a decorative hole in the wall.
Planning before framing and tiling also makes it easier to create balanced grout lines, clean edges, useful shelf heights, and comfortable access.
The best shower niche does not need to be unusually large or visually dramatic. It simply needs to fit the shower and its users well, provide enough everyday storage, be easy to maintain, and remain properly integrated with the shower’s waterproofing system for the long term.
FAQs
What is the best size for a tile shower niche?
There is no single best size. The niche should be large enough for your everyday shower products while fitting safely within the available wall framing and working with the tile layout.
What is a good shower niche height?
A good shower niche height allows users to reach bottles comfortably without excessive bending or stretching. The ideal position depends on user height, shower layout, controls, and whether children also use the shower.
Should a tile shower niche match the shower tile?
It can. Matching tile creates a subtle, seamless appearance, while mosaics, contrasting colors, or patterned tiles can turn the niche into a decorative focal point.
Does a shower niche need waterproofing?
Yes. A shower niche sits inside a wet area, so it must be properly integrated with the shower’s waterproofing system before tile is installed to help protect the wall behind it.
Can I install a tile shower niche myself?
DIY installation is possible for experienced homeowners, especially with prefabricated systems. However, framing changes, plumbing conflicts, and waterproofing mistakes can cause serious problems, so professional installation may be safer in complicated projects.
Disclaimer: This article provides general information about tile shower niche planning, design, sizing, and installation. Building methods, waterproofing requirements, and local codes can vary. Always follow the niche and waterproofing manufacturers’ instructions and consult a qualified professional when structural, plumbing, electrical, or moisture-control issues are involved.
Enjoyed this article? Discover more helpful ideas and fresh inspiration on Vogue Cultures.