A fan can look clean from across the room while hiding a thick layer of dust behind its grille. Every time it runs, air passes over the blades and through the openings. Dust, lint, pet hair, and sometimes kitchen grease gradually settle on these surfaces. Buildup may restrict airflow.
Learning how to clean a fan does not mean you have to take the whole appliance apart. A soft brush and vacuum may be enough for light dust, while a fan with removable covers might benefit from a more thorough cleaning. The right approach depends on whether you own a standing, table, box, tower, ceiling, or bladeless fan.
The most important rule comes first: switch the fan off and disconnect it from power before cleaning, and never let water enter its electrical parts.
Snippet-Ready:
At voguecultures.co.uk, this informational guide explains how to clean a fan safely using simple tools. It covers standing, tower, box, and ceiling fans, helping readers remove dust without damaging their appliances.
Quick Guide: Fan Cleaning Methods
| Fan Type | Recommended Cleaning Method | Main Precaution |
| Standing Fan | Soft brush, vacuum, damp cloth | Keep motor dry |
| Table Fan | Clean grille and accessible blades | Unplug before cleaning |
| Tower Fan | Vacuum vents and use a soft brush | Avoid inserting tools inside |
| Ceiling Fan | Pillowcase and microfiber cloth | Ensure blades are stationary |
| Box Fan | Vacuum grille and wipe approved parts | Avoid bending blades |
| Bladeless Fan | Wipe exterior and clean accessible vents | Follow manufacturer’s instructions |
Quick Steps to Clean a Fan Safely
- Unplug the fan: Disconnect it from electricity before cleaning.
- Remove loose dust: Use a soft brush or vacuum attachment on the grilles.
- Clean the blades: Wipe accessible blades gently, or wash removable parts only if permitted.
- Dry everything: Ensure cleaned components are completely dry before reassembly.
- Reassemble and check: Secure all covers and check that the fan operates normally.
What You Need Before Cleaning a Fan
Most jobs require only a few things you may already have at home: a microfiber cloth, a soft paintbrush or cleaning brush, and a vacuum with a brush or narrow nozzle attachment. For washable parts, keep some lukewarm water, mild dish soap, a soft sponge, and a dry towel nearby. An old toothbrush can reach corners.
Before touching the grille, unplug a portable fan. For a ceiling fan, turn it off at the wall switch; isolate power at the breaker if you will be working near wiring or removing fixtures. Check the owner’s manual, especially if the product has special coatings, built-in filters, or covers that appear difficult to remove.
Start with dry dust removal whenever possible. Never immerse the assembled fan, wash its motor housing, or allow liquid into switches, vents leading to electronics, plugs, or the power cord connection.
How to Clean a Fan Without Disassembling It
You can remove a surprising amount of dust without opening the fan. First, unplug the appliance and move it somewhere easy to clean, ideally over a sheet or newspaper that will catch loose debris.
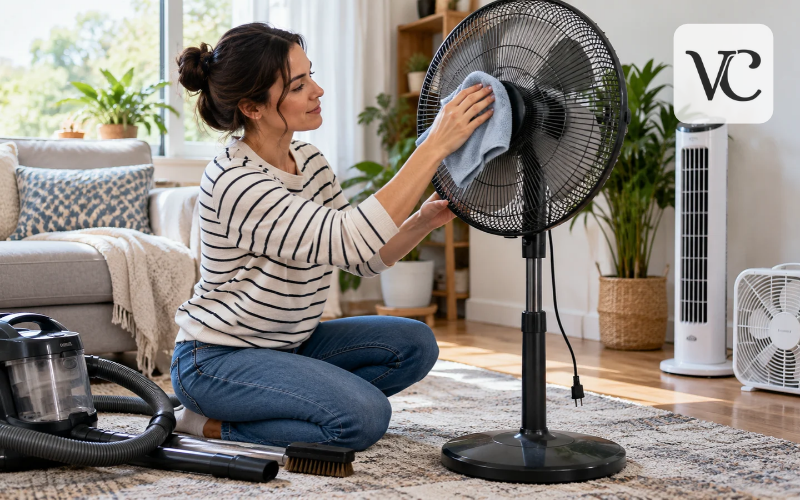
Use a vacuum’s soft brush attachment along the outside of the front and rear grilles. Work from the top downward so you do not push dust into already cleaned areas. For dust caught between narrow bars, loosen it carefully with a soft brush while holding the vacuum nearby. Do not force anything through the grille toward the blades.
If you are wondering how to clean a standing fan without opening it, follow the same approach on both sides of the head, then wipe the stand and base with a slightly damp cloth. This method will not remove every hidden deposit, but it offers a safe alternative to spraying liquid into a closed fan.
Deep Cleaning a Standing or Table Fan Step by Step
Check the manual before starting because clips, screws, blade caps, and the direction used to loosen a retaining nut vary between models. Never assume that a cover or blade is designed to come off just because you can see a screw.
Once the fan is unplugged, place it on a stable surface. Release the grille clips or remove the specified screws and keep small parts in a container. Lift away the front cover without bending it. If blade removal is allowed, follow the manufacturer’s instructions for the cap or fastening system. Avoid pulling hard on the motor shaft or twisting the blades out of shape.
Vacuum loose dust from the removed grille and the accessible blade surfaces before using moisture. A soft brush or toothbrush can dislodge dirt in the grille corners. Wash only approved detached parts; otherwise, use a dry or lightly damp cloth. Use mild soapy water on suitable plastic parts, then remove any soap residue.
Wipe the motor housing, neck, pole, and base with a cloth that is barely damp, keeping moisture away from openings and controls. Let every cleaned piece dry completely. Refit the blades and grille exactly as directed, and check that each fastener is secure before using the fan again.
How to Clean Fan Blades With Water Without Causing Damage
Some manufacturers permit detached plastic blades to be washed in warm, soapy water. Others recommend wiping the blades without removing them. Follow the care instructions for your model.
For an approved washable blade, start by brushing away loose dirt. Wash gently with lukewarm water and a small amount of mild dish soap, using a soft cloth rather than an abrasive pad. Rinse if permitted and dry with a towel before leaving it to air-dry completely. Do not put fan blades in a dishwasher unless the manual explicitly allows it; heat can distort certain plastics.
If the blades must stay attached, use a cloth that is only lightly dampened, and do not let water run toward the central shaft. Avoid spraying cleaning solution onto the fan. The motor, bearings, wiring, and switches should remain dry throughout the process.
Cleaning Box Fans and Window Fans the Right Way
Box fans have broad grilles that can collect dust on both sides. Begin by unplugging the fan and vacuuming the front and rear guards. Use a soft brush to free lint caught in the corners. If the manual allows the grille to be removed, take it off carefully and clean the accessible blades without bending them. Even a slight change in blade shape can cause unwanted noise or vibration.
With window fans, first switch off and unplug the unit. If it is securely mounted or difficult to lift, do not strain to remove it on your own. Follow the instructions for taking it out of the window, and support the fan properly so it cannot fall. Check for any dust or debris around the frame and openings.
Wash detachable covers only when approved, and keep the motor and control panel dry. Once the parts are completely dry and reinstalled, make sure the fan is stable and securely positioned before running it.
How to Clean a Tower Fan Without Disassembling It
Most routine cleaning can be done from the outside. Turn off and unplug the fan, then wipe its casing with a dry microfiber cloth. Run a vacuum’s crevice or soft brush attachment gently across the intake and outlet openings, taking care not to press against delicate grille pieces.
A small soft brush can help loosen dirt between the vertical slats. If your model’s manual recommends a flexible cleaning wand or an air duster, use it as directed and avoid driving dust farther into the appliance. Never insert a metal tool or reach through the grille toward the internal rotating parts.
For anyone searching how to clean a tower fan without disassembling it, this dry method is the best starting point. Some tower fans have a removable rear panel for a deeper clean, while others are designed to remain closed. If the air passages are heavily blocked and the manual provides no safe access method, contact the manufacturer rather than prying open the casing.
Cleaning Ceiling Fans Without Spreading Dust
Ceiling fan blades often collect thick dust along their upper edges, where it is easy to overlook. The pillowcase method helps capture that dust instead of dropping it onto a bed, sofa, or floor. Turn the fan off and wait until it stops completely. Make sure any attached light has cooled down before reaching near it.
Slide an old pillowcase gently over one blade. Hold the fabric lightly against the top and bottom, then pull it toward the outer tip. The dust falls inside the case. Repeat with each blade, taking care not to bend or push the blades upward. Empty the pillowcase outdoors and wash it afterward.
For sticky marks, use a microfiber cloth lightly dampened with a cleaner suitable for the blade’s finish, then dry the surface. Choose a stable step stool or suitable ladder on a level floor; do not stretch beyond comfortable reach. Avoid touching wires or opening the motor housing as part of ordinary dusting.
How to Clean Bladeless Fans and Fans With Air Filters
Switch off and unplug the unit, then use a soft cloth to clean the visible loop, body, and base. Where the manual permits, a slightly damp lint-free cloth can remove marks; avoid dripping water into any openings.
Use a soft brush to lift dust from the air inlet holes and narrow outlets. Do not force brushes deep into the machine or attempt to open sealed sections. Some manufacturers advise against detergents or polish, so check the care instructions before using anything stronger than water.
A fan with an air-purifying filter also needs filter maintenance. A dirty filter is not the same as a dusty grille: some filters can be cleaned in a particular way, while many HEPA and carbon filters are not washable and must be replaced. Check the filter indicator and the model’s instructions rather than rinsing an unfamiliar filter under the tap.
Removing Stubborn Dust, Grease, and Sticky Buildup
Start with a vacuum or soft brush, then treat the remaining marks on surfaces the manufacturer allows you to wipe. A microfiber cloth with a little mild soapy water is often enough to lift sticky buildup. Use a second lightly damp cloth to remove soap, and dry the area immediately.
People sometimes ask how to clean a fan with baking soda. Although baking soda can help with some household stains, its grains may scratch certain finishes, leave white residue in tight spaces, or enter areas that cannot be rinsed. It is not a good default cleaner for fan grilles or assembled electrical appliances. Use it on a detached, manufacturer-approved washable part only if the surface and care guidance allow it.
Avoid bleach, harsh solvents, scouring pads, and strong sprays. If a stain will not shift safely, leaving a minor cosmetic mark is better than damaging the fan.
Fan Cleaning Hacks and Common Mistakes to Avoid
Short videos sometimes show a fan being sprayed with cleaning liquid, covered by a plastic bag, and switched on to blow dirty water into the bag. The plastic bag TikTok trick might look quick, but it is not a safe cleaning recommendation. Moisture can reach electrical parts, and the bag may block airflow or be drawn toward moving blades. Never run a fan while it is covered for cleaning.
Another popular search is how to clean a standing fan with WD-40. Ordinary WD-40 multi-use spray is not a substitute for washing or dusting, and spraying it into the grille or motor can leave residue in places you cannot reach. Some fans have sealed, permanently lubricated motors that should not be oiled at all. If a fan squeaks, follow the manual or seek servicing rather than guessing which lubricant to apply.
Avoid excessive water, forced disassembly, and objects pushed through the guard. Do not operate a fan with a missing grille, loose blades, or a damaged cord. A gentle cleaning method is almost always better than a dramatic internet shortcut.
Drying, Reassembling, and Checking Your Fan After Cleaning
After cleaning, let washable parts dry fully before putting them back. Drying time depends on the shape of the components and the surrounding air, so do not rely on a fixed number of minutes. Look closely at screw holes, blade hubs, seams, and grooves where water may linger. Nothing damp should be reattached near electrical parts.
Follow the manual in reverse order to replace the blades, caps, and grilles. Check that clips are engaged and screws are secure, but do not overtighten plastic fittings. Make sure the guard is properly fitted and the blades can turn freely without rubbing when checked according to the manufacturer’s instructions.
Once the complete fan is dry and assembled, place it in a stable position and test it briefly from a safe distance. If it makes a new rattling sound, shakes strongly, smells hot, or has weaker airflow than expected, turn it off and unplug it. Recheck permitted assembly steps or ask a qualified technician for help. Do not use a damaged fan.
How Often Should You Clean a Fan to Prevent Dust Buildup?
A fan used daily in a dusty room will need attention sooner than one stored for most of the year. Pets, open windows, nearby cooking, and the amount of dust in your home can all affect how quickly the grille and blades collect buildup.
As a practical starting point, inspect a frequently used fan every week or two and dust the exterior whenever dirt becomes visible. Check the blades and vents more closely every month or so during heavy use. A deeper cleaning may be useful every few months, or sooner if airflow is clearly obstructed. These are flexible habits, not rules that replace the manufacturer’s maintenance schedule.
Dust nearby surfaces, keep the floor around the fan clean, and store an unused fan in a dry place once it has been cleaned and dried. If you use a protective cover for storage, remove it completely before the fan is switched on.
Conclusion
Knowing how to clean a fan starts with choosing a method that suits its design. Light dust on a fixed grille often needs only a brush and vacuum. A standing fan with removable parts may allow a more thorough clean, while tower, ceiling, box, and bladeless fans each need slightly different care.
Whatever the model, disconnect the power, keep liquid away from the motor and controls, and follow the manufacturer’s instructions. Skip risky cleaning hacks and give every washed part time to dry fully. A little routine attention can keep the fan looking cleaner and help air move freely without turning a simple home task into a messy repair job.
Frequently Asked Questions
Can I clean a fan without taking it apart?
Yes. Unplug the fan, loosen dust with a soft brush, and remove it using a vacuum attachment. Avoid pushing tools through the grille or spraying cleaning liquid into the appliance.
Can I wash fan blades with water?
Yes, but only when the manufacturer permits it. Clean approved removable blades with mild soapy water and dry them completely. Never allow water to enter the motor or electrical components.
How do I clean a tower fan without opening it?
Unplug the tower fan and gently vacuum its intake and outlet vents. Use a soft brush to remove stubborn dust, and follow the manufacturer’s instructions for any deeper cleaning.
Is the plastic bag fan-cleaning hack safe?
The plastic bag method is not recommended. Covering a running fan can obstruct airflow or interfere with moving parts. Sprayed liquid may also reach electrical components, creating unnecessary safety risks.
How often should I clean my fan?
Inspect frequently used fans every week or two and remove visible dust. Deeper cleaning depends on usage, dust buildup, pets, and the manufacturer’s maintenance recommendations.
Disclaimer: This article on voguecultures.co.uk is provided strictly for general informational and educational purposes. It is not a guest post, paid promotion, advertisement, or product endorsement. Cleaning methods vary by fan model, so always follow the manufacturer’s instructions and electrical safety precautions. We do not provide professional appliance cleaning or repair services.
Enjoyed this article? Discover more helpful ideas and fresh inspiration on Vogue Cultures.