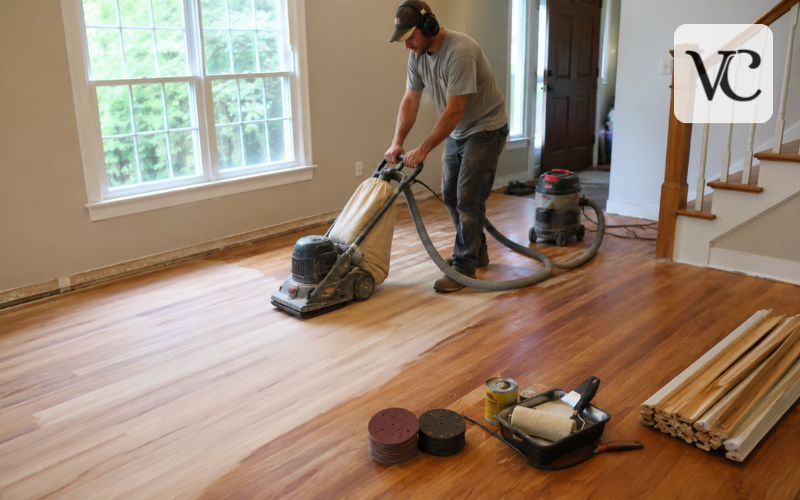
Learning how to refinish hardwood floors means understanding more than how to operate a sanding machine. A complete refinishing job removes the old coating, levels light surface damage, repairs small defects, and adds a fresh protective finish. Stain is optional. It changes the color, while the clear topcoat protects the wood from everyday wear.
Refinishing can improve floors that look dull, scratched, uneven in color, or worn down to bare wood. It will not solve every problem. Deep pet stains may remain visible, loose or badly cupped boards may need repair, and wood that is too thin should not be sanded. Bona recommends full sanding and refinishing when a floor has moderate or severe scratches, worn-through finish, or when the owner wants a different stain color or sheen.
This is a demanding DIY project. The machines are heavy, sanding mistakes are difficult to hide, and the room may remain out of service for several days while stain and finish dry and cure. The safest approach is to inspect the flooring first, choose a sanding plan based on its condition, and follow the exact instructions for the stain and finish you buy..
Quick Guide to Refinishing Hardwood Floors
| Stage | Main Task | Key Point |
| Floor inspection | Check the wood type and condition | Confirm the floor is thick enough to sand |
| Room preparation | Remove furniture and seal openings | Keep dust from spreading throughout the home |
| Initial sanding | Remove old finish and surface damage | Start with a grit suited to the floor’s condition |
| Fine sanding | Smooth scratches from earlier passes | Move gradually through finer grits |
| Edge sanding | Sand borders, corners, and closets | Match the grit sequence used in the main area |
| Repairs | Fill small holes and stable cracks | Replace badly damaged boards where necessary |
| Staining | Change the wood color if desired | Test the stain before covering the whole floor |
| Finishing | Apply protective floor-rated coatings | Follow drying, recoating, and curing instructions |
Step-by-Step Guide
- Inspect the flooring: Identify whether it is solid or engineered hardwood and confirm that enough wood remains for safe sanding.
- Clear and seal the room: Remove furniture, curtains, vents, doors, and shoe molding. Cover doorways and HVAC openings with plastic.
- Clean and repair the floor: Vacuum thoroughly, remove staples, set raised nails, secure loose boards, and replace severely damaged sections.
- Sand the main area: Use a drum, belt, or orbital floor sander. Begin with the least aggressive grit capable of removing the old finish.
- Sand edges and corners: Use an edge sander near walls and detail tools in corners. Blend these areas carefully with the main floor.
- Complete final sanding: Move gradually through medium and fine grits. Vacuum between each pass and remove visible scratches or swirl marks.
- Apply stain if required: Test the color in a hidden area, apply it evenly with the grain, and allow it to dry fully.
- Protect the floor: Apply thin coats of a compatible floor finish. Follow the manufacturer’s directions for sanding between coats, ventilation, drying, and curing.
Determine Whether Your Hardwood Floors Can Be Refinished
Start by confirming that the surface is real wood. Solid hardwood is wood through its full thickness and can often be refinished more than once, provided enough material remains above the tongue-and-groove joint. Engineered hardwood has a real-wood top layer bonded to a layered core. Some engineered products can be refinished, but thin-veneer products may not tolerate full sanding.
Do not judge an engineered floor by appearance alone. Check leftover product records, remove a floor vent if possible, or ask a flooring professional to measure the wear layer. The National Wood Flooring Association says that, in general, a previously finished floor should not be sanded when the remaining wear thickness is below 3/32 inch, or about 2.5 mm. Its refinishable program uses minimum wear-layer benchmarks to help identify suitable engineered products.
Also inspect the floor for exposed fasteners, deep dents, loose boards, dark water or urine stains, large gaps, severe cupping, and signs of repeated past sanding. When nail heads are already close to the surface, another aggressive sanding may expose the tongue or weaken the boards. A professional inspection is a sensible choice for thin engineered flooring, historic floors, widespread moisture damage, structural movement, or boards that need replacement.
Hardwood Floor Resurfacing vs. Refinishing
The terms resurfacing, recoating, and refinishing are often used as though they mean the same thing, but the work can be very different. A screen-and-recoat lightly abrades an existing sound finish so a new coat can bond to it. It does not sand the floor back to bare wood, remove deep scratches, or change the stain color.
“Resurfacing” has no single meaning in everyday advertising. Some companies use it for a light recoat, while others use it for sanding and minor repairs. Ask exactly what will be removed and which new coatings will be applied before comparing prices.
For homeowners researching how to restore hardwood floors without sanding, a professional recoat may be enough when the finish is dull or lightly scratched but still covers the wood. The floor must also be free of wax, silicone polish, oil, and other contaminants that can prevent adhesion. Bona’s professional recoat process includes careful cleaning, fine abrasion, rinsing, and a compatible finish rather than simply spreading a new coating over an unprepared floor.
Full refinishing is the better choice when scratches cut through the finish, large areas are bare, the color is blotchy, or the owner wants a new stain. A recoat cannot hide damage that is already in the wood.
Tools, Materials, and Safety Equipment
A typical full-refinishing setup includes a drum or belt floor sander for open areas, an edge sander for the perimeter, a floor buffer or square-buffer machine for final blending, a scraper for corners, and a strong vacuum with effective fine-dust filtration. You will also need the correct abrasives for every machine, a nail set, hammer, small pry bar, wood filler suited to flooring, applicator pads or brushes, optional stain, and a floor-rated protective finish.
Protect yourself with eye protection, hearing protection, knee pads, work clothing, and a properly fitted particulate respirator suitable for wood dust. Sanding produces fine dust that can irritate the eyes, skin, and respiratory system, so dust collection and respiratory protection should not be treated as optional.
Before renting, compare the machine type, weight, voltage, dust-control system, abrasive availability, transport requirements, rental period, and damage policy. Lowe’s offers rental periods ranging from four hours to several weeks at participating locations, but stock and prices vary by store. Ask for an operating demonstration and confirm whether the machine will fit in your vehicle.
Cost to Refinish Hardwood Floors
The cost to refinish hardwood floors depends on square footage, local labor rates, floor condition, repairs, room shape, stairs, stain choice, and the finish system. As a current U.S. reference point, Homewyse estimated basic professional hardwood refinishing at about $6.49 to $7.92 per square foot in May 2026. That range is only a starting point; damaged floors, difficult layouts, premium coatings, furniture moving, and hazardous-material testing can raise the final quote.
DIY work replaces much of the labor charge with equipment rental and personal time. Your budget should include the main sander, edger, buffer, several grades of abrasive, vacuum supplies, plastic sheeting, tape, filler, stain if used, finish, applicators, respirator filters, and waste-disposal materials.
The safest way to learn how to refinish hardwood floors cheap is to reduce avoidable costs, not skip essential steps. Clear the room yourself, remove and label shoe molding carefully, compare local rental packages, practice using the machine on a less visible area, and keep the natural wood color if staining is unnecessary. Do not save money by skipping protective equipment, dust control, intermediate grits, or compatible floor finish.
Prepare the Room and Contain the Dust
Remove all furniture, rugs, curtains, wall art, floor registers, and doors that interfere with the work. Remove shoe molding with a thin pry bar, working slowly to avoid splitting it, and mark each piece so it returns to the correct wall.
Seal the work zone with sturdy plastic sheeting. Cover doorways, cabinets, return-air openings, and supply vents so the HVAC system does not spread sanding dust through the home. Turn the system off while sanding when practical, but do not block combustion-air openings or create unsafe conditions around fuel-burning equipment.
Plan ventilation separately for sanding and finishing. During sanding, focus on containment and machine dust collection. During coating, follow the finish label for fresh air and temperature requirements, but avoid strong airflow that carries dust, hair, or insects onto the wet surface. Confirm that the electrical circuit can safely run the rented equipment and keep extension cords out of the sanding path.
Inspect, Clean, and Repair the Floor
Sweep and vacuum before the first sanding pass. Small screws, staples, grit, and carpet tacks can tear abrasive paper or damage a machine. Drive raised nail heads slightly below the surface with a nail set, but do not drive them so deeply that they create large repair holes.
Secure loose boards using a repair method appropriate to the subfloor and installation. Investigate squeaks before sanding because some come from movement below the finished surface. Replace boards that are split, rotten, severely stained, or too damaged to sand level.
Ordinary filler works best for small nail holes, narrow stable cracks, and minor surface defects. It is not a reliable fix for wide gaps that open and close with seasonal humidity. Rigid filler placed in a moving gap can crack or break free. Dark pet stains and deep water damage may also run too far into the wood to disappear during normal sanding, so board replacement or a darker stain may be more realistic than aggressive material removal.
Choose the Right Sander and Grit Sequence
A drum or belt sander removes old finish quickly and levels uneven boards, but it can cut deep grooves when stopped in place. A multi-disc or orbital floor sander is generally easier for a beginner to control and may combine sanding, edging, and buffing functions, though it usually works more slowly on thick finish or badly uneven floors. Lowe’s describes one random-orbit rental model as an all-in-one sander, edger, and buffer, but the correct machine still depends on the floor and coating.
There is no universal grit sequence for every floor. A badly worn or heavily coated surface may begin around 36 or 40 grit, while a flatter floor with a thinner finish may start at 50 or 60. The next passes often move through 60, then 80, and sometimes 100 grit. The key rule is gradual scratch removal: Bona notes the NWFA guidance not to skip more than one grit between sanding cuts.
For anyone learning how to refinish hardwood floors for beginners, the easiest method is not necessarily the fastest one. Choose the least aggressive starting grit that will remove the coating efficiently, use the same general grit stage on the main field and edges, vacuum between stages, and do not move to a finer abrasive until the previous scratch pattern is gone.
Sand the Main Floor Correctly
Read the rental manual and practice raising and lowering the sanding drum before entering the main room. Begin moving before the abrasive contacts the floor, then lower it gently. At the end of each pass, lift the drum while the machine is still moving. Starting or stopping with the drum down can create a hollow that remains visible after finishing.
Work in straight, controlled passes with modest overlap. On a flat strip floor, the finishing passes normally follow the board direction. Floors that are uneven or laid in special patterns may require a professional sanding plan.
Follow the machine’s dust-bag and fire-safety instructions. Vacuum after each grit and inspect the floor under low side lighting. Pencil marks placed lightly across the surface can help show where sanding is incomplete. Do not keep cutting one isolated spot with a large machine; feather the surrounding area or repair the board instead.
Sand Edges, Corners, and Difficult Areas
Use the edge sander around walls, door jambs, closets, radiators, and other places the main machine cannot reach. Match its grit stages closely to the field sanding so the perimeter does not remain rougher or darker. Keep the edger moving in controlled arcs and avoid leaning heavily on it, which can leave circular depressions.
The edge and center must be blended. A visible band around the room, sometimes called a picture-frame effect, often appears when the perimeter has a different scratch pattern or stain absorption. A final buffer or multi-disc pass can help blend the two zones, but it will not remove deep edger marks.
Scrape corners with a sharp floor scraper, working with the grain, and then hand-sand them through suitable finer grits. Detail-sand beneath cabinet overhangs and around pipes. Use side lighting again before leaving this stage because swirl marks that seem minor on bare wood can become much darker after stain.
Fill Imperfections and Complete the Final Screening
The timing of filler depends on the product and repair. Flooring professionals often apply trowel filler after an early sanding pass, then remove the excess during later passes. Small isolated nail holes can be filled before final sanding. Read the filler instructions and confirm that it accepts the planned stain and finish.
Do not spread ordinary filler over flexible seasonal gaps or use it to disguise loose boards. Match repairs by testing the filler on sanding dust or scrap from the same species, yet expect some color difference because filler does not absorb stain exactly like wood.
Complete the final abrasion with the grit recommended for the wood species, stain, and finish system. A 100- or 120-grit screen may be appropriate in some systems, but making the surface too polished can reduce or change stain absorption. The goal is an even scratch pattern with no coarse lines, edge swirls, chatter, or shiny patches—not simply using the highest grit available.
Remove Every Trace of Sanding Dust
Dust left on the floor can create rough finish, visible bumps, and weak spots between coats. Vacuum the floor slowly in more than one direction, then clean baseboards, windowsills, walls, door trim, and ledges above the work area.
Use a clean microfiber pad or the dust-removal method specified by the finish manufacturer. Avoid introducing household polish, oily tack-cloth residue, or an unapproved cleaner that may affect adhesion. Check corners, gaps, radiator covers, and the tops of doors for hidden dust.
After the final cleanup, restrict the room. Keep pets, children, shoes, fans, and unnecessary traffic out. Prepare an exit route before opening the stain or finish.
Apply Stain and Protective Finish
Stain is optional. Leave the floor natural when you like the bare wood color or want to avoid the extra drying step. When changing the color, test the full stain-and-finish system in a closet or on matching scrap. Species, sanding grit, filler, and previous stains can all affect the final shade.
Apply stain evenly with the grain, keep a wet edge, and remove excess within the manufacturer’s stated time. Let it dry fully before topcoating. Do not assume products are compatible because both are labeled for wood; use a floor finish approved over the chosen stain and follow its application window.
Water-based floor finishes generally dry faster, have less odor, and keep light woods clearer. Oil-based polyurethane usually adds a warmer amber tone and often requires longer intervals between coats. Durability depends on the specific product and complete coating system. Current floor products show why label instructions matter: some water-based finishes allow recoating in about two hours, while an oil-based floor product may permit light traffic after 24 hours, yet full cure takes longer.
Apply thin, even coats with the applicator named on the label, working toward the exit and maintaining a wet edge. Some systems require abrasion between every coat; others allow recoating within a set window without sanding. When abrasion is required, 220-grit paper or an equivalent pad is common, followed by complete dust removal. Never guess the number of coats or cure time.
Keep flames, sparks, smoking materials, and pilot-light risks away from solvent products. Rags or waste wet with oil-based stain or finish can heat and ignite if piled together. Store and discard them exactly as the label and local rules require; the U.S. Fire Administration advises keeping oily or solvent-wet rags in a tightly sealed metal container.
Conclusion
The difference between poor and impressive refinishing hardwood floors before and after results usually comes down to preparation. A careful inspection prevents sanding a floor that is too thin. A gradual grit sequence removes scratches evenly. Clean edges, sensible repairs, complete dust removal, and thin finish coats create a smoother and more dependable surface.
A beginner can handle a small, open room when the boards are flat, thick enough to sand, and free from major damage. Professional help is safer for thin engineered flooring, historic wood, stairs, severe cupping, deep stains, complex patterns, or large connected spaces where sanding marks must remain consistent.
Once the final coat is dry, resist the urge to move everything back immediately. Follow the product’s separate instructions for socks, normal foot traffic, furniture, rugs, and full cure. Lift furniture rather than sliding it, add clean felt pads, and wait the full stated period before covering the floor. That patience protects the finish at the stage when it is most vulnerable and completes the process of how to refinish hardwood floors successfully.
Frequently Asked Questions
Can I refinish hardwood floors myself?
Yes, a careful beginner may refinish a small, flat room. However, sanding machines can quickly create deep marks, so damaged, thin, historic, or engineered floors are often safer with professional help.
How long does it take to refinish hardwood floors?
The physical work may take several days, depending on room size and repairs. Drying and full curing take longer and vary according to the stain, finish type, temperature, and humidity.
Can hardwood floors be restored without sanding?
Floors with light scratches and an intact finish may only need cleaning, light abrasion, and recoating. Deep scratches, bare wood, heavy discoloration, or widespread wear normally require full sanding and refinishing.
How many times can hardwood floors be refinished?
Solid hardwood can often be refinished several times, depending on its thickness and previous sanding. Engineered flooring may allow limited refinishing or none at all if its real-wood wear layer is thin.
Should I use water-based or oil-based polyurethane?
Water-based finishes usually dry faster, produce less odor, and remain clearer. Oil-based polyurethane generally creates a warmer tone and dries more slowly. Choose a floor-rated product compatible with your stain.
Disclaimer: This article provides general educational guidance about how to refinish hardwood floors. Floor construction, coatings, damage, equipment, and local safety requirements can vary. Always follow the instructions supplied with rental machines, stains, fillers, and finishes. Before sanding engineered, historic, thin, moisture-damaged, or heavily refinished flooring, consult a qualified flooring professional. Use suitable eye, hearing, respiratory, and skin protection, maintain safe ventilation, and keep sanding dust, solvent vapors, oily rags, flames, sparks, and ignition sources properly controlled.
Enjoyed this article? Discover more helpful ideas and fresh inspiration on Vogue Cultures.