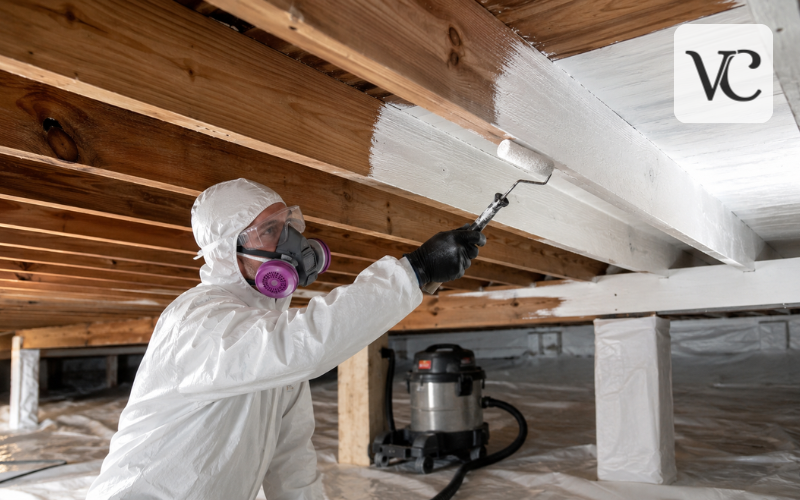
Mold encapsulation is the use of a specially made coating on a building surface after mold has been removed and the material has been cleaned and dried. The coating forms a continuous layer that may hold down small residual particles and protect the material.
The most important point is that mold encapsulation is not a shortcut. It should not be used to hide visible mold, seal damp wood, or avoid repairing a leak. The U.S. Environmental Protection Agency says moldy hard surfaces should be scrubbed clean and dried completely, while moldy porous materials may need to be discarded. It also warns against painting or caulking over moldy surfaces.
A proper project begins with moisture control. The leak, condensation problem, drainage issue, or high humidity must be corrected. Contaminated material is then removed or cleaned, loose particles are collected, and the remaining surface is allowed to dry. Only after those steps may a mold encapsulation paint, sealant, or coating be considered.
Mold Encapsulation Quick Guide
| Topic | Quick Explanation |
| Main purpose | Seals cleaned surfaces and helps contain residual mold particles |
| Best surfaces | Sound structural wood, concrete, masonry, attic framing, and floor joists |
| Unsuitable materials | Wet drywall, insulation, carpet, ceiling tiles, and badly damaged materials |
| Required preparation | Fix moisture, remove visible mold, HEPA-vacuum, clean, and dry the surface |
| Application methods | Brush, roller, or professional spray equipment |
| Common products | Mold encapsulation paint, primer, sealant, and antimicrobial coating |
| Main benefit | May preserve sound structural materials and reduce unnecessary demolition |
| Main risk | Mold may regrow beneath the coating if moisture or contamination remains |
| Professional help | Recommended for large, hidden, recurring, or hazardous mold problems |
Mold Encapsulation Steps
- Inspect the affected area to find visible mold, hidden moisture, and damaged materials.
- Repair the moisture source, such as a plumbing leak, roof problem, condensation issue, or groundwater seepage.
- Remove unsalvageable materials, including badly contaminated drywall, insulation, carpeting, or weakened wood.
- Physically clean the remaining surface to remove visible mold, dust, stains, and loose particles.
- HEPA-vacuum the area and allow the material to dry completely before applying a coating.
- Apply the encapsulant by brush, roller, or spray according to the manufacturer’s coverage, thickness, and drying instructions.
- Inspect the finished surface for missed areas, bubbling, peeling, moisture, or poor adhesion.
What Mold Encapsulation Is—and What It Is Not
In practical terms, mold encapsulation is a final coating step used on a sound building material that will remain in place. It is most often considered for structural wood, masonry, or concrete that would be difficult or expensive to remove. The coating is applied to the exposed material after remediation work has taken away visible growth and contamination.
A mold encapsulation sealant is not the same as ordinary wall paint. Standard paint is mainly decorative. An encapsulating or mold-resistant coating is designed for a specific surface and service condition. Product claims differ, so the label and technical data must be read carefully.
Encapsulation also does not “kill the problem” by itself. Even dead mold particles may still cause reactions in sensitive people, which is why physical removal and cleaning remain important. The EPA does not recommend routine reliance on bleach or other biocides during mold cleanup and notes that killing mold is not a substitute for removing it.
Simply rolling paint over stained or fuzzy growth is concealment, not mold remediation.
How the Mold Encapsulation Process Works
The process starts with an inspection. The inspector looks for damp materials, staining, odors, past leaks, and hidden areas where water may have traveled.
Next, the moisture source is corrected. This may mean repairing a roof or plumbing leak, improving exterior drainage, stopping foundation seepage, insulating a cold surface, or managing indoor humidity. CDC and NIOSH guidance consistently places water control at the center of mold remediation because cleaned materials can become contaminated again if they remain damp.
Workers then remove materials that cannot be saved and physically clean surfaces that can remain. This may involve controlled scrubbing, sanding, wire brushing, or another method that removes contamination without spreading dust.
After cleaning, the work area and exposed materials are commonly HEPA-vacuumed. EPA guidance recommends HEPA vacuuming for final cleanup after contaminated materials have been removed and the remaining area has been thoroughly dried.
Once the surface is clean, sound, and dry enough for the selected product, the encapsulant is brushed, rolled, or sprayed at the required thickness. It must then cure for the period stated by the manufacturer.
Surfaces That May Be Suitable for Encapsulation
Structural wood is one of the most common surfaces considered for mold encapsulation. Attic rafters, roof sheathing, floor joists, beams, and crawl-space framing can be costly or unsafe to remove when they are still structurally sound. If the wood has been properly cleaned, has no ongoing moisture problem, and meets the coating manufacturer’s moisture limits, a compatible product may provide a useful finishing layer.
Concrete and masonry may also be candidates. Foundation walls and selected block or brick surfaces may be suitable, but coatings should not be used to hide water movement through a wall. Efflorescence, active seepage, loose surface material, or high moisture can weaken adhesion and cause peeling.
Suitability depends on more than the name of the material. The surface must be firm enough to hold the coating. Rotting wood, crumbling masonry, delaminated sheathing, or materials with deep damage may require repair or replacement. A moisture meter may be used before coating, and manufacturer moisture limits must be followed.
When Mold-Damaged Materials Should Be Removed Instead
Some materials are difficult to clean fully because mold can grow into their pores, fibers, or paper layers. The EPA lists absorbent materials such as ceiling tiles and carpet as items that may have to be discarded when moldy because contamination can fill spaces that are difficult or impossible to clean.
Drywall is a common example, especially when it has been soaked, softened, or contaminated through its paper facing. Wet insulation, carpet padding, heavily affected carpet, fiberboard, and damaged ceiling tiles are also often better removed than coated.
Removal is especially important when a material has lost strength, will not dry, or has hidden contamination that cannot be reached. CDC guidance advises cleaning and drying wet items quickly, generally within 24 to 48 hours, or removing them when they cannot be saved.
Replacement is often the safer choice when cleaning cannot return the material to an acceptable condition.
Mold Encapsulation Paint, Sealant, Primer, and Spray
The words paint, sealant, primer, and spray are often used loosely, but they do not always describe the same type of product. Mold encapsulation paint usually refers to a coating that leaves a visible finished layer. A mold encapsulation sealant may focus more on forming a closed barrier over the cleaned surface. A primer is generally meant to prepare the substrate for another approved coating, although some restoration products are sold as primer-sealers.
Mold encapsulation spray normally describes the application method rather than a separate chemical category. Spraying can cover large or irregular areas quickly, but nearby surfaces, ducts, wiring, and equipment must be protected from overspray. Rolling offers good control on flat surfaces, while brushing is useful around joints, edges, fasteners, and rough areas.
A thick spray coat will not correct poor cleaning, active moisture, or weak material. The correct wet-film or dry-film thickness, number of coats, drying conditions, and recoat time should come from the product instructions rather than guesswork.
What to Look for in Mold Encapsulation Products
The first requirement is surface compatibility. A product approved for bare wood may not be suitable for damp concrete, previously painted masonry, metal, or pressure-treated lumber. Check the label and technical sheet for allowed substrates, required primers, surface temperature, moisture limits, and cleaning instructions.
Coverage rate matters because a low-priced container may require more product or several coats. Adhesion, flexibility, finish, drying time, odor, and resistance to changing temperature or humidity can also be important in attics and crawl spaces.
Pay close attention to antimicrobial and mold-resistant claims. In the United States, some products with claims about controlling microorganisms are regulated as pesticides, while treated-product claims may be limited to protecting the product or coating itself. A label that says a coating resists mold growth does not necessarily mean it remediates mold already growing in a building.
Review the safety data sheet for ventilation, protective equipment, storage, and exposure precautions.
Choosing the Best Mold Encapsulation Products
There is no single best mold encapsulation product for every job. The right choice depends on the substrate, location, temperature, moisture conditions, expected wear, and whether the space will be occupied during or soon after application.
Water-based coatings may offer easier cleanup and lower odor, but they are not suitable for every surface. A contractor should compare technical data rather than relying only on front-label phrases such as “maximum protection” or “professional strength.”
The best mold encapsulation products are those that match a properly prepared surface and can be applied exactly as directed. A premium coating can still peel when placed over dust, loose fibers, wet wood, or active contamination. In the same way, a less expensive product may perform well when it is approved for the substrate, applied at the correct thickness, and protected from renewed moisture.
Before buying, confirm whether the product is a finish coat, primer, stain blocker, or mold-resistant coating because these terms describe different functions.
Professional Mold Encapsulation Application
A professional project usually begins by protecting occupants and separating the work zone from unaffected areas. Larger or dust-producing work may require plastic barriers, controlled air movement, HEPA-filtered equipment, and careful waste handling. EPA and OSHA guidance supports containment and HEPA cleanup when remediation could spread particles.
Workers should also use suitable protective equipment. CDC guidance recommends at least an approved N95 respirator for mold cleanup, along with eye protection and gloves. More demanding demolition or longer exposure may require greater respiratory protection.
Before coating, professionals remove remaining dust, verify dryness, and apply the product at the labeled thickness, including edges and hard-to-reach areas.
A final inspection should look for thin spots, missed areas, bubbles, poor adhesion, staining, or moisture. Some projects also include independent post-remediation verification, especially when contamination was extensive or the building has sensitive occupants.
DIY Encapsulation vs. Hiring a Mold Professional
A small, clearly limited area on an accessible hard surface may be manageable after the water source has been fixed, provided the person can isolate, clean, dry, and coat the area safely.
Professional help is the better choice when mold covers a large area, returns after cleaning, involves structural cavities or HVAC components, follows flooding or sewage, or affects materials that require demolition. It is also wise to avoid DIY work when an occupant has asthma, severe allergies, a weakened immune system, or chronic lung disease because mold exposure can cause stronger reactions in sensitive people.
When searching for “mold encapsulation near me,” ask what will happen before the coating is applied. A strong proposal should explain moisture correction, containment, material removal, cleaning methods, drying goals, product name, application thickness, number of coats, and final inspection.
Ask whether the company follows the current ANSI/IICRC S520 professional mold-remediation standard or another recognized guideline. The fourth edition of the S520 standard was published in 2024.
Check local licensing rules, references, insurance, exclusions, and warranty terms.
Mold Encapsulation Cost and Pricing Factors
Mold encapsulation cost cannot be judged from coating price alone. The final bill usually depends more on the work required before application. A small, open basement wall is easier to reach than a tight crawl space or attic with complex framing. Labor rises when workers need extensive containment, protective equipment, debris removal, HEPA filtration, difficult access, or repeated cleaning.
Material condition also changes the price because rough lumber, thick growth, stains, joints, and fasteners can require more preparation. Water-source repairs, structural repairs, insulation removal, drying equipment, disposal, and post-remediation checks may be separate charges.
Product selection affects cost through container price, coverage, required thickness, and number of coats. Spray work may be faster, but masking and equipment setup add labor.
A useful quote should separate remediation from encapsulation. It should state what materials will be removed, how the remaining surfaces will be cleaned, how dryness will be checked, which mold encapsulation products will be used, and what the warranty covers. An unusually low quote may include little more than spraying over the visible area, which is not a complete solution.
Benefits, Limitations, and Common Failure Risks
Mold encapsulation can provide a finishing layer on cleaned, sound framing or concrete that would be difficult to replace. A light-colored coating may also make later stains easier to notice.
The main limitation is that the coating depends on the condition beneath it. If dust, active mold, moisture, rot, or a weak surface remains, adhesion can fail. Warning signs include peeling, bubbling, cracking, discoloration, renewed musty odor, or visible growth at edges and uncoated areas.
Hidden regrowth is possible when moisture returns because no paint can overcome a leaking roof, wet foundation, plumbing problem, or condensation. CDC recommends keeping indoor humidity no higher than 50 percent and fixing water problems promptly.
Encapsulation may reduce unnecessary demolition, but it should never create false confidence. The success of the job comes from moisture control and removal of contamination. The coating is only the final protective part of that larger process.
Mold Encapsulation vs. Crawl Space Encapsulation
Mold encapsulation and crawl space encapsulation sound similar, but they solve different problems. Mold encapsulation is a coating applied to a cleaned building material, such as a floor joist or foundation wall. It is limited to the treated surface.
Crawl space encapsulation is a broader moisture-control system using a vapor barrier, air sealing, drainage measures, and often dehumidification to reduce ground moisture and condensation.
The two services may be used together. For example, mold may first be removed from sound joists, followed by an approved coating. A vapor barrier and humidity-control system may then be installed to reduce the chance of the framing becoming damp again.
However, one service does not replace the other. A coating on joists will not stop groundwater vapor, and a new liner should not be used to avoid cleaning existing contamination.
Preventing Mold After Encapsulation
Long-term prevention depends on keeping the treated area dry. Indoor humidity should be monitored with a reliable humidity meter, especially during hot or wet seasons. CDC guidance recommends keeping household humidity at or below 50 percent, while some homes may need a lower level to prevent condensation on cool surfaces.
Inspect plumbing, roofing, gutters, drainage, foundation walls, sump systems, and HVAC drains regularly. In attics, basements, and crawl spaces, watch for condensation, standing water, damp insulation, and musty odors.
Periodic checks can reveal peeling, staining, cracks, or new growth. A clean-looking coating does not prove that the area behind it is dry.
When water intrusion returns, act quickly. Drying or removing wet materials within 24 to 48 hours can reduce the chance of new mold growth.
Conclusion
Mold encapsulation can be useful as the final stage of a complete remediation plan. It may protect cleaned structural wood, concrete, masonry, and other sound materials that can remain in place.
However, the coating cannot repair a leak, dry wet wood, restore rotten material, or make visible mold disappear safely. Porous or badly damaged materials may need to be removed, and every remaining surface must be cleaned and dried before a mold encapsulation paint, primer, spray, or sealant is applied.
The right decision depends on the material, contamination, moisture source, and quality of preparation. Whether the work is completed by a homeowner or a professional, lasting results come from the same order of priorities: stop the water, remove what cannot be saved, clean what can remain, verify dryness, and only then apply a suitable encapsulating coating.
Frequently Asked Questions
Does mold encapsulation permanently stop mold?
Mold encapsulation can provide lasting protection when the surface is properly cleaned and kept dry. However, mold may return if leaks, condensation, high humidity, or other moisture problems are not corrected.
Can I apply mold encapsulation paint over visible mold?
No. Visible mold should be physically removed before applying mold encapsulation paint. Coating active or wet growth can trap contamination, weaken adhesion, and allow hidden mold to continue growing underneath.
What surfaces can be mold encapsulated?
Sound attic rafters, floor joists, roof decking, crawl-space framing, concrete, and masonry may be suitable. The surface must be stable, properly cleaned, free from active growth, and completely dry.
Is mold encapsulation safe for drywall?
Encapsulation is usually unsuitable for heavily contaminated, wet, soft, or damaged drywall. Because mold can penetrate the paper and gypsum, affected sections often need to be cut out and replaced.
How long does mold encapsulation last?
Its lifespan depends on surface preparation, coating quality, correct application, and moisture control. A properly applied coating may last for years, but it should still be inspected periodically for damage or renewed moisture.
Disclaimer: This article provides general information about mold encapsulation and should not replace a professional inspection, medical advice, or local remediation guidance. Mold conditions vary by property, material, moisture source, and level of contamination. Large, recurring, hidden, sewage-related, or hazardous mold problems should be evaluated by a qualified mold remediation professional. Always follow product labels, safety instructions, and applicable local regulations.
Enjoyed this article? Discover more helpful ideas and fresh inspiration on Vogue Cultures.