Learning how to install a mailbox is not difficult, but it does require careful measuring and a safe, stable setup. A curbside mailbox must be easy for the mail carrier to reach, strong enough to stay upright in bad weather, and placed where it does not create a roadside hazard.
The job usually has four main stages. First, choose the correct location and confirm the required height and distance from the road. Next, prepare the ground and set the mailbox post. After the post is stable, attach the mailbox with the correct bracket and hardware. Finally, check the height, setback, alignment, door movement, and address numbers before considering the project complete.
Good drainage also matters because trapped water can rot wood or encourage metal to rust. This guide focuses on a standard post-mounted curbside mailbox in the United States. Local rules and unusual delivery routes may affect the final location, so confirm the plan before digging.
Quick Guide Table
| Installation Step | What to Do | Key Check |
| Choose the location | Mark the mailbox position near the curb or road edge | Confirm the location with your local Post Office |
| Measure the height | Plan the post so the mailbox floor is 41–45 inches above the road | Measure from the road surface, not the lawn |
| Check the setback | Position the mailbox door 6–8 inches behind the curb face or road edge | Measure to the front door of the mailbox |
| Check for utilities | Contact 811 before digging | Wait until underground services are marked |
| Prepare the hole | Dig according to the post maker’s instructions and add drainage gravel if needed | Do not use an excessively deep or rigid roadside support |
| Set the post | Use concrete, foam, an anchor, or compacted soil | Keep the post straight with a bubble level |
| Mount the mailbox | Attach a compatible bracket and corrosion-resistant fasteners | Make sure the door and flag move freely |
| Complete the inspection | Add visible address numbers and test the stability | Recheck height, setback, alignment, and access |
Step-by-Step Guide
- Confirm the placement: Ask your local Post Office where the mailbox should be installed, especially if the road has no raised curb.
- Contact 811: Have underground utility lines marked before using a shovel or post-hole digger.
- Measure carefully: Plan for the mailbox floor or mail-entry point to sit 41–45 inches above the road, with the door 6–8 inches behind the curb or road edge.
- Dig the post hole: Follow the mailbox-post manufacturer’s instructions and account for any gravel placed at the bottom for drainage.
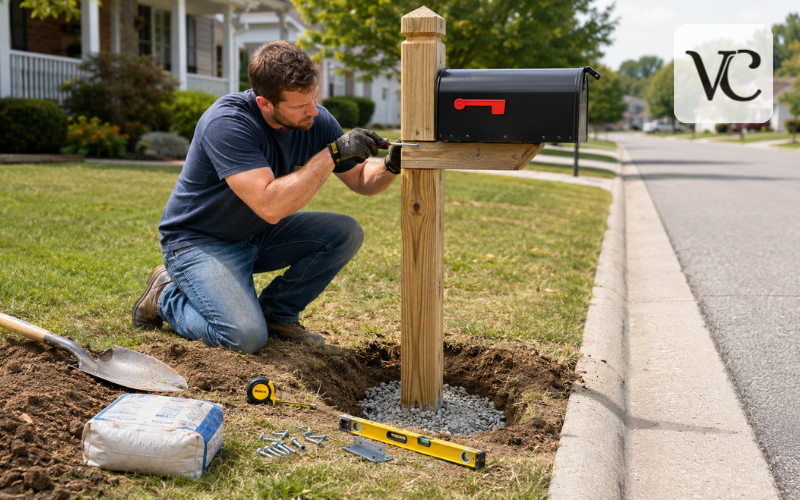
- Position the post: Place it in the hole, check it from two sides with a level, and hold it upright with temporary braces.
- Secure the foundation: Add concrete, post-setting foam, a ground anchor, or compacted backfill according to the chosen post system.
- Allow it to set: Follow the foundation product’s curing instructions before placing weight on the post.
- Mount the mailbox: Install the correct bracket, center the mailbox, and secure it with exterior-grade screws or bolts.
- Add address numbers: Use clear, contrasting numbers that are easy for the carrier and emergency services to see.
- Inspect the installation: Confirm the box is level, stable, correctly placed, and easy to open without roadside obstructions.
USPS Rules for Mailbox Placement
USPS says the bottom of a curbside mailbox, or the point where mail enters, should generally be 41 to 45 inches above the road surface. The mailbox door should normally sit 6 to 8 inches back from the front face of the curb. Where there is no raised curb, USPS advises contacting the local postmaster for guidance.
Measure from the road surface, not from the lawn beside the post. The ground may sit higher or lower than the road, so measuring only from the soil can place the mailbox outside the correct range. It is usually easier to work backward from the planned mailbox height and then decide how much of the post should remain above ground.
USPS also recommends contacting the local Post Office before installing or replacing a mailbox because road shape, curb design, traffic flow, snow removal, and carrier access can vary. The mailbox should be placed so the carrier can reach it safely and conveniently without leaving the vehicle on routes designed for curbside delivery.
Display the house or apartment number clearly on the box. Current USPS guidance says address information should use neat, contrasting letters or numbers at least one inch high. If the mailbox is on a different street from the home, include the full street address. Local rules or neighborhood standards may also control mailbox color, style, grouping, or location.
Choosing the Right Mailbox and Mailbox Post
Before installing anything, make sure the mailbox, post, and mounting bracket are designed to work together. Some mailboxes screw directly to a flat wooden mounting board. Others use a metal or plastic bracket shaped for a particular box. A mismatch can leave gaps, create weak attachment points, or prevent the door from opening correctly.
Wooden posts look traditional and are easy to drill, but they need checks for rot and loose fasteners. Metal posts are slim and durable, although damaged finishes can rust. Plastic or composite posts resist rot and often fit over an inner support. Combination kits may include the post, arm, bracket, and cover.
Mailbox size should match the amount of mail and small packages you normally receive. A larger box can be useful, but it also catches more wind and may place greater strain on a weak post. Check the manufacturer’s weight and mounting instructions before choosing the support.
Roadside safety is more important than creating the heaviest possible foundation. USPS says the best supports remain stable during normal use but bend or fall away if struck. It recommends a wooden support no larger than 4 by 4 inches or a standard steel or aluminum pipe about 2 inches in diameter, buried no more than 24 inches. Heavy metal pipes, solid concrete posts, and other unyielding supports can create a serious roadside hazard.
Tools and Materials Needed for the Installation
Gather the mailbox, compatible post, mounting board or bracket, exterior screws or bolts, and address numbers before opening the ground. Basic tools include a tape measure, post-hole digger or shovel, bubble level, screwdriver or wrench, work gloves, and eye protection.
Foundation materials may include gravel and quick-setting concrete, post-setting foam, a ground anchor, or a direct-burial support. Stakes and scrap wood are useful for bracing. Check the kit before buying extra hardware, and use corrosion-resistant fasteners suitable for the bracket and post material.
Planning the Location Before You Dig
Start by measuring 6 to 8 inches from the curb face or road edge to the planned position of the mailbox door. Do not use the center of the post as the setback point because the box may extend several inches beyond it. Place the mailbox or measure its depth so you know exactly where the post must stand.
Next, plan the finished height. The floor or mail-entry point needs to fall within the 41-to-45-inch range measured from the road surface. Account for the height of the mailbox, mounting board, bracket, and any horizontal arm before cutting the post or digging the hole.
Before digging, contact 811 or submit a request through your state’s 811 center. The national service advises contacting it a few business days before projects such as mailbox installation so utility owners can mark the approximate locations of buried lines. Wait until all utilities have responded, then dig carefully around marked areas.
Look beyond the measurements as well. Avoid sprinkler pipes, drainage channels, steep slopes, driveway sight lines, and places where parked vehicles or trash cans will block the carrier. In snowy areas, consider where plows push snow. USPS notes that an extended-arm support can help keep the post farther from the plow path while leaving the mailbox accessible.
Preparing the Site and Removing an Old Post
If an old mailbox post is already present, decide whether it is truly strong enough to reuse. Push it gently from several directions. A post that moves at ground level may have a loose base, rotted wood, rusted metal, or cracked concrete below the soil. Also inspect the top for split wood, enlarged screw holes, bent brackets, and damage around the mounting area.
Remove the mailbox before pulling the post. Dig around a direct-buried wooden base until it can be worked free. A concrete-set post may require exposing and lifting the old base. If it is large or near marked utilities, professional removal may be safer.
Clear roots, broken concrete, rusted anchors, and loose soil from the work area. Level the surface enough to measure accurately. Reusing an existing foundation only makes sense when it is solid, correctly positioned, and compatible with the new post. If it leans, sits at the wrong setback, or has hidden damage, replacing it is usually more reliable than trying to patch it.
How to Install a Mailbox Post in the Ground
Mark the center of the post hole after confirming where the mailbox door will finish. Dig to the depth required by the post manufacturer, but keep the USPS roadside-safety guidance in mind: the recommended support should not be buried deeper than 24 inches.
Make the hole large enough for the chosen setting material without overdigging. Loose, wet, or rocky soil may require another anchor method. Stop if you find an unmarked cable, pipe, conduit, or warning tape.
A layer of compacted gravel at the bottom can improve drainage, especially for a wooden post. Remember that gravel reduces the effective post depth, so include it in your measurements. Lower the post into the center of the hole, place a level against two adjacent sides, and adjust it until it is vertical.
Brace the post with stakes and scrap wood. Check the planned mailbox height and setback again before adding concrete, foam, or compacted soil. It is much easier to move the post now than after the foundation hardens.
Installing a Mailbox Post With Concrete
Concrete is a common choice where the soil is loose or the mailbox assembly is fairly heavy. Prepare the mix exactly as directed on the bag. Some quick-setting products are poured dry and then watered, while others must be mixed first. Do not assume all concrete products use the same method.
With the post braced and level, add the concrete evenly around it. Pause several times to check that the post remains plumb. Leave the top of the concrete slightly below ground level so it can be covered with soil, and shape the exposed surface so water drains away from the post rather than collecting against it.
Do not mount the mailbox until the concrete has cured for the time stated by its manufacturer. Cold or wet conditions may slow the process.
Avoid creating an oversized, unyielding roadside base. The goal is to hold the post steady during normal use while following the approved support size and depth guidance. A massive concrete pillar or deeply buried heavy pipe is not a safer mailbox support.
How to Install a Mailbox Post Without Concrete
It is possible to install a mailbox post without concrete when the post system and soil conditions allow it. Common options include screw-in ground anchors, drive-in sleeves, direct-burial posts, and compacted backfill. These systems can make future removal easier and may reduce waiting time.
Use a ground anchor rated for the post size and keep it straight as it enters firm soil. A tilted anchor produces a tilted mailbox, while forcing the post upright can weaken the connection. Protect drive-in sleeves with the correct installation tool.
Direct burial may suit a basic 4-by-4 wooden post. Place the post in the hole, add soil or crushed gravel in thin layers, and compact each layer firmly before adding the next. Poorly compacted fill often settles after rain, causing the post to lean.
Concrete-free methods may not perform well in very soft soil, high winds, repeated freeze-and-thaw conditions, or with an oversized mailbox. Follow the post manufacturer’s limits. If the support moves after firm hand pressure, correct the foundation before attaching the box.
How to Install a Mailbox Post With Foam
Expanding post-setting foam is a lightweight alternative to concrete. Many products combine two liquid parts that expand and harden around the post. Read the full label because mixing and installation methods differ.
Prepare the hole, drainage base, post, level, and braces first. Foam can expand quickly, leaving little time to correct a leaning post. Mix only as directed, pour it into the proper area, and keep your hands and face away from the expanding material. Wear the protective equipment listed by the manufacturer.
Allow the foam to harden for the stated period before cutting away excess or mounting the mailbox. Confirm that the product is suitable for your post material, outdoor ground contact, soil conditions, and mailbox weight. Some foams are convenient for small posts but may not be appropriate in every climate or for every post design.
Foam reduces mixing and can be easier to carry than concrete. However, convenience should not replace correct measurement, bracing, drainage, or roadside-safe support selection. The post still needs to remain within the recommended size and burial depth.
How to Install a Mailbox on a Wooden Post
Once the foundation is stable, attach the mounting board or bracket to the top of the wooden post. Follow the mailbox maker’s hole positions rather than guessing. If drilling pilot holes, choose a bit slightly smaller than the screw body so the threads can grip without splitting the wood.
Set the mailbox on the bracket and center it from side to side. Open the door fully to make sure it does not rub against the mounting board, post arm, decorative trim, or nearby plants. Check that the flag can move freely and that the box does not rock.
Use exterior-grade fasteners that hold firmly without creating sharp points inside the box. Tighten them evenly; overtightening can crush a plastic bracket, strip a hole, or split the wood.
Before finishing, make sure the box is securely attached. USPS notes that the mailbox should remain connected to the support if struck rather than separating into a loose roadside object.
How to Install a Mailbox on an Existing Post
Installing a mailbox on an existing post can save time, but only when the support is sound and correctly placed. Check the post at ground level, where rot and rust often begin. Look for leaning, cracks, loose anchors, swollen wood, and movement in the foundation.
Measure the current setup from the road surface to the mailbox floor, then measure from the curb face or road edge to the door. An old post may have shifted or may have been installed under a different local arrangement. Confirm the location with the local Post Office if anything is unclear.
Replace any mounting board or bracket that does not match the new box. Do not reuse damaged holes or badly rusted fasteners.
A video can help you understand the general process, but a “how to install a mailbox on an existing post” YouTube demonstration may show a different mailbox, bracket, road layout, or local rule. Use the video as a visual aid, then rely on your product instructions, actual measurements, utility markings, and local postal guidance.
Final Measurements, Safety Checks, and Common Mistakes
Complete a final inspection before putting the tools away. Measure the height from the road surface to the bottom of the mailbox or mail-entry point. Confirm that the mailbox door is 6 to 8 inches back from the curb face or road edge, unless the local Post Office has approved a different placement.
Stand in front of and beside the box. It should look level, remain firm when gently pressed, and have a door that opens and closes freely. Install clear, contrasting address numbers at least one inch high in the position required for your route. Keep the approach free from branches, parked vehicles, trash containers, and snow.
Common mistakes include digging before contacting 811, measuring from the lawn instead of the road, placing the post where the mailbox door misses the setback, and mounting the box before the foundation is ready. Other problems include weak brackets, untreated fasteners, poor drainage, and a post that was never checked with a level.
A leaning post usually means the soil or foundation has moved. Straighten it, improve the base, and brace it until stable. A loose box often needs a sound mounting board and fresh fasteners. Reshape the soil if water collects at the base. When the location is wrong, move the post rather than expecting the carrier to work around it.
Conclusion
Knowing how to install a mailbox properly comes down to accurate placement, safe digging, a stable but roadside-friendly support, and secure mounting hardware. Measure from the road, not just the lawn, and confirm both the height and setback before setting the post.
Contact 811 before breaking ground, follow the instructions supplied with the mailbox and foundation material, and ask the local Post Office about unusual curbs, roads, or delivery conditions. USPS currently recommends a mailbox height of 41 to 45 inches and a door setback of 6 to 8 inches in standard curbside situations.
Finish with one practical check: confirm the post is upright, the mailbox is firmly attached, the door moves freely, the address is easy to read, and the carrier has a clear approach. A careful final inspection can prevent years of leaning, loosening, drainage trouble, and delivery problems.
Frequently Asked Questions
How deep should a mailbox post be installed?
A standard roadside mailbox support should generally not be buried deeper than 24 inches. Always follow the post manufacturer’s directions and account for gravel, soil conditions, and local requirements.
Can I install a mailbox post without concrete?
Yes. Ground anchors, drive-in sleeves, direct-burial posts, or firmly compacted backfill may work. The best option depends on the post design, mailbox weight, soil stability, wind, and climate.
What is the correct height for a mailbox?
The bottom of the mailbox or its mail-entry point should normally sit 41–45 inches above the road surface. Measure from the road rather than the surrounding grass or soil.
How far should a mailbox be from the curb?
The front door of a curbside mailbox should generally be positioned 6–8 inches behind the curb face. Where no curb exists, ask the local Post Office for exact placement guidance.
Can I mount a new mailbox on an existing post?
You can reuse an existing post if it is stable, upright, correctly positioned, and free from rot or rust. Replace damaged brackets, mounting boards, and fasteners before installing the new box.
Disclaimer: This information provides general guidance for installing a standard post-mounted curbside mailbox in the United States. Mailbox placement can vary because of road design, carrier routes, local laws, neighborhood rules, snow removal, and utility locations. Always confirm the proposed location with your local Post Office before installation. Contact 811 or your local utility-marking service before digging, follow the mailbox and post manufacturer’s instructions, and use suitable protective equipment. Consider hiring a qualified installer when the site is near buried utilities, heavy traffic, concrete sidewalks, unstable soil, or other hazards.
Enjoyed this article? Discover more helpful ideas and fresh inspiration on Vogue Cultures.