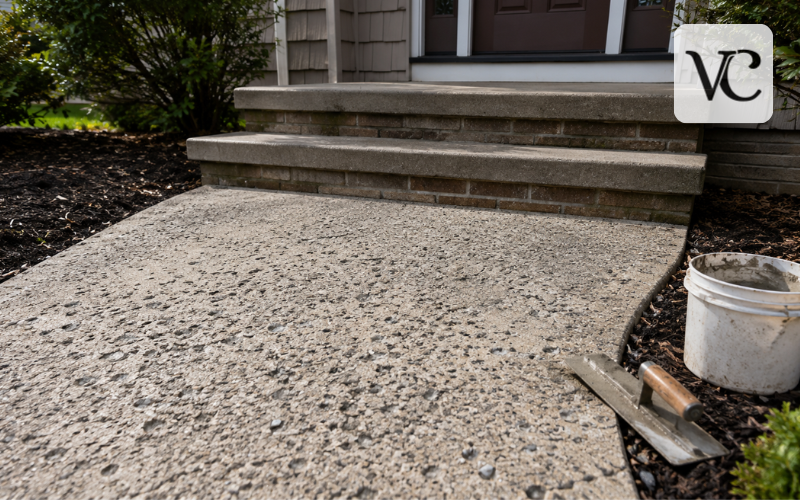
Concrete pitting is the development of small holes, shallow craters, or rough depressions in the surface of hardened concrete. It may begin as a cosmetic problem, but it can become more serious when water, road salt, oil, and dirt collect inside the damaged spots. Over time, the edges of the pits may loosen, nearby areas may break away, and the surface can become harder to clean or use safely.
Pitting can appear on driveways, patios, sidewalks, steps, garage floors, and other concrete slabs. It often develops where the top layer was weak from the beginning or where the concrete has faced repeated moisture, freezing weather, chemicals, or heavy wear. A few tiny marks may not need urgent work, but expanding pits, exposed stone, cracking, or loose concrete should not be ignored. Early concrete pitting repair is usually simpler than waiting until the slab needs a full resurfacing treatment or partial replacement.
Concrete Pitting Quick Guide
| Damage Type | Common Signs | Best Repair Option |
| Minor pitting | Small pinholes or shallow marks | Concrete patch or epoxy filler |
| Localized deep pits | Larger holes with firm surrounding concrete | High-strength repair mortar |
| Widespread shallow pitting | Roughness across a large surface | Polymer-modified concrete resurfacer |
| Salt-related damage | Pits, scaling, and white residue | Clean, patch, resurface, and seal |
| Severe deterioration | Deep cracks, hollow areas, or crumbling concrete | Professional assessment or slab replacement |
Step-by-Step Concrete Pitting Repair
- Inspect the damage: Check the size, depth, and spread of the pits before selecting a repair method.
- Clean the concrete: Remove dirt, dust, grease, salt residue, coatings, and loose concrete.
- Prepare damaged areas: Remove weak edges and slightly undercut deeper pits when required by the repair product.
- Apply the repair material: Use epoxy for small pits, repair mortar for deep holes, or resurfacer for widespread shallow damage.
- Smooth the surface: Level the repair with the surrounding concrete and add a slip-resistant texture where needed.
- Allow proper curing: Protect the repaired area from traffic, rain, freezing temperatures, and strong sunlight.
- Seal the concrete: Apply a compatible penetrating sealer after the repair has fully cured to reduce future moisture and salt damage.
What Concrete Pitting Looks Like
Concrete pitting does not look exactly the same in every case. Light damage may appear as pinholes, small pockmarks, or shallow bowl-shaped spots scattered across the surface. The slab may feel rough underfoot even though it remains firm. On a garage floor, the pits may hold dust and dark stains. On a driveway, they may become more noticeable after rain because water stays inside them.
The main concern is whether the damage is limited to the surface. Minor cosmetic pitting usually has solid concrete around and below each spot. More advanced damage may include loose edges, visible stones, powdery material, widening holes, or areas that sound hollow when tapped.
A growing network of cracks, broken joints, rust stains, sinking sections, or exposed reinforcing steel may point to a deeper problem. In those cases, filling the visible holes alone will not address the cause, and a concrete professional should assess the slab. The National Ready Mixed Concrete Association describes progressively worse surface loss as moving from small localized areas to exposed coarse aggregate and larger damaged sections.
The Most Common Concrete Pitting Causes
Freeze-thaw action is one of the leading concrete pitting causes in cold climates. Concrete contains pores that can absorb water. When saturated concrete freezes, the water expands and creates pressure near the surface. Repeated freezing and thawing can gradually loosen the top layer. De-icing chemicals can make the problem worse by keeping the surface wetter and increasing the number of freeze-thaw events it experiences.
Some pitting begins during installation. Adding too much water to the concrete mix may make placement easier, but it can also leave a weaker and more porous surface. Poor finishing, finishing while bleed water remains on top, inadequate curing, or allowing the slab to dry too quickly may also reduce surface strength. Small air pockets near the face of the slab can later open as pinholes or shallow voids. Industry guidance identifies improper mixture proportions, insufficient curing, low surface strength, and poor finishing as major causes of concrete surface breakdown.
Traffic and abrasion add another source of wear. Vehicle tires, metal wheels, dragging equipment, pressure washing at very close range, and repeated impacts can slowly enlarge existing weak spots. Oil, fuel, fertilizers, harsh cleaners, and other contaminants may also stain the slab or prevent future repair products from bonding properly.
Why Exterior Concrete Pitting Develops Faster
Exterior concrete faces conditions that indoor floors usually avoid. Rain and melting snow enter pores and cracks. Sunlight heats the slab during the day, while lower nighttime temperatures make it contract. In colder regions, the same surface may pass through many freezing and thawing cycles during one winter. This repeated exposure places stress on concrete that is porous, poorly cured, cracked, or already worn.
Drainage plays a major role. Water that sits in low spots, flows from a downspout, or collects near a slab edge keeps the concrete wet for longer periods. Cracks and failed joints can also direct water into the slab or the soil beneath it. If the base becomes unstable, movement may create new cracks and broken edges in addition to exterior concrete pitting.
A suitable sealer can reduce water and salt entry, but it cannot strengthen loose concrete or correct poor drainage. The surface must first be sound, clean, and properly repaired. Any coating or penetrating sealer must also be compatible with the repair material and applied only after the required curing period. Penetrating silane-siloxane sealers are one available option for repelling water and protecting exterior concrete from salts.
Concrete Driveway Pitting and Its Main Risk Factors
Concrete driveway pitting often develops faster than pitting on a lightly used patio because a driveway carries vehicles and receives more winter treatment. Tire pressure and turning movements can wear weak surface mortar, especially where cars stop, turn, or enter the garage. Snowplows, metal shovels, jack stands, and dropped tools may chip already weakened areas.
Salt exposure is another major risk. De-icing products can be carried onto the driveway from nearby roads, even when the homeowner does not spread salt directly. Salty snow may fall from wheel wells and melt in the same parking spots throughout winter. The water then enters the surface and may freeze again later. De-icing chemicals are especially damaging when concrete is frequently wet, exposed to freezing, or still relatively new.
Oil, gasoline, brake fluid, and cleaning chemicals can leave stains or interfere with repair adhesion. Pitting is also common near control joints, slab edges, garage entrances, and drainage channels because these areas may receive concentrated water or impact. Before repairing a pitted driveway, check whether runoff is moving away from the slab and whether cracks or joints need separate attention.
Concrete Pitting and Spalling: Key Differences
Concrete pitting and spalling are related surface problems, but they are not identical. Pitting usually describes small, individual holes or shallow depressions. Spalling normally involves larger pieces, flakes, or layers breaking away from the surface. Scaling is another closely related term used when the finished surface peels or flakes, often after freeze-thaw and de-icer exposure.
The terms sometimes overlap in everyday use because one condition can develop into another. Several small pits may join together and become a larger scaled area. A crack over corroding reinforcing steel may push off a deeper section of concrete and create a true spall. This is why the size of the visible defect is not the only factor to consider.
Damage may be more serious when the surface sounds hollow, the slab has deep cracks, aggregate is becoming exposed over a wide area, or rust-colored marks appear. Spalling around reinforcement, major settlement, or movement at a foundation should be evaluated by a qualified contractor or engineer rather than covered with a thin patch.
How to Assess the Depth and Extent of the Damage
Start by cleaning enough of the slab to see the full damaged area. Count the pits, note where they are concentrated, and measure a few of the deepest spots. A coin, ruler, or depth gauge can help with a basic inspection, but product labels should determine the repair thickness that a particular compound can handle.
Next, remove or probe loose material carefully. Sound concrete should feel firm and resist light scraping. Weak concrete may powder, crumble, or break away around the pit. Tapping the surrounding surface with a small hammer can sometimes reveal hollow areas, although interpreting the sound takes experience. Do not strike hard enough to cause more damage.
Spot repair is usually reasonable when the pits are limited, the surrounding slab is solid, and there are no signs of movement or deep cracking. Resurfacing may be more efficient when shallow pitting covers much of an otherwise stable slab. Replacement or professional repair may be the better choice when deterioration is deep, widespread, structurally important, or linked to a failing base. Repair-industry guidance treats damage evaluation, surface preparation, environmental conditions, and material selection as connected parts of a successful repair.
Preparing Pitted Concrete for Repair
Good preparation often matters more than the brand of repair material. A patch cannot bond well to dust, oil, old sealer, paint, loose cement paste, or crumbling concrete. Sweep and wash the area, then use a suitable degreaser where oil is present. A stiff brush may be enough for light dirt, while a pressure washer, grinder, or another mechanical method may be needed for coatings and unsound material.
Pressure washing should remove contamination without cutting deeply into sound concrete. Grinding can create a clean, open texture, but it produces large amounts of dust. Eye protection, gloves, hearing protection, and effective dust collection are important. Follow the equipment instructions and avoid grinding into reinforcing steel.
For deeper repairs, square or slightly undercut edges may hold a patch better than thin, feathered edges. However, the exact shape and minimum depth depend on the selected product. Some cement-based mortars require the old concrete to be damp but free of standing water, while some epoxy products require a dry surface. Always follow the current label and technical sheet instead of using one preparation method for every repair.
Concrete Pitting Repair for Small, Localized Areas
Small, isolated pits can often be filled with a concrete-compatible patching compound, polymer-modified thin patch, or epoxy repair paste. The best choice depends on whether the slab is indoors or outdoors, whether it receives vehicle traffic, how deep the pits are, and whether the surface will later be sealed or coated. Polymer-modified thin-patch materials are specifically available for non-structural pitted concrete on floors, driveways, sidewalks, steps, and similar surfaces.
After cleaning and preparing the pit, mix only the amount that can be placed within the product’s working time. Press the material firmly into the void to remove trapped air and create full contact with the concrete. Use a trowel, putty knife, or rubber float to level the repair. Try to match the nearby texture, especially on exterior walking surfaces where a glass-smooth patch could become slippery.
Do not add extra water to make a cement-based product easier to spread unless the instructions allow it. Excess water can reduce the material’s strength and bond. Protect the repair from rain, freezing temperatures, strong sun, and traffic for the stated period. Color differences are normal because new patch material rarely matches weathered concrete perfectly.
Repairing Large or Deep Concrete Pits
Large or deep pits need more than a thin cosmetic filler. Begin by removing all loose, cracked, or weak concrete until the remaining surface is solid. Avoid leaving thin edges that can dry quickly or break away. Some repair mortars call for a square-cut perimeter and a minimum depth, while others can be feathered. The product instructions should control this decision.
Choose a high-strength repair mortar designed for the slab’s position and exposure. A horizontal driveway repair may require a different product from a vertical foundation wall or an overhead surface. If reinforcing steel is exposed, remove loose rust as directed and have the cause of corrosion evaluated. Simply covering active corrosion may lead to another failure.
A bonding agent is not automatically required for every mortar. Some products bond directly to a properly prepared, damp surface, while others specify a separate primer or bonding coat. Deep holes may need to be filled in layers or with a material that allows thicker placement. Professional repair-mortar instructions commonly specify sound concrete, prepared edges, correct moisture conditions, careful mixing, and controlled curing.
Using Concrete Resurfacer for Widespread Pitting
A concrete resurfacer is useful when shallow pitting, scaling, or general wear covers a large part of a slab that remains stable underneath. Instead of filling hundreds of small defects separately, resurfacing places a thin, continuous layer over the prepared surface. Polymer-modified cement-based resurfacers are made to improve adhesion and create a new wear surface over old concrete.
Resurfacing is not a way to hide a moving crack, sinking slab, weak base, or deep delamination. Major cracks and deep holes usually need repair first, and working joints should remain functional rather than being covered. The old concrete must be thoroughly cleaned and mechanically prepared as required by the chosen system. Any remaining weak layer can cause the overlay to separate.
During application, maintain the original slope so water continues to drain away. Use the recommended squeegee, trowel, or other tool, and add a broom texture where slip resistance is needed. Work within the stated temperature range and protect the new surface until it can safely accept foot or vehicle traffic. Manufacturers offer different products according to repair thickness, so the permitted depth should be confirmed before application.
How to Fix Concrete Pitting From Salt
To fix concrete pitting from salt, first remove as much residue as possible. Sweep away loose salt, wash the slab with clean water, and use a concrete-safe cleaner if oily road film or other contamination is present. Allow the area to dry or reach the moisture condition required by the repair product. Salt left in the pores or on the surface can interfere with bonding and continue attracting moisture.
Remove weak and flaking concrete before patching. Fill isolated pits with an exterior-rated repair compound, or use a resurfacer if the shallow damage is widespread and the slab below remains sound. Select products approved for freeze-thaw conditions and de-icing chemical exposure where those conditions apply.
New concrete is especially vulnerable while it is still gaining strength and drying. As a practical rule, avoid de-icing chemicals during the first winter unless the installer or product manufacturer provides different guidance. Remove snow early with a plastic-edged shovel, improve traction with sand when suitable, and avoid piling salty snow in one place. No de-icer is completely harmless to weak or saturated concrete, and industry guidance recommends minimizing its use, particularly on newly installed slabs.
Choosing a Concrete Pitting Repair Kit
A concrete pitting repair kit should match the job rather than simply promising a fast fix. First check the approved use: interior floor, exterior slab, driveway, vertical wall, or general-purpose repair. Then compare the allowed repair depth, minimum and maximum temperature, working time, curing time, coverage, color, and traffic rating.
Epoxy fillers can work well for small, firm, localized defects and may be useful where a smooth, durable repair is needed. Cement-based patching compounds are often a practical choice for exterior concrete because their appearance and movement are closer to the original slab. Resurfacing kits are better suited to broad, shallow wear than to one deep crater.
Also check whether the kit requires a primer, bonding agent, damp surface, dry surface, topcoat, or special tools. Confirm that it is compatible with any planned sealer, paint, or garage-floor coating. Read the latest product sheet before buying because formulations and instructions can change. For a large driveway or uncertain damage, a professional assessment may prevent the cost of applying the wrong system.
Conclusion
A lasting concrete pitting repair begins with finding the cause. Freeze-thaw exposure, salt, poor drainage, weak surface concrete, chemical spills, and heavy wear all require slightly different prevention steps. Filling the holes without correcting ongoing moisture or surface weakness may provide only a temporary improvement.
After the patch or concrete resurfacer has fully cured, consider a compatible penetrating sealer for exterior concrete. Silane-siloxane products are one common option designed to reduce water and salt entry without creating a thick surface film, but the slab and repair material must meet the manufacturer’s preparation and curing requirements. Sealing will not repair cracks or stop water that ponds because of poor slope.
Keep drains and joints clear, move downspout water away from the slab, clean spills promptly, and limit harsh de-icing chemicals. Inspect the concrete after winter and repair new pits while they are still small. With sound preparation, the right repair material, and better moisture control, a pitted slab can often remain useful for many years.
Frequently Asked Questions
Can concrete pitting be repaired?
Yes. Small pits can usually be filled with epoxy or concrete patching compound. Larger holes may need repair mortar, while widespread shallow damage may be better treated with a concrete resurfacer.
Is concrete pitting a structural problem?
Minor surface pitting is usually cosmetic. However, deep pits, spreading cracks, hollow areas, exposed reinforcing steel, or crumbling concrete may indicate more serious damage that requires professional inspection.
What causes concrete driveway pitting?
Concrete driveway pitting commonly results from freeze-thaw cycles, de-icing salts, poor curing, excess water in the original mix, vehicle traffic, moisture exposure, and gradual surface wear.
Can salt-damaged concrete be resurfaced?
Salt-damaged concrete can often be resurfaced when the remaining slab is stable and sound. All salt residue, loose concrete, and weak surface material must be removed before applying the resurfacer.
How can I prevent concrete pitting?
Improve drainage, clean spills quickly, limit de-icing salt use, repair small cracks, remove snow regularly, and apply a compatible penetrating concrete sealer after the slab or repair has properly cured.
Disclaimer: This article provides general information about identifying, repairing, and preventing concrete pitting. Repair requirements can vary depending on the slab’s condition, location, depth of damage, weather exposure, and construction method. Always follow the repair-product manufacturer’s instructions and safety guidance. Consult a qualified concrete contractor or structural professional when the slab has deep cracks, movement, exposed reinforcement, widespread crumbling, or possible structural damage.
Enjoyed this article? Discover more helpful ideas and fresh inspiration on Vogue Cultures.