A basement wall vapor barrier is a material that slows or blocks water vapor as it moves through a wall. Concrete may look solid, but it contains tiny pores. Moisture in the soil can move through those pores, while warm, humid basement air can reach a cold wall and form condensation.
A good moisture-control system keeps damp concrete away from wood framing, fiberglass insulation, paper-faced drywall, and other materials that can be damaged by moisture. It should also control air leakage because moving air can carry moisture into hidden wall cavities.
The key is to treat a basement wall vapor barrier as part of a complete wall assembly. Insulation, air sealing, drainage, wall finishes, climate, and foundation condition must work together. Current building-science guidance often favors foam insulation placed directly against concrete, with sealed joints and no additional interior polyethylene. The U.S. Department of Energy advises that interior basement insulation should be airtight while still allowing suitable inward drying.
This guide explains material choices, placement rules, installation steps, and the common mistakes that can trap moisture.
Quick Guide to Basement Wall Moisture-Control Options
| Material or system | Main purpose | Best suited for | Important consideration |
| EPS rigid foam | Insulation, air control, and moderate vapor resistance | Finished concrete basement walls | Seal all joints, edges, and penetrations |
| XPS rigid foam | Insulation and stronger vapor resistance | Cold or moderately damp basement walls | Thickness affects insulation and permeability |
| Closed-cell spray foam | Insulation, air sealing, and vapor control | Uneven concrete, block, or stone walls | Professional installation is often recommended |
| Dimpled membrane | Directs seepage toward a drain or sump | Basements with recurring minor water entry | Must connect to a working drainage system |
| Six-mil polyethylene | Strong vapor resistance | Selected unfinished areas or approved assemblies | Can trap moisture inside finished basement walls |
| Waterproof coating | Helps resist limited wall dampness | Sound masonry without major leaks | Does not repair cracks or water pressure problems |
Basement Wall Vapor Barrier Installation Steps
- Inspect the foundation wall: Check for cracks, damp stains, peeling paint, efflorescence, mold, and active water entry.
- Correct water problems: Repair leaks and improve gutters, grading, downspouts, window wells, drainage, or sump performance before covering the wall.
- Choose one compatible system: Select rigid foam, closed-cell spray foam, or a drainage membrane according to the wall condition, climate, and intended basement use.
- Prepare the concrete: Remove dust, loose coatings, damaged material, and debris. The surface should be clean and suitable for the chosen adhesive or insulation.
- Install the material continuously: Place foam directly against the concrete or install the drainage membrane according to the manufacturer’s instructions.
- Seal every opening: Use compatible tape, sealant, or spray foam around seams, corners, floor edges, pipes, cables, and other penetrations.
- Add framing and finishes: Keep untreated wood away from damp concrete and install any required drywall or fire-protective covering.
- Check local requirements: Confirm insulation levels, vapor-retarder rules, fire protection, and permit requirements with the local building department.
Basement Wall Vapor Barrier or Not: How to Decide
Whether you need a basement wall vapor barrier depends on how the basement is used and how the wall is built. An unfinished basement with exposed concrete can often dry toward the room. A finished or conditioned basement is different because framing, insulation, and drywall may hide moisture.
Climate matters, but it is not the only factor. Cold regions need enough insulation to keep indoor air away from cold concrete. Warm, humid regions may have strong inward moisture movement. Wall condition, exterior drainage, indoor humidity, insulation type, and local building requirements must also be considered.
An impermeable plastic sheet can create problems when installed over air-permeable insulation, such as fiberglass, on the room side of a below-grade wall. Moisture entering from the concrete may become trapped because the wall cannot dry inward. Building America guidance warns against this type of assembly.
For many finished basements, continuous rigid foam or properly applied closed-cell spray foam is safer than a basic fiberglass-filled stud wall covered with plastic. However, the final choice should match the specific basement and the code adopted locally.
Vapor Barriers, Moisture Barriers, and Waterproofing
These terms are often mixed together, but they solve different problems. Water vapor is moisture in gas form. A vapor retarder slows its movement through a material. Condensation forms when humid air touches a surface that is cold enough to turn vapor into liquid. An air barrier limits air leakage, which can carry moisture into wall cavities.
Waterproofing deals with liquid water. It may include exterior membranes, crack repairs, footing drains, sump pumps, and drainage layers. A dimpled interior membrane can direct seepage to a perimeter drain, but it does not stop water from reaching the foundation.
A vapor barrier cannot repair an active leak, standing water, or water entering around a window well. Those problems require drainage, waterproofing, or structural repairs first. The EPA recommends correcting leaks and other basement moisture problems before converting the space into a living area.
In simple terms, use waterproofing for liquid water, an air barrier for air leakage, insulation for cold surfaces, and an appropriate vapor retarder for vapor diffusion. A reliable basement system may need several of these controls working together.
Why Plastic Sheeting Can Trap Moisture
Six-mil polyethylene strongly resists vapor. That makes it useful beneath concrete slabs or over exposed soil in crawl spaces. On the interior side of a finished basement wall, however, it may prevent the wall from drying.
A risky assembly often includes concrete, a framed wall filled with fiberglass, and polyethylene directly behind the drywall. Ground moisture can pass through the concrete or enter through small defects. The plastic blocks inward drying, while air leaks around outlets and edges may allow humid room air to reach cold concrete and condense.
The result can be damp insulation, mold on drywall paper, wood decay, damaged finishes, and musty odors. DOE guidance warns against interior polyethylene, foil wall coverings, and other Class I finishes that can trap moisture in basement walls.
Two vapor barriers are not better than one. For example, low-permeance foam against concrete combined with interior polyethylene may trap framing between two restrictive layers. Use one complete, tested wall design and preserve its intended drying direction.
Moisture Problems to Fix Before Installation
Inspect the basement after heavy rain and during normal weather. Look for wet cracks, dark patches, peeling paint, damp sill plates, standing water, rust, and white powdery deposits known as efflorescence. Efflorescence does not always indicate a major leak, but it shows that moisture has moved through the masonry.
Outside, check that gutters are clear, downspouts discharge away from the foundation, and the ground slopes away from the house. Inspect window wells, exterior cracks, buried drains, and patios or driveways that direct runoff toward the wall. The EPA identifies gutter maintenance and proper grading as basic moisture-control measures.
Try to identify the source. Liquid water usually creates stains, trickles, or puddles after rain. Vapor movement causes more general dampness. High indoor humidity may create condensation on cold walls, pipes, or floors. A dehumidifier can help with humid air, but it cannot repair poor drainage or foundation damage.
Contact a qualified professional when walls bow, cracks widen, water flows through joints, flooding repeats, or the sump system cannot keep up. Complete those repairs before covering the foundation.
Best Moisture Barrier for Basement Walls
There is no single best moisture barrier for basement walls. The right material is one that manages moisture while remaining compatible with the full wall assembly.
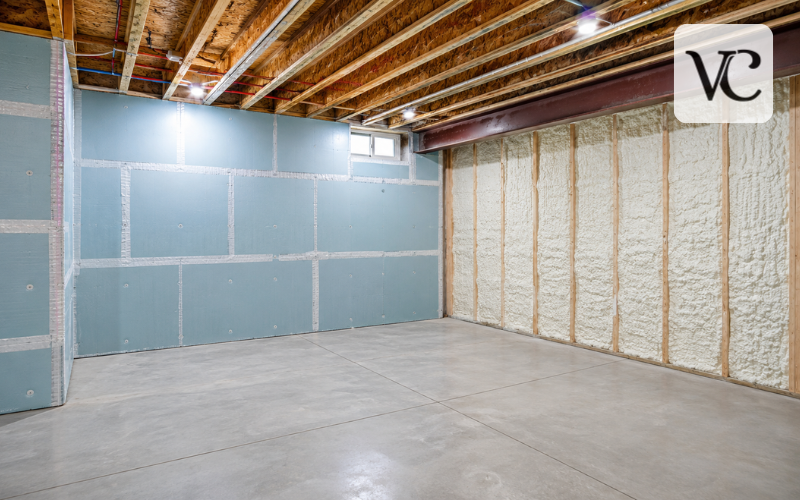
Rigid EPS or XPS foam suits many smooth concrete walls. It separates framing from concrete, warms the interior surface, and can become a continuous air-control layer when seams and edges are sealed. EPS is generally more vapor-open than XPS at a similar thickness, but exact ratings vary by product and thickness.
Closed-cell spray foam is useful on uneven stone, block, or concrete walls where boards may leave gaps. It combines insulation and air sealing, but its vapor resistance depends on installed thickness and product testing. Application quality is especially important.
A dimpled membrane is useful where seepage must be directed to an interior perimeter drain or sump. It creates a drainage space but does not provide meaningful insulation by itself. Some projects combine a drainage membrane with foam insulation.
Choose by considering leakage history, wall shape, climate, required insulation value, planned framing and finish, fire protection, and local code. Do not rely only on words such as “waterproof” or “premium.” Check the tested perm rating, approved use, required thickness, and compatibility with adhesives, tapes, sealants, concrete, drywall, and insulation.
Rigid Foam Board Against Concrete Walls
Rigid foam should normally be installed continuously against clean concrete rather than left loose behind framing. Full contact reduces hidden air channels where warm basement air could reach cold concrete and condense. DOE guidance states that foam panels should adhere to the foundation without air gaps and that edges and seams should be tightly sealed.
Both EPS and XPS can be used. Thickness should be chosen according to climate, required insulation value, condensation control, product permeability, and local energy code. One inch or more may provide a useful separation layer in some approved systems, while many finished basement designs use about two inches for stronger thermal control. Two inches is not a universal rule.
Fit boards closely and stagger joints where practical. Use tape approved by the foam manufacturer. Seal the top, bottom, corners, seams, and service penetrations with compatible sealant or spray foam. Framing can then be installed on the room side.
If cavity insulation is added, avoid covering it with interior polyethylene unless a code-approved design specifically requires it. Exposed foam usually needs an approved thermal barrier, commonly 1/2-inch gypsum board, unless a tested exception applies.
Closed-Cell Spray Foam for Basement Walls
Closed-cell spray polyurethane foam can be applied directly to concrete or masonry. As it expands and cures, it follows irregular surfaces and can create a continuous layer with fewer joints than foam boards. This makes it useful for uneven stone walls, block walls, rim joists, and areas with pipes or other obstructions.
It slows heat flow, limits air movement, and resists vapor according to the installed thickness and tested product data. DOE research describes closed-cell spray foam as a strong interior moisture-control option, while noting that its vapor class changes with thickness.
Results depend on good installation. Thin spots, missed areas, poor adhesion, or incorrect mixing can weaken the system. The surface must be suitable for spraying, and active water entry must be controlled first. Foam also hides the foundation, which can make future crack inspection and repair more difficult.
Closed-cell spray foam usually costs more than rigid board and is commonly installed by trained professionals. It must also meet fire-safety rules. In many finished spaces, foam plastic requires an approved thermal barrier such as 1/2-inch drywall unless a tested assembly or code exception allows another method.
Dimpled Membranes and Interior Drainage Systems
A dimpled membrane is a tough plastic sheet with raised bumps. With the dimples facing the foundation, the sheet creates a narrow drainage space. Seepage can move downward instead of reaching framing, insulation, or drywall.
At the bottom, the water must enter a properly designed drainage channel, interior footing drain, or sump system. The membrane is therefore one part of a larger water-management system. Building America case studies show dimple drainage mats combined with interior footing drains and foam insulation where existing foundations had moisture risks.
This method can help when exterior excavation is not practical or when minor seepage cannot be fully stopped outside. However, it does not repair structural cracks, correct poor grading, or remove water pressure around the foundation. The drain and sump must remain serviceable and able to discharge safely.
Treat the membrane as controlled drainage, not evidence that the concrete wall is dry. The system should also be sealed and detailed so it does not freely draw humid air or soil gases into the living space.
Vapor-Retarder Classes and Perm Ratings
A perm rating shows how easily water vapor passes through a material. Lower numbers mean stronger resistance. Building codes commonly divide vapor retarders into three classes.
| Vapor-retarder class | Perm rating | Common examples | Basement consideration |
| Class I | 0.1 perm or less | Polyethylene, foil, some membranes | Very little drying ability |
| Class II | More than 0.1 and up to 1.0 perm | Some foam boards and coatings | Moderate vapor control |
| Class III | More than 1.0 and up to 10 perms | Latex paint and some finishes | Greater drying ability |
These examples are general. Foam can move from one class to another as thickness increases, and a facing may greatly change its rating. Paint ratings also differ by formula and application thickness.
The lowest perm rating is not always the safest choice. Below-grade walls often need enough resistance to control vapor while keeping a reasonable inward drying path. Check the technical data for the exact product and judge the concrete, exterior waterproofing, insulation, framing, and interior finish as one assembly.
Coordinating Wall and Floor Moisture Control
Basement walls and floors face related moisture sources, but they need separate checks. A wall may remain dry while vapor moves through an older slab with no barrier beneath it. A slab can also become cold enough for indoor humidity to condense on its surface.
In new construction, a vapor barrier and capillary break are normally installed beneath the concrete. DOE guidance describes a gravel drainage layer with sealed polyethylene or rigid foam above it, joined carefully at walls and penetrations.
In an existing basement, the underside of the slab cannot be reached. Before installing vinyl, laminate, carpet, a floating floor, or a wood subfloor, test the concrete using the flooring manufacturer’s required method. Select a system approved for below-grade use and the measured moisture level. The EPA notes that liquid water, vapor, and condensation can create mold risks beneath basement carpet.
Coordinate the floor underlayment, wall foam, drainage membrane, and slab edge. Open joints around walls, posts, pipes, and cracks can let moisture or air bypass the main barrier. At the same time, flooring or foam must not block a drainage path intended to carry water to a sump.
Basement Wall Vapor Barrier Installation
A successful basement wall vapor barrier installation begins with preparation. Remove loose paint, dirt, damaged finishes, and materials that cannot be dried or cleaned. Repair known leaks and allow the wall and surrounding materials to dry. The EPA stresses that the water source must be corrected or mold is likely to return.
Mark pipes, shutoffs, electrical panels, drains, and areas that may need future access. Install the selected foam or membrane continuously and in the direction required by the manufacturer. Avoid open gaps, torn sheets, crushed insulation, and air channels behind boards.
Use the recommended tape, adhesive, sealant, or canned foam. Cheap cloth duct tape may release from dusty concrete or foam. Seal board joints, corners, wall-to-floor edges, the rim-joist transition, and every service penetration. A continuous air seal matters because leaking air can carry moisture to cold surfaces.
Keep untreated wood away from damp concrete. Plan electrical work so unnecessary holes are not cut through the control layer. Add any required fire-protective covering, coordinate the wall with the floor and drainage system, and follow local permit and inspection rules. Where the wall design requires it, leave drywall slightly above the slab to reduce contact with minor floor moisture.
Pros and Cons of a Vapor Barrier in a Basement
A correctly designed vapor-control system can make a basement easier to heat, cool, and keep comfortable. Continuous foam warms the interior wall surface, reduces condensation risk, separates framing from concrete, and improves insulation. Sealed joints can also reduce drafts and musty air movement.
Problems appear when materials are placed incorrectly. Very low-permeance plastic may hide leaks and prevent drying. Spray foam can be costly and may make later inspection difficult. Rigid foam requires careful cutting and sealing. Dimpled membranes need a working drain and sump. Every option can fail if active water is ignored.
Searches for “basement vapor barrier Reddit” often lead to conflicting advice because one homeowner’s climate, foundation, and wall design may be completely different from another’s. Personal experiences can reveal useful warning signs, but they should be checked against building-science guidance and local code.
When comparing vapor-barrier products at Home Depot or another retailer, look beyond the title. Check the perm rating, approved substrate, below-grade use, required thickness, compatible tape and sealant, fire-protection requirements, and manufacturer instructions. The best product is the one that fits a complete moisture-control plan, not simply the thickest sheet or lowest perm number.
Building a Basement Wall That Can Stay Dry
A basement wall vapor barrier cannot replace good water management. Start with gutters, downspouts, grading, cracks, window wells, drains, and sump performance. Correct standing water and active seepage before insulation or drywall hides the evidence.
Next, choose one compatible assembly. Many finished basements use continuous EPS or XPS foam or closed-cell spray foam directly against concrete, sealed as an air-control layer, with framing and a suitable finish on the room side. Where seepage must be managed indoors, a dimpled membrane may connect the wall to a perimeter drainage system.
The wall also needs an appropriate drying path. A lower perm rating is not automatically better, and two vapor barriers can trap moisture between them. Match the system to the climate, foundation condition, insulation level, indoor humidity, flooring, drainage, and local building rules.
When these parts work together, the basement is more likely to stay dry, comfortable, and durable. Base the final decision on how moisture and air move through the specific basement, not on a one-size-fits-all product label.
Conclusion
A basement wall vapor barrier can protect a finished basement, but only when it is part of a complete moisture-control system. Repair active leaks first, then select insulation and vapor-control materials that work together without blocking all drying paths.
For many homes, sealed rigid foam or closed-cell spray foam provides safer moisture control than plastic sheeting placed over fiberglass insulation. Basements with seepage may also require a dimpled membrane connected to a drain or sump.
Before starting, consider the climate, wall condition, insulation type, indoor humidity, flooring, and local building code. A properly planned wall assembly can reduce condensation, protect building materials, and help the basement remain comfortable and durable.
Frequently Asked Questions
Should I install a vapor barrier on my basement walls?
It depends on the wall condition, climate, insulation, and finishing plan. Many finished basements benefit from sealed rigid foam rather than polyethylene installed behind drywall.
Can I put plastic sheeting over basement wall insulation?
Plastic over fiberglass insulation can trap moisture between the concrete and interior finish. A continuous foam system that controls air and vapor movement is often a safer option.
What is the best moisture barrier for interior basement walls?
Rigid EPS or XPS foam works well for many smooth concrete walls. Closed-cell spray foam may be better for uneven surfaces, while dimpled membranes manage minor seepage.
Does a basement vapor barrier stop active water leaks?
No. A vapor barrier slows water vapor but cannot repair foundation cracks, standing water, or flowing seepage. Active leaks require drainage, waterproofing, or foundation repairs first.
Do I need a moisture barrier under basement flooring?
A floor moisture barrier may be required beneath laminate, vinyl, carpet, or floating subfloors. Test the slab and follow the flooring manufacturer’s instructions for below-grade installation.
Disclaimer: This article provides general educational information about basement wall vapor barriers and moisture control. Every basement has different soil conditions, drainage, construction methods, insulation needs, and local building requirements. Do not cover active leaks, structural cracks, mold growth, bowing walls, or repeated flooding without first identifying and repairing the source. Products must be installed according to their manufacturer’s instructions, including approved adhesives, tapes, thicknesses, and fire-protective coverings.
Enjoyed this article? Discover more helpful ideas and fresh inspiration on Vogue Cultures.