
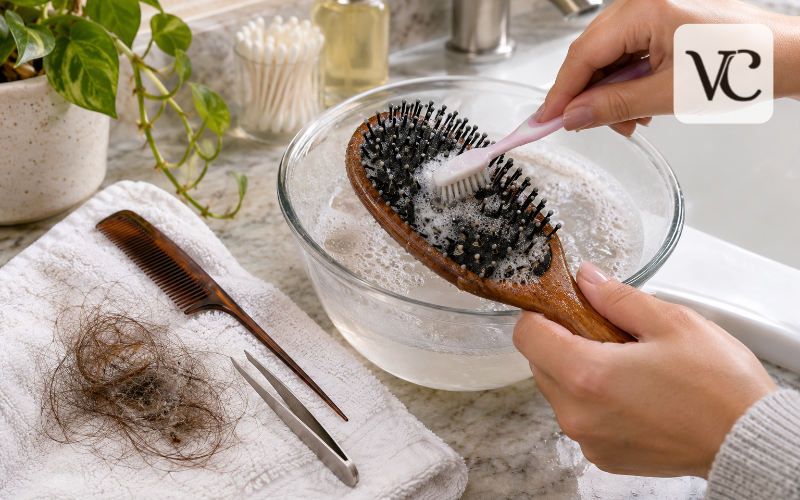
Your hairbrush is something you probably use every day, but how often do you actually clean it? Over time, loose hair, scalp oils, dust, dead skin cells, and styling products collect between the bristles. This buildup can make your brush look dirty and leave unwanted residue on freshly washed hair.
Learning how to clean a hairbrush is a simple way to keep your hair care routine fresh and hygienic. You do not need expensive products or special equipment. A little warm water, mild soap, and a few everyday household tools are usually enough.
However, not every hairbrush should be cleaned in the same way. Plastic brushes can generally handle more water, while wooden handles, natural bristles, and cushioned bases require gentler treatment.
This guide explains how to remove stubborn hair, lint, and product buildup without damaging your brush. You will also learn how to dry it correctly and keep it cleaner between washes.
Snippet-Ready:
Cleaning a hairbrush involves removing trapped hair, washing away oils and product buildup, and drying it properly. Voguecultures.co.uk provides informational guidance only on how to clean a hairbrush safely at home.
Quick Guide: How to Clean Different Hairbrush Types
| Hairbrush Type | Recommended Cleaning Method | Important Precaution |
| Plastic Hairbrush | Wash with warm water and mild shampoo. | Avoid very hot water. |
| Wooden Hairbrush | Gently clean with a damp cloth and mild soap. | Never soak wooden parts. |
| Paddle Hairbrush | Remove hair and gently clean between bristles. | Avoid soaking the cushion. |
| Round Hairbrush | Remove tangled hair and scrub between bristles. | Check the barrel material before rinsing. |
| Boar-Bristle Hairbrush | Use a suitable soft cleaning brush and approved cleaner. | Avoid harsh scrubbing and soaking. |
| Synthetic-Bristle Brush | Clean with mild soapy water. | Check for glued or padded components. |
Step-by-Step Guide to Cleaning a Hairbrush
- Remove trapped hair: Pull out loose strands using your fingers, a comb, or tweezers.
- Prepare a cleaning solution: Mix a few drops of mild shampoo with warm water.
- Clean the bristles: Gently scrub between them using a small cleaning brush or soft cloth.
- Remove stubborn lint: Carefully loosen grey lint and product buildup with tweezers or a suitable cleaning tool.
- Rinse carefully: Rinse washable plastic brushes thoroughly. Use a damp cloth for wooden or cushioned brushes.
- Air-dry completely: Allow the brush to dry in a well-ventilated area before using it again.
What You Need Before Cleaning Your Hairbrush
Cleaning a hairbrush becomes much easier when you have the right supplies ready. Most of the things you need are probably already in your bathroom or kitchen.
Start with a bowl of warm water, a little mild shampoo or gentle liquid soap, a fine-tooth comb, and a clean, soft cloth. A small cleaning brush or an old, clean toothbrush can help you reach the spaces between the bristles.
You may also need tweezers for stubborn lint and small scissors for hair tightly wrapped around round brushes.
Choose a cleaning product that removes oils and residue without being unnecessarily harsh. Mild soap works well for many plastic brushes. However, some specialist brushes require particular cleaners, so always check the manufacturer’s instructions first.
Before adding water, examine your brush carefully. Look for wooden parts, a soft rubber cushion, natural bristles, or visible glue around the base.
These details matter because some brushes can be rinsed thoroughly, while others should only be cleaned with a lightly dampened brush or cloth.
Removing Trapped Hair and Stubborn Lint
The first step in cleaning any hairbrush is removing the hair caught between its bristles. Doing this before washing makes it easier to reach the dirt underneath.
For flat and paddle brushes, use your fingers to pull out loose strands. If the hair is tightly packed, slide the pointed end of a tail comb underneath it and gently lift it away from the base.
Work slowly so you do not bend the bristles or pull them out.
Round brushes can be more difficult because hair often wraps tightly around the barrel. Carefully slide small scissors between the rows of bristles and cut through the tangled strands. Keep the blades away from the brush surface to avoid damaging it.
Once the hair is loosened, remove it with your fingers or tweezers.
You might also notice small grey balls of lint stuck around individual bristles. This material commonly contains dust, oils, dead skin cells, and styling residue.
To remove stubborn lint, gently loosen it with tweezers or a small cleaning brush. Avoid scraping the bristle bases with sharp objects.
If some lint remains, slightly dampening the area with soapy water may help loosen it before another gentle cleaning.
How to Clean a Hairbrush at Home, Step by Step
If you are wondering how to clean a hairbrush at home, the basic process is straightforward. The important thing is adjusting the amount of water to suit your brush.
Start by removing loose hair and visible lint. Fill a small bowl with comfortably warm water and add a few drops of mild shampoo or suitable liquid soap. Stir gently until the soap mixes into the water.
For a simple, fully plastic brush without a cushion or moisture-sensitive parts, dip a small cleaning brush into the solution and scrub gently between the bristles. Pay attention to the base, where oils and product residue often collect.
Move the cleaning brush in different directions to reach narrow spaces without applying excessive pressure.
Once the dirt has loosened, rinse the plastic brush with clean, lukewarm water to remove soap residue.
If your hairbrush has a wooden handle, rubber cushion, or natural bristles, avoid completely immersing it. Instead, clean the bristles with a lightly dampened cleaning brush and carefully wipe away the soap.
Finally, shake off excess water where appropriate and allow the hairbrush to air-dry completely.
This simple method is suitable for routine cleaning, although heavily soiled brushes may need additional attention.
How to Deep Clean Hairbrushes with Heavy Buildup
Sometimes regular cleaning is not enough, especially when you frequently use hairspray, dry shampoo, styling creams, or hair oils.
These products can collect near the bristle bases and gradually form a sticky layer. Dust and loose hair then become trapped in the residue, making the brush harder to clean.
To deep clean hairbrushes, begin by removing as much hair and lint as possible. Prepare fresh warm, soapy water and gently work the solution into the dirty areas using a soft cleaning brush.
For suitable one-piece plastic brushes, a short soak of around five to ten minutes may help loosen stubborn buildup, provided the manufacturer permits soaking.
Do not soak wooden, cushioned, or glued brushes, as water may become trapped or damage their construction.
If buildup remains, repeat the gentle scrubbing process rather than applying excessive force or using harsh cleaning chemicals.
Pay particular attention to the spaces around the bristles. These areas often hold more residue than the visible surface.
A deep clean should leave the brush free from obvious dirt, sticky deposits, and soap residue. If a brush remains unpleasant-smelling or damaged despite cleaning, replacing it may be more practical.
Cleaning Plastic and Synthetic-Bristle Hairbrushes
Plastic brushes are often among the easiest types to maintain because their surfaces generally tolerate water better than natural materials.
However, the way a brush is constructed matters just as much as the material of its bristles.
For a fully plastic brush without a cushion, start by removing trapped hair. Wash the bristles using warm water and mild soap, gently scrubbing between them with a small cleaning brush.
If the manufacturer allows immersion, you can briefly soak the brush to loosen oily residue.
After cleaning, rinse thoroughly to remove any remaining soap. Check between closely spaced bristles because residue can hide in these narrow gaps.
A brush with synthetic bristles may still have a padded base, glued parts, or a wooden handle. These features make full soaking unsuitable.
For those brushes, use a damp cleaning tool instead of placing the entire brush underwater.
Avoid boiling water, strong chemicals, and excessive heat, which may damage or change the shape of some plastic bristles.
With gentle cleaning and proper drying, most plastic brushes can stay in good condition for regular use.
How to Clean a Wooden Hairbrush or Wooden Handle
Wooden hairbrushes require extra care because prolonged contact with water can affect the wood and its protective finish.
If you want to know how to clean a wooden hairbrush, the safest general approach is to use as little moisture as possible.
First, remove loose hair using your fingers or a comb. Then dip a soft cleaning brush into a small amount of mild soapy water, unless the manufacturer recommends a different cleaner.
Gently clean the bristles and the spaces around their bases without soaking the wooden body.
For a hairbrush with a wooden handle but synthetic bristles, concentrate the cleaning solution on the bristles while keeping the handle as dry as possible.
Use a slightly damp cloth to remove leftover soap. Immediately wipe moisture from exposed wooden surfaces.
Never leave a wooden brush soaking in a sink or bowl. Water can cause some wood to swell, crack, or lose its finish. It may also weaken certain glued connections.
After cleaning, leave the brush in a well-ventilated place until completely dry.
Regular gentle cleaning is better than allowing heavy buildup to develop and then attempting an aggressive wash.
Cleaning Paddle, Cushioned, and Round Hairbrushes
Paddle and round brushes are popular for everyday styling, but their shapes can make cleaning more challenging.
A paddle brush usually has widely spaced bristles set into a soft cushion. Although the cushion makes brushing comfortable, water may enter through gaps around the bristles or an air hole.
To clean a cushioned paddle brush, lift away trapped hair and use a lightly dampened cleaning brush to remove dirt from the base.
Avoid soaking the cushion or directing a strong stream of water into it.
Wipe the surface carefully to remove soap, then position the brush so moisture can drain and evaporate.
Round brushes need a slightly different approach. Because hair wraps around the barrel, remove tangled strands before attempting to wash it.
If necessary, carefully cut the trapped hair between rows of bristles and pull it away.
Use a small cleaning brush to scrub around the barrel and between the bristles. Whether you can rinse the barrel directly depends on its materials and construction.
For both styles, proper drying is essential. Water left inside a cushion or enclosed section may contribute to unpleasant smells or damage over time.
Caring for Natural Boar-Bristle Hairbrushes
Natural boar-bristle brushes need careful handling because their bristles and construction may be more sensitive than those of ordinary plastic brushes.
These brushes can collect hair oils, dust, and styling residue just like other types. However, soaking them in water is generally not recommended.
Start by gently removing loose hair with a comb or a cleaning tool suitable for natural bristles.
Next, check the manufacturer’s washing instructions. Some specialist brushes require a particular cleaning product or recommend using only mild soap foam applied through a separate cleaning brush.
Where permitted, lightly clean the bristles with the recommended solution, keeping unnecessary moisture away from the base and handle.
Do not aggressively scrub, pull, or bend the bristles. Natural bristles may become damaged if handled roughly.
Remove the cleaning solution using the manufacturer’s recommended method and allow the brush to dry naturally.
Avoid placing it near a radiator or using a hot hairdryer to speed up the process.
A gentle routine helps preserve the brush’s shape and condition while removing unwanted residue.
How to Clean a Hairbrush with Baking Soda
Baking soda is sometimes suggested as a household cleaning ingredient because it can help loosen certain types of grime.
However, it is not necessary for most hairbrushes. Mild soap and warm water are usually a better starting point.
If you want to try cleaning a hairbrush with baking soda, limit its use to suitable, washable plastic brushes. Check the manufacturer’s instructions first.
Mix a small amount of baking soda with water to make a thin solution rather than a thick, gritty paste.
Apply a little to a small, inconspicuous area and gently work it over stubborn residue with a soft cloth or cleaning brush.
Avoid vigorous rubbing because baking soda particles can scratch some surfaces or leave residue between closely spaced bristles.
Rinse thoroughly afterward, making sure no powder remains.
Do not use this method on wooden brushes, natural boar bristles, delicate finishes, or moisture-sensitive cushions unless their manufacturer specifically approves it.
Baking soda is not a guaranteed disinfectant, and it should not replace proper cleaning.
If ordinary soapy water removes the buildup successfully, there is little reason to add another ingredient.
Cleaning Hairbrushes with Vinegar and Baking Soda
You may have seen online suggestions about cleaning hairbrushes with vinegar and baking soda together.
Although both ingredients have household cleaning uses, mixing them does not automatically create a stronger hairbrush cleaner.
Vinegar is acidic, while baking soda is alkaline. When combined, they react and gradually neutralise each other. The bubbling looks impressive, but it does not necessarily mean stubborn dirt is being removed more effectively.
For ordinary hairbrush cleaning, this combination offers little practical advantage over mild soap and warm water.
Vinegar may also be unsuitable for certain brush finishes, natural materials, and glued components.
Similarly, baking soda can leave gritty deposits that are difficult to remove from tightly packed bristles.
If you have a wooden or natural-bristle brush, avoid experimenting with these ingredients without clear manufacturer guidance.
For plastic brushes, a suitable mild cleaning solution is generally easier to control and rinse away.
Remember that vinegar and baking soda should not be treated as reliable methods of disinfecting a hairbrush.
The best approach is usually the simplest one: remove trapped hair, wash away buildup with an appropriate cleaner, rinse where suitable, and dry thoroughly.
How to Clean a Hairbrush Without a Toothbrush
An old toothbrush is useful for cleaning hairbrushes, but it is not essential.
If you do not have one available, several everyday tools can help remove dirt and reach narrow spaces.
A fine-tooth comb is helpful for lifting loose hair from flat brushes. Slide it carefully beneath the tangled strands and pull upwards without forcing it against the bristles.
For stubborn lint, tweezers can remove small pieces of debris trapped near the base.
A clean cotton swab is another option for reaching narrow gaps. Slightly dampen it with a suitable cleaning solution and work gently around individual bristles.
Soft cloths can help wipe larger surfaces, including handles and solid plastic brush bases.
You can also use a dedicated hairbrush cleaning tool with fine teeth or soft bristles.
Whatever tool you choose, avoid sharp metal edges or anything that could scratch the surface, pull out bristles, or damage a soft cushion.
The aim is to loosen dirt gently, not scrape it away with force.
With patience and a suitable cleaning solution, you can clean most brushes effectively without using a toothbrush.
Drying Your Hairbrush and Keeping It Clean Longer
Cleaning is only part of maintaining a hairbrush. Allowing it to dry properly is equally important.
After washing, gently shake off excess water if the brush’s construction allows it. Use a clean cloth to wipe moisture from handles and other solid surfaces.
For cushioned brushes, placing the brush with the bristles facing downward can help prevent water from collecting inside the base. Position it so that air can circulate rather than pressing wet bristles firmly into a towel.
However, drying recommendations vary between manufacturers. Some one-piece plastic detangling brushes can be left with their bristles facing upward. Always follow the instructions for your particular brush.
Leave the brush in a well-ventilated area until it is completely dry. This may take several hours or longer, depending on its construction and the amount of moisture used.
Avoid using hot hairdryers, radiators, or direct intense heat to speed up drying.
Heat can damage synthetic bristles, protective finishes, cushions, and certain adhesives.
How often should you clean your hairbrush?
A useful habit is removing loose hair after each use or every few days.
For regular washing, checking your brush weekly is a good starting point. Some brushes may only need a thorough wash every few weeks, while brushes exposed to frequent hairspray, dry shampoo, or styling creams may need cleaning more often.
Visible buildup is a better guide than following a strict calendar.
You should also inspect your brush for damage. Missing bristles, cracked handles, loose cushions, rough edges, or persistent unpleasant smells can indicate that replacement is necessary.
Store clean, dry brushes away from damp surfaces and avoid sharing personal hairbrushes unnecessarily.
A few simple habits can help reduce buildup and make future cleaning much easier.
Conclusion
Knowing how to clean a hairbrush makes it easier to maintain a simple, hygienic hair care routine. Removing trapped hair, loosening stubborn lint, and washing away oils and styling products can help keep your brush clean and comfortable to use.
The most important step is choosing a cleaning method that suits your brush. Fully plastic brushes may tolerate more water, while wooden, cushioned, and natural-bristle brushes generally need gentler care.
Avoid harsh cleaning products, unnecessary soaking, and excessive heat. Always allow your hairbrush to dry completely before using it again.
With regular attention and a few basic household tools, you can prevent heavy buildup, protect your hairbrush from avoidable damage, and keep it ready for everyday styling.
Frequently Asked Questions
How often should you clean your hairbrush?
Remove loose hair after every use or every few days. Wash your hairbrush every few weeks, or more frequently if you regularly use dry shampoo, hairspray, oils, or other styling products.
What is the easiest way to remove grey lint from a hairbrush?
Use tweezers or a fine-tooth comb to loosen grey lint around the bristles. For stubborn buildup, gently clean the affected areas with mild soapy water and a soft cleaning brush.
Can you clean a hairbrush with baking soda?
Baking soda may help remove stubborn residue from suitable plastic brushes, but it is not essential. Use a small amount, avoid abrasive scrubbing, rinse thoroughly, and never apply it to delicate materials without checking care instructions.
Is it safe to soak a hairbrush in water?
Some fully plastic brushes can tolerate brief soaking. However, wooden, cushioned, and natural-bristle brushes should generally not be submerged because trapped moisture can damage the materials, weaken adhesives, or affect the brush’s condition.
How can you clean a hairbrush without damaging the bristles?
Remove tangled hair gently, use mild soap, and avoid excessive scrubbing. Choose the cleaning method according to the brush material, follow manufacturer instructions, and let the brush air-dry completely before using it.
Disclaimer: This article on “How to Clean a Hairbrush” is published by voguecultures.co.uk for general informational and educational purposes only. The cleaning methods described are intended as general guidance and may not be suitable for every hairbrush material, design, or manufacturer. Readers should always check the manufacturer’s care instructions before using water, soap, baking soda, vinegar, or other cleaning products. Vogue Cultures is not responsible for damage resulting from improper cleaning methods. This article is independent editorial content and does not involve guest posting, paid promotion, sponsorship, or advertising.
Enjoyed this article? Discover more helpful ideas and fresh inspiration on Vogue Cultures.