A whiteboard makes it easy to share ideas, explain lessons, and keep daily plans in sight. Faint outlines of old writing may remain, dark marks may resist the eraser, and some areas may feel harder to wipe clean. These problems are often caused by leftover ink, dirty erasers, or cleaning products that leave a film behind.
Learning how to clean a whiteboard is mostly about using gentle methods in the right order. Start by removing dry marker dust, then use a soft cloth and a cleaner that suits the board’s surface. Wipe away any leftover solution and let the board dry before writing again. The right method can make everyday stains much easier to manage without harming the finish.
Not every whiteboard is made the same way, though. A glass board, a painted board, and an older melamine board may need different care. This guide explains how to handle routine cleaning, old writing, permanent marker accidents, and the marks that seem to keep coming back.
Snippet-Ready:
Cleaning a whiteboard involves removing marker ink, stains, and ghost marks using a soft cloth and suitable cleaning solution. voguecultures.co.uk provides informational guidance only about how to clean a whiteboard safely and effectively.
Whiteboard Cleaning Quick Guide Table
| Cleaning Problem | Recommended Method | Important Tip |
| Fresh marker ink | Dry eraser or microfiber cloth | Erase gently |
| Light stains | Slightly damp microfiber cloth | Dry completely |
| Old marker stains | Approved whiteboard cleaner | Avoid hard scrubbing |
| Ghost marks | Surface-compatible cleaner | Check for coating damage |
| Permanent marker | Fresh dry-erase marker technique | Test a small area first |
| Dirty whiteboard eraser | Remove dust or wash if permitted | Dry before reuse |
| Streaks after cleaning | Clean cloth and water, if permitted | Remove cleaner residue |
How to Clean a Whiteboard: Simple Steps
- Remove old writing: Use a clean whiteboard eraser to wipe away dry marker ink.
- Prepare your cloth: Lightly dampen a soft microfiber cloth with water or an approved whiteboard cleaner.
- Clean the surface: Wipe gently in overlapping strokes without applying excessive pressure.
- Treat stubborn marks: Use a cleaner recommended for your whiteboard material.
- Remove leftover residue: Wipe with a clean, slightly damp cloth if permitted by the cleaning instructions.
- Dry completely: Use a dry microfiber cloth before writing on the board again.
What You Need Before Cleaning a Whiteboard
You do not need a cupboard full of products to clean a whiteboard. A clean microfiber cloth, a dry-erase eraser, a little water, and an appropriate whiteboard cleaner are enough for most situations. Keeping a second dry cloth nearby is useful because drying the surface is just as important as wiping it.
Choose a soft cloth that does not shed lint or feel rough against the board. If you have a spray cleaner, check that its label names the type of writing surface you own.
Before cleaning, look for the maker’s instructions on the frame, packaging, or product information. This matters particularly for whiteboard-painted walls, speciality coatings, and older inexpensive boards. Some surfaces tolerate alcohol-based solutions, while others can lose performance with repeated use. If you cannot identify the finish, begin with the mildest option and test any approved product in a small, less noticeable area.
How to Clean a Whiteboard Step by Step
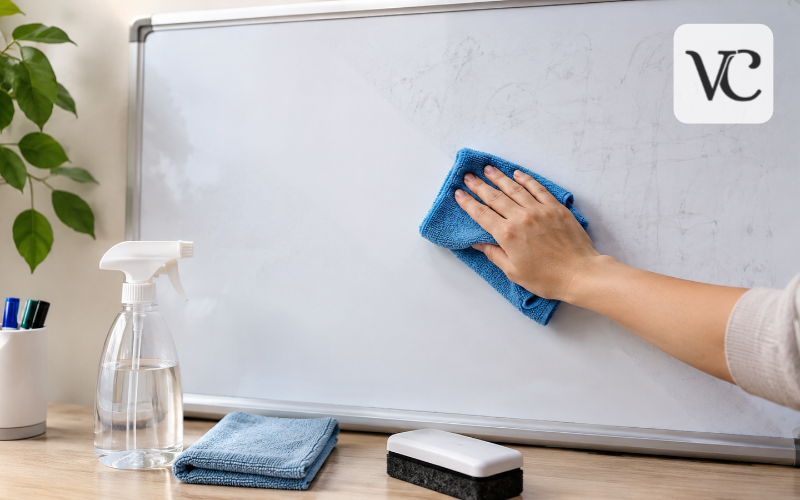
For regular upkeep, the best approach is simple: erase, clean, and dry. First, allow fresh dry-erase writing to dry, then wipe the whole board with a clean eraser or dry microfiber cloth. This removes loose ink dust that might otherwise mix with the cleaner and create streaks.
Next, lightly dampen a cloth with water or a cleaning product approved for your particular board. Wipe a small section using gentle, overlapping strokes. If the board is large, clean it in sections so liquid does not sit on the surface or run towards the frame.
Use another cloth, barely dampened with clean water if the product instructions call for rinsing, to lift away any remaining cleaner. Finish with a dry, lint-free cloth until the surface feels completely dry. This final step helps prevent a cleaner film from mixing with marker ink the next time you write.
Avoid pouring liquid onto the board or soaking the edges. Too much moisture can collect around the frame, and a wet surface can make fresh writing smear. If marks remain after one pass, repeat gently with a suitable cleaner rather than reaching straight for a stronger household chemical.
How to Clean a Whiteboard Without Alcohol or Commercial Cleaner
If you are wondering how to clean a whiteboard without alcohol, plain water is a sensible place to start. Erase the writing first, then gently wipe the board with a microfiber cloth dampened with clean water. The cloth should be moist, not dripping. Follow with a separate dry cloth to remove moisture and any loosened ink residue.
For heavy stains, water alone may not be enough, but that does not mean you should immediately use a strong cleaner. Check what the manufacturer permits before trying anything else.
Some boards can be cleaned with a tiny amount of mild dish soap diluted in water. Only use this if the board’s care instructions allow it, and wipe the surface again with a clean damp cloth so no soap remains. Soap film can make erasing harder later. When the finish is unknown, water and gentle wiping are safer starting points than experimenting with homemade mixtures.
Choosing the Right Whiteboard Cleaner for Different Surfaces
The best whiteboard cleaner depends on the material beneath the marker ink. Melamine boards, often found in inexpensive home or office setups, may stain more easily as they age. Gentle cleaning and prompt removal of writing are especially important because a worn surface can hold onto ink even after it has been wiped.
Painted steel boards have a coated writing surface, sometimes with a magnetic backing. Use the cleaner recommended for that coating rather than assuming any product safe for metal will work. Porcelain or ceramic-steel boards are generally more durable and often tolerate regular cleaning well, but their own care instructions still come first.
A cleaner specifically approved for glass writing boards and a lint-free cloth can help. Ordinary glass cleaner is not automatically suitable for every glass board, especially if it has a special finish or printed backing.
Whiteboard paint applied to a wall needs extra care. Some manufacturers warn that frequent alcohol cleaning can reduce the coating’s performance. Although certain porcelain or ceramic-steel board makers allow diluted isopropyl alcohol, high-strength rubbing alcohol should never be treated as the universal best method. Use it only when your board’s instructions specifically permit it, with suitable ventilation and away from flames.
How to Clean a Whiteboard With Old Marker on It
Old writing can be more stubborn than marks from the same day. As dry-erase ink sits on the surface, residue can become harder to lift, particularly if the board is already scratched or worn. A dusty eraser may move some of the colour around without removing the faint outline beneath it.
Start by wiping away loose dust with a clean, dry cloth. Then use a slightly damp microfiber cloth or an approved whiteboard cleaner and let the product work for the time stated on its label. Gently wipe the area, turning the cloth to a clean section as ink comes away. Repeat if needed instead of trying to scrub everything off at once.
Some old marks may respond to being covered briefly with a fresh dry-erase marker and erased, but try that only on a surface intended for normal dry-erase writing. If repeated gentle cleaning makes little difference, stop and assess the board’s condition. Aggressive rubbing can damage a finish that is already failing.
How to Clean a Whiteboard That Is Stained or Ghosting
Ghosting is the faint shadow of writing that remains after the visible ink has been erased. It often appears as pale letters, lines, or a grey haze. Sometimes the cause is simply leftover ink or a thin film from a cleaning product. In other cases, marker pigment has settled into a worn surface and is much harder to remove.
To clean a whiteboard that is stained, begin with the ordinary erase-clean-dry method. Use a compatible whiteboard cleaner on the affected area, then remove residue according to the cleaner’s directions. Look at the board from an angle once it is dry. If the shadow has faded, a second gentle cleaning may help.
Notice what happens when you write over the area again. If fresh ink consistently sticks, spreads, or leaves the same outline even after careful cleaning, the coating may be damaged. Scratches, dull patches, and rough spots are further warning signs. Cleaning can remove surface deposits, but it cannot rebuild a missing protective layer. A badly worn board may need replacement or a manufacturer-approved resurfacing solution.
Removing Permanent Marker From a Whiteboard
Accidentally using a permanent marker does not always mean the whiteboard is ruined. On many standard dry-erase surfaces, a fresh dry-erase marker can help loosen permanent ink. This works because the newer marker contains solvents that may soften the older marks, making them easier to lift.
Choose a fresh dry-erase marker and trace directly over a small section of the permanent writing. Follow the board maker’s suggested waiting time, if available, then wipe with a clean eraser or microfiber cloth. You may need to repeat it once, but do not press harder each time.
If the mark remains, look for a permanent-ink remover approved for your board’s finish. Do not assume nail polish remover, paint thinner, or concentrated alcohol is safe. These products can damage some coatings. For painted or speciality surfaces, the manufacturer’s permanent-marker instructions are especially important.
How to Clean a Whiteboard With Vinegar: Is It Safe?
Vinegar is often suggested as a cheap cleaning trick, but it is not the best default choice for every whiteboard. Diluted white vinegar may remove certain types of residue on some compatible surfaces, and some cleaners made specifically for glass writing boards contain vinegar-based ingredients. That does not mean a homemade vinegar mixture is safe for all finishes.
Whiteboard coatings differ, and repeated exposure to unsuitable liquids can affect how easily marker ink erases. If you want to try it, first check that your board manufacturer permits vinegar cleaning and follow the recommended dilution and use instructions.
For a board with unknown care requirements, begin with clean water or a labelled whiteboard cleaner instead. Avoid mixing vinegar with other cleaning chemicals. A simple, approved method is more useful than an experiment that may leave the writing surface worse than before.
Whiteboard Cleaning Hacks That Help and Those to Avoid
Online whiteboard cleaning hacks can sound convincing because they promise to remove ink in seconds. For example, isopropyl rubbing alcohol can lift stubborn marker residue on boards whose manufacturers approve it. Other makers specifically warn against repeated alcohol use, especially on whiteboard paint and certain coated surfaces.
Hand sanitiser is a less predictable substitute. It may contain alcohol, but gels, moisturisers, fragrances, and other ingredients can leave a film that makes the board feel sticky or difficult to erase. If a suitable whiteboard cleaner is available, it is a better choice than guessing how a sanitiser will behave.
Toothpaste is another popular suggestion. Even ordinary white toothpaste may contain fine polishing particles, which can scratch delicate finishes. Scouring pads and cleaning powders create a similar risk. Furniture polish, wax, and oily products may make a board appear shiny for a moment but can leave residue that interferes with future writing.
Household glass cleaners also need caution. Some contain ammonia or other ingredients that particular board makers advise against. The most useful cleaning habit is not a dramatic hack: use a clean cloth, the right solution, light pressure, and a proper final wipe. That method is easier to repeat and far less likely to create a new problem.
How to Clean a Whiteboard Eraser Properly
A whiteboard eraser collects dry marker particles every time it passes over the surface. Eventually, the felt or microfiber pad becomes loaded with dust. Instead of lifting ink away, it starts dragging that dust across the board, creating grey smudges and making the writing look harder to remove.
For routine care, take the eraser away from the board and gently remove loose dust. A soft brush can help with some felt surfaces. Avoid shaking marker dust into the air or scattering it across nearby desks. If the eraser has removable microfiber material, check whether it can be washed. Follow its washing instructions and allow it to dry completely before reuse.
Not every felt eraser is washable. Soaking one that is not designed for water may loosen its layers or leave trapped moisture. If the pad stays dirty, feels rough, or still smears ink after cleaning, replace it. Keeping one clean microfiber cloth for occasional board cleaning also reduces the amount of residue your eraser has to handle.
Common Mistakes That Can Damage a Whiteboard
One of the biggest mistakes is treating a whiteboard like a kitchen counter. Strong household chemicals and rough cleaning tools may remove a mark but also harm the smooth finish that allows dry-erase ink to wipe away. Once the surface is scratched or dulled, the board may hold ink more easily than before.
Using too much liquid is another avoidable problem. Spraying heavily near the frame can let moisture collect around seams and edges. A lightly damp cloth gives you more control, especially on mounted boards and whiteboard-painted walls. Harsh rubbing is rarely the answer to a stubborn stain; it is better to try an approved cleaner twice than scrape at the surface.
Do not overlook the cloth itself. A dirty microfiber towel can spread old ink, while a cloth used with polish or soap may transfer residue onto the board. Leaving cleaner behind is equally unhelpful because it can cause streaking and poor erasing. Finish by removing residue as directed and drying thoroughly. Finally, avoid writing on a surface that is still wet; fresh ink may smear and make cleaning more difficult.
Simple Habits to Keep Your Whiteboard Clean for Longer
The easiest way to prevent difficult stains is to erase writing regularly. At the end of a lesson, meeting, or planning session, clear away notes that are no longer needed. This reduces the chance that old ink will sit for weeks. You do not have to deep-clean the board every time you use it, but frequent light care can prevent bigger jobs later.
Make a habit of inspecting the eraser and using a fresh section of microfiber cloth when cleaning. For a board used daily, a more thorough clean may be helpful every few days or weekly, depending on the maker’s advice and how much writing it receives. A board used occasionally may need cleaning only when dust or residue starts to appear.
Use markers designed for the board, and make sure they are not permanent markers by mistake. Replace markers that write poorly or smear unusually, and close their caps tightly after use. Store them according to the maker’s directions. If a new cleaning product leaves streaks, stop using it and return to the board’s approved routine rather than adding more products to the surface.
Conclusion
Knowing how to clean a whiteboard helps keep notes clear and makes everyday writing and erasing less frustrating. For most routine cleaning, the important steps are straightforward: remove dry ink dust, wipe gently with a suitable solution, clear away any residue, and dry the board completely. Clean cloths and erasers make a noticeable difference.
The exact cleaner matters because whiteboard surfaces are not interchangeable. A product that works on glass or porcelain may be unsuitable for a painted wall or an older coated board. If you are dealing with old writing, ghost marks, or an accidental permanent marker, begin with the least aggressive method and follow the manufacturer’s guidance before trying stronger products.
Regular care will not repair a damaged finish, but it can help prevent avoidable stains and streaks. These small habits help keep the surface ready for your next idea.
Frequently Asked Questions
What is the best thing to clean a whiteboard with?
A soft microfiber cloth and a manufacturer-approved whiteboard cleaner are usually the best options. For light residue, a slightly damp cloth may be enough. Always check the board’s surface material before using stronger products.
How do you clean a whiteboard without rubbing alcohol?
Start by erasing loose ink with a clean eraser. Wipe the surface gently using a microfiber cloth lightly dampened with water, then dry thoroughly. Use a mild cleaning solution only if the manufacturer allows it.
How do you remove old marker stains from a whiteboard?
Remove loose marker dust first, then apply a suitable whiteboard cleaner to a soft cloth. Gently wipe the stained area and repeat if necessary. Avoid rough scrubbing because it may damage the writing surface.
Can vinegar be used to clean a whiteboard?
Diluted white vinegar may work on certain compatible surfaces, but it is not recommended for every whiteboard. Check the manufacturer’s cleaning instructions before using vinegar, especially on painted or specially coated boards.
Why does my whiteboard leave ghost marks after cleaning?
Ghost marks can appear when old marker residue remains on the surface or the protective coating becomes worn. Proper cleaning may remove leftover ink, but permanent surface damage cannot always be corrected.
Disclaimer: This article on “How to Clean a Whiteboard” is published by voguecultures.co.uk for general informational and educational purposes only. The cleaning methods discussed are intended to help readers understand safe whiteboard maintenance and stain removal. Results may vary depending on the board’s material, condition, and manufacturer’s recommendations. Readers should always follow their whiteboard manufacturer’s care instructions and test suitable cleaning products before use. voguecultures.co.uk does not guarantee specific cleaning results and is not responsible for damage caused by improper cleaning methods. This article is independent informational content and does not involve guest posting, paid promotion, sponsored content, or advertising.
Enjoyed this article? Discover more helpful ideas and fresh inspiration on Vogue Cultures.