
Makeup brushes touch your skin almost every time you get ready. But after several uses, the bristles can hold old makeup, skin oil, dust, and germs. A brush that looks fairly clean may still have product trapped deep inside it.
Learning how to clean makeup brushes is easier than it sounds. You do not need an expensive kit or a complicated routine. A suitable gentle cleanser, lukewarm water, and a clean towel are enough for most everyday brushes. The important part is washing the bristles thoroughly while protecting the place where they join the handle.
This guide explains when to wash your brushes, which cleaning methods are worth trying, and how to dry them without damaging their shape. It also covers makeup sponges, quick cleaning, and common mistakes so you can build a routine that works for the tools you actually use.
Snippet-Ready
Cleaning makeup brushes involves gently washing the bristles with mild cleanser and lukewarm water, then air-drying them to remove makeup buildup. voguecultures.co.uk provides informational guidance about how to clean makeup brushes only.
Quick Guide: Makeup Brush Cleaning Methods
| Cleaning Method | Best For | Recommended Approach |
| Gentle liquid soap | Everyday makeup brushes | Wash gently with lukewarm water and rinse thoroughly. |
| Mild baby shampoo | Suitable synthetic or natural-hair brushes | Use a small amount and avoid rough scrubbing. |
| Dedicated brush cleanser | Foundation and concealer brushes | Follow product instructions for thorough cleaning. |
| Micellar water | Light surface makeup residue | Wipe the bristles gently; deep-clean separately. |
| Quick brush-cleaning spray | Cleaning between makeup applications | Follow label directions and allow complete drying. |
| Gentle sponge cleanser | Makeup sponges and beauty blenders | Gently squeeze, rinse, and air-dry after use. |
Step-by-Step Guide: How to Clean Makeup Brushes
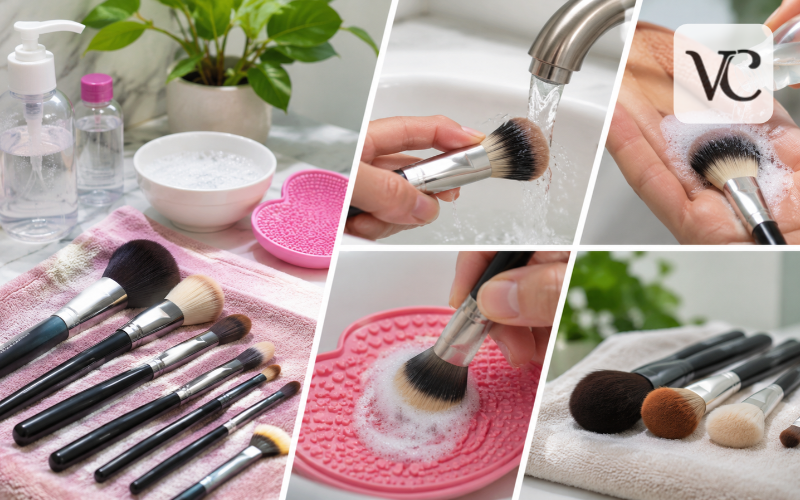
- Wet the bristles: Hold the brush downward and rinse only the bristles with lukewarm water.
- Apply cleanser: Add a small amount of gentle liquid soap or suitable brush cleanser to your palm.
- Massage gently: Swirl the bristles carefully to loosen makeup residue without damaging their shape.
- Rinse thoroughly: Remove all soap and makeup buildup while keeping water away from the ferrule and handle.
- Remove excess water: Gently squeeze the bristles with a clean towel and reshape the brush head.
- Air-dry properly: Lay the brush flat with its bristles extending slightly over the edge of a clean surface.
Why Cleaning Your Makeup Brushes Matters
A brush coated in old foundation or powder does not pick up and spread fresh makeup as evenly. Clean tools make it easier to control how much product goes onto your skin.
There is also a hygiene reason to wash them. Every time a brush touches your face, it can pick up oil, dead skin cells, and microorganisms. When makeup collects between the bristles, it becomes harder to remove that buildup with a quick wipe. Using dirty tools may contribute to irritation, breakouts, or infections, especially if you share brushes with someone else. Washing helps reduce these risks, although it cannot guarantee clear skin or completely sterilise a brush.
Regular care can benefit the brushes themselves. Removing dried products helps bristles stay flexible and prevents them from becoming stiff or clumped together. Gentle cleaning, followed by careful drying, also helps brushes keep the shape needed for smooth makeup application.
How Often Should You Clean Makeup Brushes?
As a general rule, wash your makeup brushes every 7 to 10 days. This is a useful starting point for a personal collection used regularly, but not every brush needs exactly the same schedule.
Foundation and concealer brushes deserve particular attention. Cream and liquid formulas cling to the bristles and can leave a thick film, so washing them at least weekly is sensible; daily users may prefer to clean them more often. Powder and blush brushes often collect less sticky residue, but they still need regular washing. Eyeshadow and eyeliner brushes should also be kept clean, particularly when switching colours or applying products close to your eyes.
If your skin is easily irritated or prone to breakouts, consider cleaning frequently used tools more often. Never share unwashed brushes, and avoid using a contaminated brush around an eye infection or irritated skin.
Do not rely on the calendar alone. Visible makeup buildup, an unusual smell, stiff bristles, or patchy application are signs that a brush needs attention. A brush that stays damp or develops a musty odour should not go back onto your face.
Choosing the Best Makeup Brush Cleaner
The best makeup brush cleaner is one that removes your usual products effectively without being unnecessarily harsh on the bristles. A dedicated liquid brush cleanser is convenient, especially if you use long-wearing foundation or several brushes each day.
For many brushes, a mild shampoo or gentle liquid cleanser is a practical alternative. Choose a formula that rinses away easily and does not leave a heavy coating. Fragrance-free options may be preferable if your skin reacts to scented products, although fragrance-free does not automatically mean irritation-free.
Brush material matters. Synthetic fibres are generally sturdy, while natural-hair bristles may need extra gentle handling and a cleanser recommended by the brush maker. If a brush has special care instructions, follow those first.
Avoid bleach, household disinfectants, abrasive cleaning powders, and strong degreasers that are not intended for makeup tools. Extremely hot water and harsh scrubbing can cause damage even when the cleanser itself is suitable. Paying more for a product is not essential; choosing something gentle and rinsing thoroughly is usually more important.
How to Clean Makeup Brushes at Home: Step-by-Step
First, gather your brushes, a clean towel, and a gentle cleanser near a sink. Wash your hands before starting.
Hold each brush with the bristles pointing downward and run lukewarm water over their tips. Try not to wet the metal band, called the ferrule, or the handle. Water that repeatedly gets inside this area can loosen the glue holding the bristles and may damage wooden handles. There is no need to soak the entire brush.
Next, put a small amount of cleanser into your clean palm. Gently move the damp bristles through it using small circles or light back-and-forth motions. You can use a soft silicone cleaning mat, but do not press hard or bend the bristles sharply. For dense foundation brushes, work the lather gently through the outer and inner fibres with your fingertips.
Rinse the bristles under lukewarm running water, keeping the head angled downward. Continue until the water runs clear and you cannot feel slippery cleanser left behind. If makeup remains, repeat the gentle wash rather than scrubbing harder. Take particular care near the base of the bristles, without forcing water into the ferrule.
Finally, squeeze away excess water with clean fingers or a towel. Do not twist, tug, or wring the brush. Smooth the bristles back into their original shape, then lay the brush flat to air-dry with the head extending slightly beyond the edge of a clean counter. Only use it again once it is completely dry.
Cleaning Makeup Brushes Without a Brush Cleaner
If you have run out of specialist cleanser, you can still clean makeup brushes at home with a gentle shampoo or an appropriate mild liquid soap. The aim is to loosen makeup and oils, not strip the brush fibres with the strongest product available. Check the brush manufacturer’s instructions if you own delicate or expensive brushes.
Add a small drop of cleanser to your palm, wet the bristle tips, and move them lightly through the lather. Rinse until all visible makeup and soap have gone. Repeat once if the bristles still feel coated.
Be careful with common household shortcuts. Laundry detergent, strong dishwashing liquids, and multipurpose surface cleaners are designed for different jobs and may be too harsh for brushes. Household cleaning sprays should never be used as substitutes. A basic, well-rinsed cleanser is a better choice than mixing several products in the hope of creating something stronger.
How to Clean Makeup Brushes With Micellar Water
Micellar water is made to lift makeup and oil from the skin, so it can sometimes help remove light surface residue from suitable brush bristles. It is particularly useful when you want to remove a little powder colour before switching shades. However, it is not necessarily the best option for a full wash, especially with thick or long-wearing products.
To try it, pour a small amount of plain micellar water onto a clean cotton pad or soft cloth. Gently sweep the brush tips across the damp surface until less colour transfers. Keep the handle and ferrule dry, and avoid pulling the bristles.
Some micellar waters leave ingredients behind. If the product requires rinsing, or the bristles feel coated afterward, wash the brush with a suitable mild cleanser and rinse thoroughly. Always let the brush dry before using it. Micellar water can help with a quick refresh, but it should not be treated as proof that a brush has been fully cleaned or disinfected.
Natural Ways to Clean Makeup Brushes Safely
If you prefer a simple cleaning routine with fewer products, start with lukewarm water and a mild, fragrance-free cleanser that is suitable for your brush type. Gentle handling and complete rinsing matter more than whether a cleaning method is described as natural.
Homemade solutions are popular online, but natural ingredients are not automatically safe for brush fibres or skin. Vinegar and lemon juice are acidic and may affect delicate materials or leave an irritating residue. Adding olive or coconut oil can make a brush harder to rinse clean, especially if too much oil is used. Essential oils can also cause irritation and are unnecessary for routine washing.
If you are dealing with stubborn oily makeup, use a cleanser made for removing cosmetic residue and repeat the wash gently when needed. Avoid experimenting with strong homemade mixtures on expensive brushes. A small, straightforward routine is usually the more reliable way to keep tools in good condition.
How to Clean Makeup Brushes Fast When You’re Short on Time
Sometimes you need to switch eyeshadow colours or refresh a brush without waiting for a full wash and overnight drying. For light powder residue, gently wipe the brush across a clean, dry microfiber cloth or a purpose-made colour-switching pad.
A brush-cleaning spray designed for quick use may be another option. Follow the label for how much to apply, whether it must be rinsed, and how long the brush needs to dry. Use these sprays in a ventilated space, and do not apply a damp brush near your eyes. Avoid assuming that every quick-drying spray disinfects tools; effectiveness depends on the particular product and its directions.
When a brush is heavily coated in liquid foundation or concealer, a quick wipe often leaves residue inside the bristles. Wash it properly instead and keep a spare clean brush available if you frequently need one in a hurry.
Cleaning Different Types of Makeup Brushes
Foundation brushes tend to need the most patience because creamy makeup can settle deep inside tightly packed fibres. Start with a small amount of gentle cleanser, work it carefully through the damp tips, and rinse. Repeat rather than scraping dried foundation away with your nails. The same approach works for many concealer and cream blush brushes.
Powder, bronzer, and blush brushes are often fuller and softer. Move them gently through cleanser without flattening the whole head against your palm. Rinse until no powder or lather remains, then restore their rounded shape. Small eyeshadow brushes can be cleaned in the same way, with extra care around delicate tips used for detailed work.
Synthetic brushes are usually easier to wash after cream or liquid makeup, but they can still lose their shape if treated roughly. Natural-hair brushes can be more sensitive to repeated soaking, strong cleansers, and friction. Use manufacturer-approved care products where available, and never assume that a method suitable for one brush is safe for every other one.
If the maker says to clean only the tips, follow that advice rather than submerging the brush.
How to Clean Makeup Sponges and Beauty Blenders
Makeup sponges work differently from brushes because their soft, porous material absorbs water and liquid products. Ideally, clean a reusable makeup sponge after every use instead of waiting for a weekly brush-washing session.
To clean it, wet the sponge with lukewarm water and add a small amount of gentle sponge cleanser or mild liquid soap. Press and release it repeatedly to work the cleanser through the material. Rinse under running water while squeezing gently until the water runs clear and the foam no longer feels soapy. Do not twist or tear the sponge to force out stains.
Press it into a clean towel to remove extra moisture, then leave it in an open, well-ventilated place until completely dry. A closed makeup bag is not suitable for a wet sponge. Never try to sterilise a beauty blender in a microwave.
Replace a sponge when it tears, changes texture, develops a persistent unpleasant smell, or shows possible mould. Some discolouration may remain after a proper wash, but a stained sponge with other signs of damage should be discarded.
The Right Way to Dry and Store Makeup Brushes
How you dry your brushes matters almost as much as how you wash them. After cleaning, press the bristles gently with a fresh towel and reshape each head. Lay the brush horizontally with the bristles extending slightly beyond the edge of a clean surface. This allows air to move around the damp fibres without flattening them against a towel.
Avoid standing wet brushes upright in a cup. Water can travel toward the ferrule and weaken the adhesive over time. A hair dryer, radiator, or direct blast of heat is not a good shortcut either, as heat may affect the glue, fibres, or handle finish.
Drying time varies according to brush size, density, humidity, and airflow. Do not use or pack away any brush that still feels damp near the base of its bristles.
Once fully dry, store brushes in a clean holder or case away from bathroom splashes and dusty surfaces. Protecting their heads from being crushed will help them hold their shape between uses.
Common Makeup Brush Cleaning Mistakes and How to Avoid Them
One of the biggest mistakes is soaking an entire brush in a bowl of water. This can allow moisture into the handle and ferrule, where it may loosen adhesive. Keep washing focused on the bristles instead. Very hot water is another unnecessary risk; lukewarm water is enough to loosen most makeup when paired with the right cleanser.
Scrubbing harder does not always mean cleaning better. Rough silicone mats, pulling on the fibres, and twisting wet brush heads can cause shedding or spoil their shape. Use light pressure and repeat the wash if product remains. If the bristles feel greasy after drying, there may still be cleanser or makeup residue inside. Wash again gently and rinse more thoroughly.
A stiff brush may have leftover soap, dried makeup, or damaged fibres. Try a careful rinse and reshape it before allowing it to air-dry again. If the head stays bent, the bristles fall out in clumps, or the handle becomes loose, cleaning may no longer solve the problem. Consider replacing the brush.
Also watch for persistent odours, visible mould, or anything that suggests a tool was stored wet for too long. Do not use a damaged or suspicious-smelling brush on your skin.
Conclusion
Knowing how to clean makeup brushes properly does not require special skills or expensive equipment. The most useful habit is simple: wash the bristles with a suitable gentle cleanser, rinse away the residue, protect the handle from excess water, and allow each brush to dry fully before using it again.
A regular cleaning schedule keeps old makeup from building up and helps brushes perform as they should. Quick cleaning can help between applications, but it is not a substitute for a proper wash.
Treat your brushes gently, watch for signs of wear, and choose methods that suit their materials. A few minutes of consistent care can make your makeup routine cleaner, easier, and more comfortable.
Frequently Asked Questions
How often should you clean your makeup brushes?
Most regularly used makeup brushes should be washed every 7–10 days. Foundation and concealer brushes may need more frequent cleaning, especially with daily use. Clean reusable makeup sponges after each use.
Can you clean makeup brushes with regular soap?
Yes, a suitable mild liquid soap can clean many makeup brushes. Avoid harsh detergents and strongly fragranced products. Rinse thoroughly to remove residue, and follow the manufacturer’s instructions for delicate natural-hair brushes.
How do you clean makeup brushes without brush cleaner?
You can use a small amount of gentle shampoo or mild liquid soap instead of a dedicated brush cleaner. Massage the damp bristles carefully, rinse completely, reshape them, and allow them to air-dry.
Can micellar water be used to clean makeup brushes?
Micellar water can help remove light makeup residue from brush bristles. However, it may leave ingredients behind and cannot always remove deep buildup. Regular washing with a suitable cleanser remains important.
What is the fastest way to clean makeup brushes?
For a quick refresh, remove surface powder with a clean microfiber cloth or use a suitable quick-cleaning spray. Heavily soiled brushes still require thorough washing and complete drying before reuse.
Disclaimer: The information provided in this article on voguecultures.co.uk is intended strictly for general educational and informational purposes. Our goal is to help readers understand safe and practical ways to clean makeup brushes and sponges. Cleaning methods may vary depending on brush materials, product ingredients, and manufacturer recommendations. We do not guarantee specific hygiene, skincare, or cleaning results. Readers should follow relevant product care instructions and exercise appropriate caution when using cleaning solutions. This article is independent informational content and does not involve guest posting, paid promotion, sponsored recommendations, or advertising.
Enjoyed this article? Discover more helpful ideas and fresh inspiration on Vogue Cultures.