Water softener maintenance means checking, cleaning, and caring for the parts that help the unit remove hardness minerals from household water. It is not usually a difficult job, but it needs to be done on a regular schedule. A few minutes of attention each month can prevent many of the problems that cause hard-water spots, poor soap lather, salt waste, or an unexpected service call.
The main areas that need attention are the salt supply, brine tank, resin bed, nozzle or venturi assembly, bypass valve, drain line, and any sediment pre-filter installed before the softener. These parts work together during regeneration, the cleaning cycle that restores the resin so it can continue collecting calcium and magnesium from the water.
A practical water softener maintenance schedule includes simple monthly checks, a more detailed inspection about every six months, and a deeper cleaning once a year. The exact timing may differ by brand, water hardness, iron level, household water use, and system design, so the owner’s manual should always take priority over general advice.
Water Softener Maintenance Quick Guide
| Maintenance Task | Recommended Frequency | Why It Matters |
| Check salt level | Monthly | Ensures enough brine is available for regeneration |
| Inspect for salt bridges | Monthly | Prevents hardened salt from blocking brine production |
| Check for salt mushing | Monthly | Stops thick salt sludge from blocking internal parts |
| Clean the venturi and nozzle | Every 6 months | Helps the system draw brine correctly |
| Exercise the bypass valve | Every 6 months | Prevents the valve from becoming stiff or stuck |
| Deep-clean the brine tank | Annually | Removes dirt, sludge, and salt residue |
| Clean the resin bed | Annually or as needed | Reduces iron and mineral buildup |
| Replace the sediment filter | According to filter instructions | Protects the softener from dirt and debris |
Simple Water Softener Maintenance Steps
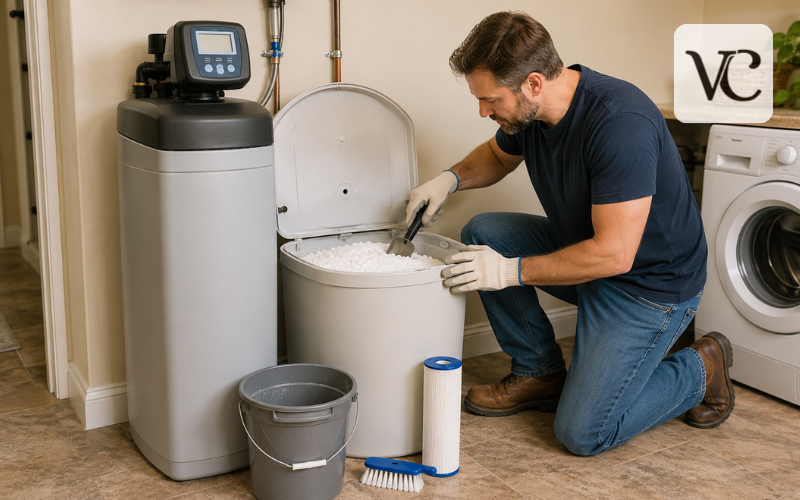
- Check the salt level and refill the tank with the salt recommended by the manufacturer.
- Look for a hard salt bridge or thick sludge inside the brine tank.
- Inspect the unit, hoses, connections, and surrounding floor for leaks.
- Clean the nozzle, venturi, and screens according to the owner’s manual.
- Replace any sediment pre-filter that is dirty or past its recommended service life.
- Deep-clean the brine tank when the salt level becomes low.
- Use a compatible resin cleaner when iron or mineral buildup is present.
- Run a manual regeneration cycle after cleaning when instructed by the manufacturer.
- Why Regular Water Softener Maintenance Matters
A salt-based water softener depends on regeneration. During this cycle, salty water moves from the brine tank into the resin tank, releases the hardness minerals held by the resin, and sends those minerals to the drain. The nozzle and venturi help create the suction needed to draw brine, while the drain line carries away the used brine and loosened material. If any part becomes blocked, dirty, or incorrectly assembled, the system may complete a cycle without actually restoring its softening ability.
Regular care helps the system use salt and water more effectively. It also gives you an early warning when salt use changes, water remains in the brine tank, or hard-water symptoms return. Ignoring these signs can allow salt bridges, compacted sludge, iron buildup, clogged screens, or leaking connections to worsen.
Maintenance needs are not identical in every home. A large family with very hard water may use more salt and regenerate more often than a small household. Well water may contain iron or sediment that calls for more frequent cleaning. A newer demand-initiated unit may also behave differently from an older timer-based model. The goal is not to follow a rigid routine blindly, but to use a schedule and adjust it according to the system’s actual performance.
Water Softener Maintenance Schedule at a Glance
The following water softener maintenance checklist provides a useful starting point. Keep a printed copy near the system or save it as a water softener maintenance PDF so dates, salt additions, filter changes, and unusual symptoms are easy to track.
| Interval | Main maintenance tasks |
| Monthly | Check the salt level, look for a salt bridge, inspect for sludge, confirm there are no leaks, and note whether salt use appears normal. |
| Every six months | Inspect and clean the nozzle, venturi, injector, and screens if the manual allows; exercise the bypass valve; check the drain hose and pre-filter. |
| Annually | Deep-clean the brine tank, inspect hoses and seals, replace due filter cartridges, review hardness settings, and use a model-approved resin cleaner when needed. |
| As needed | Run a manual regeneration after maintenance, correct salt bridging, address iron buildup, and arrange professional service for valve, motor, electrical, or resin problems. |
Some manufacturers recommend checking salt every two or three weeks and refilling when the tank falls below one-quarter full. Others may advise a different level or cleaning interval. Always follow the instructions for your model when they differ from this general schedule.
Monthly Salt-Level and Brine-Tank Checks
Lift the brine tank lid and look at the salt rather than relying only on a low-salt light or app notification. The salt should be loose enough to move slightly when touched with a blunt tool. In many homes, keeping the tank around one-third to one-half full provides a useful reserve without placing too much weight on the lower pellets.
However, the correct level is model-specific. Whirlpool guidance for one current model says to add salt when the tank falls below one-quarter full and to keep the level lower in humid conditions to reduce bridging.
Do not assume that more salt is always better. Filling the tank to the rim can make it harder to notice a hidden bridge and may encourage the lower salt to compact, especially in a damp utility room. Add a manageable amount, close the lid securely, and store unopened bags in a dry place.
Pay attention to how quickly the level changes. Very high salt use may be caused by incorrect hardness settings, frequent regeneration, a leaking toilet that increases water demand, or a control problem. Very low salt use can also be a warning. If the level stays frozen for weeks even though the household uses plenty of water, the system may have a bridge, a blocked brine draw, or a regeneration fault.
Finding and Removing Salt Bridges
A salt bridge is a hard crust that forms above the water in the brine tank. The top may look full, but an empty pocket sits underneath. Because the salt is no longer touching the water, it cannot dissolve properly to make brine. The resin then fails to regenerate, and hard water returns even though the tank appears to contain salt. High humidity and unsuitable salt are common causes.
To check for a bridge, use a clean broom handle or another smooth, blunt tool. Gently push it straight down through the salt. If it meets a hard layer before reaching the expected bottom area, work carefully in several places to break the crust into smaller pieces.
Never use a knife, screwdriver, metal rod, or other sharp object. Do not hit the outside walls of the tank. Both actions can crack or puncture the plastic. If the bridge is stubborn, some GE guidance allows warm—not hot—water to help dissolve it, but confirm that method in your own manual before adding water.
After breaking the bridge, run a manual regeneration if the system has already been producing hard water. Then watch whether the salt level begins to fall normally.
Dealing With Salt Mushing and Brine-Tank Sludge
Salt mushing is different from a bridge. Instead of forming a hard shelf above an air pocket, the salt partly dissolves and settles into a thick, wet mass at the bottom of the tank. This sludge can restrict water movement around the brine valve and make it difficult for the system to create or draw the correct amount of brine.
Wait until the salt level is low before dealing with the problem. Place the softener in bypass if the manual requires it, remove the remaining loose salt, and scoop out the soft mass with a plastic container. Avoid pulling, bending, or striking the brine well, float assembly, or tubing. Once the sludge is removed, clean the tank and refill it with the salt type approved by the manufacturer.
Salt quality and moisture both matter. Many manufacturers recommend pellet, nugget, or clean solar salt with low impurities and advise against rock salt because it can leave more dirt and residue. A humid room, a poorly closed lid, or repeated overfilling can also make compaction more likely.
Cleaning the Venturi, Nozzle, and Injector
The venturi, nozzle, or injector assembly is small but essential. It creates the suction that draws brine from the salt tank into the resin tank. Sand, silt, iron, or dirt can block its narrow openings, leading to poor brine draw and hard water.
Before opening the assembly, make sure the unit is in its normal service position rather than actively regenerating. Follow the manual to place the bypass valve correctly and remove water pressure from the assembly. Disconnect power when the manufacturer’s instructions call for it.
Remove the cover carefully and keep the parts in order. Wash the screen, gasket, flow plugs, and other removable pieces in warm, soapy water, then rinse with clean water. A small, soft brush can help remove dirt, but do not scratch or reshape the openings.
Reassembly is just as important as cleaning. The gasket holes must line up with the housing, the flow plugs must face the correct direction, and the O-ring must sit properly. Tighten the cap by hand only unless the manual states otherwise. Overtightening can crack the cap or housing. Manufacturer instructions also stress replacing every part in the correct order.
Annual Brine-Tank Deep Cleaning
The easiest time to deep-clean the brine tank is when the salt level is already low. Put the system into bypass or follow the shutdown steps in the manual. Remove the remaining salt and dispose of badly contaminated or heavily compacted material according to local rules.
Use warm water and a small amount of ordinary dish soap to loosen residue from the walls and floor. A soft brush or cloth is safer than an abrasive pad. Keep the brine well and float components protected, and do not force parts that are not designed for homeowner removal. Rinse the tank fully so soap does not remain.
Sanitizing may be useful after contamination, long disuse, flooding, odor, or certain repairs, but do not guess at the bleach amount. Water softener designs and resin volumes differ. Use only the sanitizer and exact dose approved in the model’s manual, and never mix bleach with resin cleaners, acids, rust removers, or other chemicals.
After cleaning, return all components to their proper positions, add the correct amount of water if the manual requires it, refill with approved salt, restore the unit to service, and start a manual regeneration. Check the surrounding floor and fittings for leaks during and after the cycle.
Resin-Bed Cleaning and Iron Buildup Control
The resin bed contains thousands of small beads that collect hardness minerals. Regeneration normally cleans them, but dissolved iron, sediment, and other deposits can coat the beads over time. This coating reduces their working capacity and may cause staining, odor, or hard water between cycles.
Use only a resin cleaner that is compatible with the softener and the water problem. The product label and equipment manual should agree on where to add it, how much to use, and whether a second regeneration is needed. A common process is to place the cleaner in the brine well and immediately begin a manual regeneration, but the exact method should never be assumed.
Homes supplied by well water often need closer attention because iron levels can vary. GE advises more frequent resin-bed cleaning for its systems when iron is high and directs owners to follow the chosen iron cleaner’s instructions.
If iron staining returns quickly after cleaning, test the raw water. A softener can handle limited amounts of certain forms of iron, but it is not a complete answer for every iron, sulfur, sediment, or bacterial problem. A water-treatment professional can determine whether an iron filter or another treatment stage is needed.
Filters, Bypass Valves, and Other Parts to Inspect
If the installation includes a sediment pre-filter, inspect it according to its pressure drop, appearance, and replacement schedule. A dirty cartridge can restrict water flow and allow debris to reach the control valve. Do not wait for a major pressure loss if the manufacturer specifies a set replacement interval.
Move the bypass valve gently from service to bypass and back again every few months, provided the manual allows this. Occasional movement helps reveal stiffness before an emergency. Stop if the valve binds, leaks, or requires heavy force.
Check the drain hose for kinks, plugs, or an incorrect height because a restricted line can prevent proper brine removal. Also inspect the overflow hose, tubing, seals, connections, and the floor around the unit. A damp fitting, salt crust outside the tank, or repeated puddle deserves attention.
Motor faults, cracked valve bodies, damaged wiring, major leaks, repeated error codes, and suspected resin loss are not good DIY projects. These problems normally require a qualified plumber, authorized technician, or water-treatment specialist.
DIY Water Softener Maintenance Made Safer
Basic water softener maintenance DIY work usually needs only rubber gloves, a bucket, plastic scoop, soft brush, clean cloths, dish soap, a blunt wooden handle, replacement filters, approved salt, and any cleaner named in the manual.
Start with a visual inspection. Check the display, salt level, floor, hoses, and bypass position. Correct a bridge or remove sludge only when necessary. Clean the nozzle and venturi only if the manual gives homeowner instructions. Replace due filters, restore every valve to its proper position, reconnect power, and run a manual regeneration when required. Finish by checking for leaks and confirming that the brine level changes normally.
Use bypass before opening pressurized parts, and unplug the unit when working near electrical components if the instructions direct you to do so. Never open the main control valve, disconnect plumbing, or remove the resin tank while the system is pressurized.
Water softener maintenance Reddit threads and other forums can help describe symptoms, but they are not a substitute for model-specific instructions. Advice that works for one brand may damage another. Use online discussions to create questions, then confirm the answer in the owner’s manual or with the manufacturer.
Signs Your Water Softener Needs Attention
Hard-water spots on glassware, stiff laundry, weak soap lather, and scale around faucets are common signs that the system is no longer softening properly. A single spot does not prove the softener has failed, so confirm the change with a hardness test taken from a softened cold-water tap.
The salt level should gradually drop with normal use. If it does not change for several weeks, check for a bridge and verify that the unit is regenerating. Water that stays unusually high in the brine tank may point to a blocked drain hose, dirty venturi, incorrect assembly, or valve fault.
Murky water, dark residue, strong odor, leaking connections, grinding sounds, or repeated error messages also deserve prompt attention. Other warning signs include sudden salt use, frequent regeneration, lower water pressure, and soft water that turns hard before the next scheduled cycle.
Record the date, symptom, salt level, display message, and any maintenance already completed. This information makes troubleshooting faster and helps a service technician avoid repeating work.
Water Softener Maintenance Cost and Service Options
Routine DIY costs are usually limited to salt, filter cartridges, cleaner, and simple cleaning supplies. The total depends on water hardness, household use, salt prices, filter type, and whether iron treatment is needed.
Professional water softener maintenance cost varies by location and by what the visit includes. A 2026 Angi estimate for one U.S. market places typical annual maintenance around $100 to $300, while repair costs across projects are reported much more broadly, commonly from about $162 to $981. These are planning figures rather than guaranteed prices; travel, system size, parts, access, and local labor rates can change the final bill.
A water softener maintenance service is worth considering when the unit repeatedly fails to draw brine, leaks from the control head, displays persistent errors, loses water pressure, uses salt abnormally, or continues producing hard water after basic checks. Professional testing can also be useful when the raw-water hardness or iron level has changed.
When searching for “water softener maintenance near me,” look for experience with your exact brand and system type. Ask whether the price includes water testing, valve inspection, hardness-setting review, brine draw testing, cleaning, parts, and a written report. Confirm licensing requirements in your area, check recent customer feedback, and compare itemized quotes rather than choosing only by the lowest advertised price.
Conclusion
Good water softener maintenance is mostly about consistency. Check the salt and brine tank each month, inspect the working parts every six months, and plan a deeper tank cleaning and system review once a year. These small tasks help the softener regenerate correctly, reduce avoidable salt problems, and make performance changes easier to catch.
Keep a water softener maintenance checklist beside the unit or save a printable PDF record with dates for salt additions, cleaning, filters, resin treatment, and service visits. Most importantly, treat the manufacturer’s manual as the main guide. Respond early when salt stops dropping, hard-water signs return, or the unit behaves differently. A simple routine is usually easier and less costly than waiting for a small problem to become a major repair.
Frequently Asked Questions
How often should a water softener be maintained?
Check the salt and brine tank monthly, inspect key parts every six months, and complete a deeper cleaning once a year. Your water quality and system manual may require a different schedule.
How do I know if my water softener needs maintenance?
Common signs include white spots on dishes, stiff laundry, poor soap lather, unchanged salt levels, unusual noises, cloudy brine water, leaks, or hard water returning between regeneration cycles.
Can I maintain a water softener myself?
Most basic tasks, including adding salt, removing a salt bridge, cleaning the brine tank, and replacing a filter, can be completed at home by following the manufacturer’s safety instructions.
What type of salt is best for a water softener?
Use the salt type approved for your system. High-quality evaporated salt pellets usually contain fewer impurities than rock salt and may reduce sludge, bridging, and cleaning needs.
When should I call a water softener professional?
Contact a qualified technician for control-valve problems, major leaks, electrical faults, damaged plumbing, repeated error codes, resin loss, or hard water that continues after basic maintenance and regeneration.
Disclaimer: This information provides general guidance for routine water softener maintenance and does not replace the instructions supplied with your specific system. Maintenance steps, salt requirements, cleaning products, and sanitizing procedures can vary by brand and model. Always turn off the water supply, release pressure, use bypass mode, or disconnect power when directed by the manufacturer. Avoid mixing bleach with resin cleaners, acids, rust removers, or other chemicals. Contact a qualified water-treatment technician or plumber if you notice electrical problems, major leaks, damaged valves, contaminated water, or a fault you cannot identify safely.
Enjoyed this article? Discover more helpful ideas and fresh inspiration on Vogue Cultures.