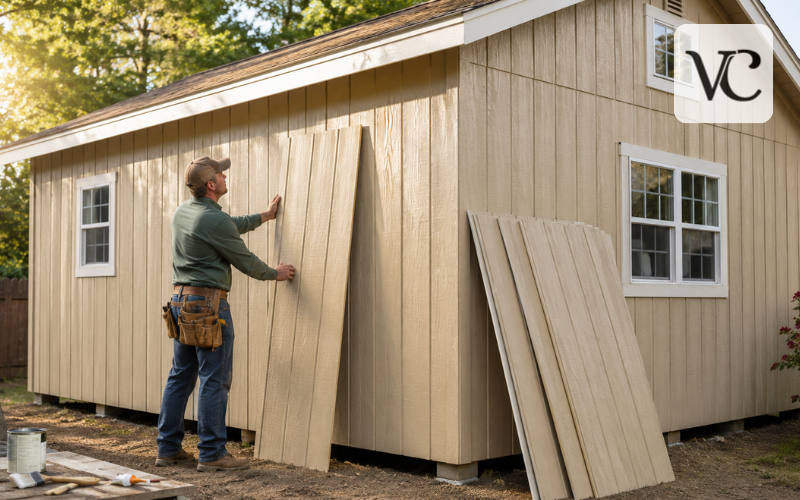
T111 siding is a grooved wood panel used to cover exterior walls. It is also commonly written as T1-11 siding. Instead of installing many narrow boards one at a time, builders can cover a large section of a wall with a single sheet. The vertical grooves give the surface a rustic plank, cabin, barn, or board-and-batten-inspired appearance.
This siding became popular because it is simple, practical, and relatively quick to install. It is still used on houses, cabins, garages, workshops, barns, and garden sheds. A standard 4-by-8-foot sheet covers about 32 square feet before cuts and waste, so a small structure can be enclosed with fewer pieces than many other siding systems.
However, T111 siding is made from wood, so correct installation and moisture protection are essential. Buyers also need to understand the differences between plywood and OSB-style panels, available sizes, thickness ratings, groove patterns, finishes, and local prices. This guide explains those details in simple terms and helps you decide whether T111 siding is suitable for your project.
T111 Siding Quick Guide
| Feature | Quick Details |
| Material | Exterior plywood or OSB-based wood panel |
| Common size | 4 feet by 8 feet |
| Longer option | 4 feet by 10 feet in selected markets |
| Common thickness | Around 11/32 inch to 5/8 inch |
| Groove spacing | Usually 4-inch or 8-inch on center |
| Best uses | Sheds, garages, cabins, barns, and some homes |
| Main advantage | Fast installation with a natural wood appearance |
| Main drawback | Requires strong moisture protection and regular maintenance |
| Finish options | Paint, exterior stain, or factory primer |
| Maintenance | Inspect yearly and refinish when the coating begins to fail |
How to Maintain T111 Siding
- Inspect the siding once a year for cracks, peeling paint, swelling, rot, or loose panels.
- Keep soil, mulch, plants, and stored objects away from the lower edges.
- Clean dirt and mildew gently with mild soap, water, and a soft brush.
- Repair failed caulk and flashing around windows, doors, corners, and roof joints.
- Seal all exposed cuts and damaged edges with a suitable exterior primer.
- Repaint or restain the siding when the finish starts fading, cracking, or peeling.
- Fix leaks and damaged panels early before moisture reaches the framing behind them.
What T111 Siding Is and How It Works
Traditional T111 siding is exterior-grade plywood with vertical grooves cut into its face. The visible surface usually has a rough-sawn wood texture, while the panel edges may be shiplapped so adjoining sheets fit together more neatly. Georgia-Pacific currently lists T1-11 plywood siding with 4-inch or 8-inch groove spacing and describes it as suitable for exterior walls and utility buildings.
One reason T111 siding is useful is that certain rated panels can perform two jobs. A properly specified structural panel may brace the wall and provide the finished exterior surface. This can reduce material and labor compared with a wall that needs separate structural sheathing and another layer of siding.
However, this does not mean every grooved panel can replace structural sheathing. The grade stamp, thickness, framing layout, manufacturer’s instructions, and local building code must all support that use. Some thinner or decorative panels need a separate layer of structural sheathing behind them.
T111 siding is mainly an exterior product, but it may be used indoors for rustic accent walls, workshops, garages, cabins, and utility rooms. For a T111 siding interior project, choose a dry, properly finished panel that is suitable for the room. Its rough grooves collect dust, making it less practical in wet or formal spaces.
Plywood vs. OSB T1-11 Siding
The original form of T1-11 is plywood. It is made by bonding thin wood veneers together, with each layer placed in a different direction. This layered construction gives the sheet useful strength and helps it hold nails and other fasteners well. Plywood T1-11 also has the natural grain and texture many homeowners want for cabins, sheds, and traditional exteriors.
The term T1-11 is sometimes used loosely for grooved panels made from oriented strand board, or OSB. OSB is produced from wood strands bonded with resins under pressure. These panels are often less expensive and can be consistent in size, but exposed edges or damaged coatings may absorb moisture and swell.
Modern engineered-wood siding should not be confused with basic untreated OSB. Branded engineered panels may include protective treatments, water-resistant overlays, factory primer, insect protection, and manufacturer warranties.
Plywood is generally the safer choice for a traditional T1-11 look. OSB-based panels may cost less, but performance depends heavily on product quality and water protection. Identify the actual material rather than relying only on the T1-11 name.
Common T111 Siding Panel Sizes
The standard T1-11 siding 4×8 panel is approximately 48 inches wide and 96 inches long. Actual dimensions can be slightly smaller. For example, a current Lowe’s Plytanium listing gives actual measurements of about 47.874 by 95.866 inches. That small difference matters when matching existing siding, planning joints, or calculating where panel edges will meet the wall studs.
Four-by-eight sheets suit common wall heights and framing layouts and are easier to find and transport. A full sheet covers about 32 square feet, although cuts and waste reduce the usable coverage.
T111 siding 10ft panels are also available in some markets, usually as 4-by-10-foot sheets. A current Home Depot product result lists a pressure-treated 5/8-inch T1-11 panel measuring 48 by 120 inches. Longer panels can cover taller walls with fewer horizontal joints, which may improve the appearance and reduce the number of flashing details.
Ten-foot sheets are heavier and harder to transport or position safely. Confirm local stock, delivery access, wall height, and expected waste before ordering. For a small shed, standard 4-by-8 sheets may be more convenient. For a tall garage or workshop, 10-foot panels may reduce seams and cutting.
T111 Siding Thickness and Groove Spacing
T111 siding thickness varies by manufacturer and intended use. Common nominal categories include 11/32 inch, 3/8 inch, 15/32 inch, 19/32 inch, and 5/8 inch. Georgia-Pacific’s current Plytanium specifications list 11/32-inch and 19/32-inch performance categories, with actual thicknesses of approximately 0.328 and 0.578 inches. Other treated or specialty panels may be available in different thicknesses.
Thickness affects stiffness, impact resistance, fastener holding, weight, price, and whether the panel is approved for direct attachment to framing. A thin decorative sheet may require solid sheathing behind it. A thicker APA-rated siding panel may be permitted to serve as structural wall sheathing in a suitable wall assembly.
Never choose T111 siding thickness based on appearance alone. Check the grade stamp, span rating, manufacturer’s instructions, and local building requirements.
Groove spacing changes the visual scale of the finished wall. Four-inch on-center grooves create the appearance of narrower vertical boards and produce a busier pattern. Eight-inch spacing creates wider sections and is commonly used on sheds, cabins, garages, and homes.
Replacement projects may require an exact groove width, depth, and spacing to match older siding. Measure the existing wall carefully because a new panel that looks similar online may not align with the old grooves after installation.
Primed and Unprimed T111 Siding
T111 siding primed at the factory can save preparation time and provide a more uniform base for paint. A good primer helps the finish coat bond to the surface and gives the wood temporary protection during construction. Primed panels are particularly useful when the final appearance will be painted rather than stained.
Primer is not a complete exterior finish. Factory-primed siding still needs the recommended topcoats within the period stated by the manufacturer. Cut edges, drilled holes, and exposed ends must also be treated because cutting removes the protective factory layer.
APA guidance recommends sealing all panel edges before installation and resealing every edge cut during the work. This is especially important along the bottom of the panels and around windows, doors, vents, and other openings.
Unprimed plywood provides more finishing flexibility. It can display the natural wood character under a suitable exterior stain, or it can be primed and painted on site. The surface must be clean and dry, and all exposed edges need careful protection.
Georgia-Pacific recommends one coat of acrylic latex primer followed by at least two coats of acrylic latex paint for its plywood siding. Its current guidance does not recommend using oil-based paint.
Whichever option you select, treat the bottom edge and fresh cuts as vulnerable areas rather than hidden details.
T1-11 Siding 4×8 Price Factors
There is no single national T1-11 siding 4×8 price. Retail prices change with lumber markets, wood species, thickness, grade, treatment, groove pattern, finish, brand, and region. Availability can also be highly local.
Lowe’s currently requires shoppers to enter a ZIP code or city before showing local pricing and availability for its 4-by-8 Plytanium panel. This is a reminder that a price shown in a search result may not match the cost at your nearest store.
Thicker plywood normally costs more than thinner panels, and traditional plywood is often priced above basic OSB-style siding. Pressure-treated, premium-faced, or factory-primed products may also have higher initial prices.
A low-cost sheet is not always a good value. A warped panel, damaged shiplap edge, unsuitable structural rating, or poorly stored sheet may require extra labor or early replacement.
Calculate more than the cost of the panels. A complete T111 siding budget may include a water-resistive barrier, flashing, corrosion-resistant nails, exterior caulk, primer, paint or stain, corner boards, window trim, delivery, waste, scaffolding, old-siding removal, and labor.
To compare panels fairly, divide the sheet price by its usable coverage and then add the expected finishing and maintenance costs. This produces a more realistic project estimate than comparing shelf prices alone.
Buying T111 Siding at Home Depot or Lowe’s
When searching for T111 siding Home Depot products, check the full product name and specifications rather than relying only on the photograph. Home Depot listings may include 4-inch or 8-inch groove patterns, different thicknesses, pressure-treated panels, and primed plywood-faced products.
Some products may appear online but remain unavailable in certain states or stores. Current search listings include 4-by-8 Plytanium panels, primed DuraTemp-style siding, and a 4-by-10 pressure-treated option.
The same advice applies when searching for T1-11 siding 4×8 Lowe’s products. Lowe’s currently lists Southern Yellow Pine Plytanium panels with 4-inch and 8-inch groove patterns, but prices and store availability depend on the selected location. Its 8-inch product page identifies the material as exterior plywood and provides the actual measurements rather than only the nominal size.
Inspect every sheet before accepting it. Look for straight panels, sound shiplap edges, even grooves, and no face separation or wet-storage damage. Confirm the thickness, exposure classification, structural rating, treatment, and finish requirements.
For a repair project, bring accurate measurements and clear photographs of the existing pattern. Older T111 siding may have a groove depth or spacing that is difficult to match with current big-box store products. A local lumberyard may have additional patterns or may be able to place a special order.
Preparing for T111 Siding Installation
Good installation starts with accurate measurement. Find the square footage of each wall by multiplying its width by its height. Add the measurements for gables, dormers, and other wall sections.
Subtracting the full area of every door and window can leave you with too little material because the removed sections may not always produce reusable pieces. Include a reasonable allowance for cuts, damaged sheets, pattern matching, and future repairs.
Plan the panel layout before ordering. Panel joints should meet suitable framing or blocking, and very narrow strips should not be left at visible corners. Planning also helps determine whether 4-by-8 or 4-by-10 panels will produce less waste.
The wall must be straight and properly framed. Confirm whether the selected T111 siding is approved for direct attachment to studs or requires separate structural sheathing. Install the required water-resistive barrier, window and door flashing, kick-out flashing, and other drainage details before covering the wall.
Siding sheds most rain, but flashing and the weather barrier manage water that reaches the back of the panels.
Choose fasteners approved for the panel and local exposure. Coastal air, treated wood, and wet climates may require greater corrosion resistance. Gather compatible sealant, edge primer, exterior finish, trim, and safe lifting equipment. Large sheets are awkward in windy conditions, so use a helper.
Installing T111 Siding Correctly
T111 siding is normally installed with the grooves running vertically. Begin from a straight and level reference line and position the first panel carefully. A small alignment error in the first sheet can continue across the entire wall.
The grooved surface faces outward, while shiplapped edges overlap according to the panel design. Vertical and horizontal joints should land on framing or blocking when required by the manufacturer.
Wood panels expand and contract as their moisture content changes. Do not force sheets tightly together or guess the correct joint gap. Follow the spacing instructions for the exact panel being installed.
Seal every field-cut edge before placing the sheet on the wall. Pay particular attention to the bottom edge and cuts around windows, doors, vents, electrical boxes, and roof intersections.
Use the approved fastener type, penetration, and spacing. Drive nail heads flush without crushing the panel face or leaving them raised. Overdriving can damage the outer veneer, weaken the fastening point, and create a place where water can collect.
Complete the wall with properly flashed horizontal joints, corner boards, opening trim, and compatible caulk where the installation instructions require it. Caulk should not be used as a replacement for proper flashing.
When the siding forms part of the structural wall system, installation errors can affect more than appearance. Homeowners who are uncertain about framing, flashing, or fastening requirements should consult a qualified siding contractor or local building official.
Protecting T111 Siding From Moisture
Water is the main threat to T111 siding. Exterior-rated plywood can handle normal outdoor exposure when it is properly installed and finished. However, repeated wetting at unsealed edges can lead to swelling, surface checking, veneer separation, fungal decay, and paint failure.
The lower edge is particularly vulnerable because rainwater splashes upward from soil, patios, paths, roofs, and decks. Wet grass, plants, mulch, and snow can also hold moisture against the wood.
APA recommends maintaining at least 6 inches of clearance between siding and the ground. In termite-prone conditions, guidance may call for 8 inches or another distance required by local regulations. This supports the common recommendation to keep T111 siding approximately 6 to 8 inches above finished soil.
Ground clearance alone is not enough. Seal the bottom edges, keep gutters clear, direct downspouts away from the walls, trim plants back, and stop sprinklers from regularly soaking the siding.
Check roof-to-wall intersections for suitable kick-out flashing. Windows, doors, vents, and exterior fixtures should also be flashed so water drains toward the outside rather than behind the panel. APA advises inspecting lower drip edges and priming or painting any unfinished areas.
Never leave raw cuts exposed. A small unsealed edge can absorb moisture faster than the broad face, allowing damage to begin behind an otherwise healthy-looking paint layer.
Maintenance, Repairs, and Expected Lifespan
T111 siding does not have one guaranteed lifespan because climate, panel quality, installation, paint, wall design, and maintenance all affect its condition. Well-installed plywood siding that remains dry can continue performing for decades. Neglected siding near soil, leaking windows, damaged roofs, or failed paint may deteriorate much sooner.
Inspect the walls at least once a year and after severe storms. Look for peeling paint, open joints, cracked caulk, soft lower edges, raised wood fibers, swelling, loose fasteners, insect activity, mildew, and dark water stains.
Clean the siding gently with a soft brush, mild cleaning solution, and low-pressure water. Aggressive pressure washing can damage the rough wood face and force water behind the panels.
The commonly suggested three-to-five-year repainting schedule should be treated as an inspection guide rather than a strict rule. Strong sunlight, frequent rain, high humidity, temperature changes, and lower-quality coatings may require earlier work. A high-quality paint system in a protected climate may last longer.
Do not wait for large areas of bare wood to appear. Repaint or reseal when the coating begins to chalk, crack, peel, fade heavily, or stop repelling water.
Small damaged areas may be removed and patched with a matching section of panel. A proper repair requires sound framing or blocking, flashing, sealed edges, compatible fasteners, and a protective finish. Widespread softness, repeated leaks, movement, or hidden wall damage should be inspected by a professional.
Advantages, Drawbacks, and Modern Alternatives
T111 siding still provides several practical advantages. Large sheets cover walls quickly, and the wood appearance works well with rustic buildings. Certain structural grades may also reduce the number of separate wall layers required.
The panels can be cut with common woodworking tools, accept paint or stain, and are widely recognized as a practical material for sheds, cabins, garages, barns, workshops, and simple residential designs.
Its disadvantages are equally important. T111 provides very little insulation by itself, so the energy performance of the wall depends on the insulation and other materials behind it. The vertical pattern limits design choices, and full sheets can be difficult to carry and position.
Real wood also requires regular coating, inspection, and moisture control. Poorly protected lower edges, windows, joints, and roof intersections are common places for damage to begin. Traditional T111 siding may be less suitable in extremely wet climates, high-fire-risk areas, or projects where the owner wants very little maintenance.
Fiber cement panels are a common alternative. James Hardie states that its fiber cement siding resists damage from moisture and rot, does not attract pests, and is noncombustible. However, fiber cement is heavier and normally requires suitable tools, handling methods, fasteners, and installation practices.
Treated engineered wood is another option. LP SmartSide panel and vertical siding uses an engineered-wood system treated to improve protection against moisture and impact, with factory-finished choices available. It maintains a wood-based appearance while aiming to reduce some weaknesses associated with traditional wood panels.
Conclusion
T111 siding can be a practical choice when you want a simple vertical wood appearance, fast wall coverage, and a material suited to sheds, garages, cabins, workshops, barns, and some homes.
A 4-by-8 panel is generally the easiest size to find and handle, while 10-foot sheets can reduce joints on taller walls. Plywood provides the traditional T1-11 character, while OSB-style and engineered panels should be judged by their actual construction, treatment, rating, finish, and warranty.
The best results depend less on the product name and more on selecting the correct panel. Check the T111 siding thickness, groove spacing, structural rating, actual dimensions, edge design, and finishing requirements before purchasing. Compare local Home Depot, Lowe’s, and lumberyard stock because product availability and prices vary by location.
Most importantly, plan for water control. Proper flashing, sealed cuts, suitable paint or stain, clear ground separation, working gutters, and regular inspections can greatly extend the siding’s service life.
For a low-maintenance exterior or a building in a difficult climate, fiber cement or modern treated engineered wood may provide better long-term value. For a well-protected project where natural wood appearance and straightforward installation matter, correctly selected and installed T111 siding can still be a sensible and attractive option.
Frequently Asked Questions
Is T111 siding made from real wood?
Traditional T111 siding is made from plywood veneers bonded together. Some similar grooved siding panels use OSB or treated engineered wood, so always check the product label before purchasing.
How long does T111 siding last?
Properly installed and maintained plywood T111 siding can last for several decades. Its lifespan depends heavily on climate, ground clearance, flashing, paint quality, and protection from repeated moisture exposure.
Does T111 siding need to be painted?
T111 siding should receive a protective exterior coating. It may be painted or stained, depending on the product, but all cut edges and exposed wood must be sealed carefully.
Can T111 siding be installed directly over studs?
Some structural-rated T111 panels can attach directly to wall framing and provide sheathing and siding together. Thinner or decorative panels may require separate sheathing, so check local codes and manufacturer instructions.
Is T111 siding waterproof?
T111 siding is not completely waterproof. Exterior-grade panels resist normal weather when properly sealed, painted, flashed, and installed, but exposed edges can absorb water and develop swelling or rot.
Disclaimer: This article provides general information about T111 siding, including common materials, sizes, installation methods, maintenance needs, and alternatives. Product specifications and building requirements may differ by manufacturer, location, climate, and project type. Always review the manufacturer’s instructions and local building codes before installation. Consult a qualified contractor or building professional when structural framing, water damage, electrical lines, complex flashing, or major siding repairs are involved.
Enjoyed this article? Discover more helpful ideas and fresh inspiration on Vogue Cultures.