Your washing machine works hard to keep your clothes fresh, but when was the last time you cleaned the machine itself? Many people assume that regular washing cycles automatically keep the inside clean. Unfortunately, detergent, fabric softener, dirt, and moisture can slowly collect in places you rarely notice.
Over time, this buildup may create unpleasant smells, leave marks on freshly washed clothes, or affect how well your washing machine works. The good news is that regular cleaning can help prevent these problems without much effort.
Learning how to clean washing machine involves more than wiping the drum. The detergent drawer, rubber seals, filters, and hidden corners also need attention. These areas can hold moisture, lint, and leftover detergent even when the main drum looks spotless.
Whether you own a front-load or top-load washer, this guide explains practical cleaning methods, suitable products, and simple maintenance habits. With the right approach, you can keep your washing machine cleaner and your laundry smelling fresher.
Snippet-Ready:
Cleaning a washing machine involves removing detergent buildup, dirt, and trapped moisture from its drum, seals, drawers, and filters. VogueCultures.co.uk provides this article for informational purposes only, not cleaning services or product promotion.
Quick Guide Table: How to Clean a Washing Machine
| Area to Clean | Common Problem | Recommended Cleaning Method |
| Washing machine drum | Detergent residue and unpleasant odors | Run the manufacturer-recommended drum-cleaning cycle. |
| Rubber door seal | Trapped moisture, lint, and mold | Wipe accessible folds with a suitable cleaner and dry thoroughly. |
| Detergent drawer | Sticky detergent and softener buildup | Remove if permitted, wash with warm water, and dry. |
| Drain pump filter | Lint, coins, and trapped debris | Follow the manual to drain and clean accessible filters safely. |
| Top-load basket and rim | Dirt and soap residue | Wipe accessible surfaces and run the recommended tub-cleaning cycle. |
| Door and lid | Water marks and remaining grime | Clean with a damp microfiber cloth and allow to dry. |
Step-by-Step Guide to Cleaning a Washing Machine
- Empty the washer: Remove all clothes and check the drum for forgotten objects.
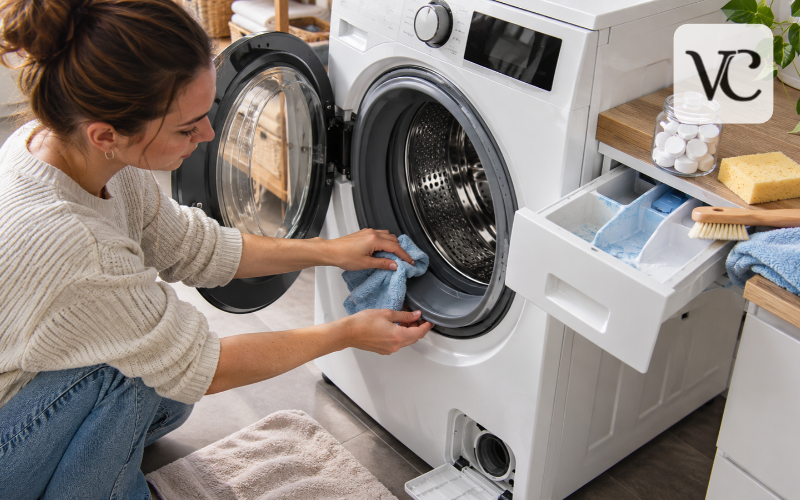
- Clean the detergent drawer: Remove accessible compartments and rinse away detergent buildup with warm water.
- Wipe the rubber seals: Gently clean accessible folds and remove trapped lint or moisture.
- Check the filters: Follow your appliance manual to clean any user-accessible filters safely.
- Run a cleaning cycle: Select Tub Clean, Drum Clean, Self Clean, or the recommended program using an approved cleaner if required.
- Dry the machine: Wipe remaining moisture and leave the door or lid slightly open when safe.
Why Washing Machines Get Dirty and How Often to Clean Them
A washing machine handles dirty clothing, detergent, and water almost every day. Although much of the dirt disappears down the drain, small amounts of residue can remain inside.
Using too much detergent is a common cause of buildup. Excess soap may not rinse away completely, especially during shorter or cooler washing cycles. Fabric softener can also leave a sticky coating inside dispensers and other surfaces.
Trapped moisture creates another problem. When the machine stays damp between washes, mold and mildew may develop, particularly around rubber seals and detergent compartments.
You may notice several warning signs, including musty smells, visible black or grey spots, sticky residue, or clothing that smells unpleasant after washing.
For frequently used machines, a monthly cleaning routine is a sensible starting point. Some manufacturers recommend running a drum-cleaning cycle after a certain number of washes instead.
Detergent drawers and door seals may need more frequent attention, especially when residue or moisture is visible. Check accessible filters according to your machine’s instructions.
Cleaning regularly is usually easier than dealing with months of accumulated grime.
What You Need Before Cleaning Your Washing Machine
You do not need an expensive collection of cleaning supplies to maintain your washing machine. Most cleaning tasks require a few everyday items and a suitable product for the drum.
A soft microfiber cloth is useful for wiping surfaces, while a sponge or old toothbrush helps remove buildup from narrow spaces. Warm water can loosen detergent residue in removable drawers and dispensers.
For the drum itself, choose a washing machine cleaner that your appliance manufacturer allows. These products are available as tablets, powders, or liquids designed to remove residue from the washer.
Before using any cleaner, read both the appliance manual and the product label. Not every cleaning product is suitable for every machine, and some self-cleaning cycles require no added chemicals.
Safety matters, too. Switch off and unplug the washer before manually cleaning accessible filters or parts where the instructions require it. Allow hot water to cool before opening any drain filter.
Avoid sharp tools, harsh scrubbing pads, and unnecessary disassembly. They can damage seals, plastic components, or protective surfaces.
Finally, keep cleaning products away from children and pets, and never combine different chemicals unless their instructions specifically permit it.
How to Clean a Washing Machine Drum Step by Step
The drum is where your clothes spend most of their washing time. Even when its surface looks shiny, detergent residue and grime can collect in less visible areas.
Cleaning the drum regularly helps reduce buildup and unpleasant odors.
Here is a straightforward method for cleaning a compatible washing machine:
- Empty the machine: Remove all clothing and check the drum for loose objects, such as coins, hair clips, or small pieces of fabric.
- Check the cleaning instructions: Look for a Tub Clean, Drum Clean, Self Clean, or similar cycle on the control panel. Some machines use a different name or require another approved cycle.
- Add the correct cleaner: If your machine permits cleaning products, follow the recommended amount and placement instructions. Some tablets go directly into the drum, while certain powders or liquids belong in the dispenser.
- Run the cleaning cycle: Start the selected program and allow it to finish without interruption.
- Inspect and dry the drum: Once the cycle ends, check for remaining residue. Wipe accessible surfaces with a clean cloth and allow the interior to dry.
If your machine does not have a dedicated cleaning cycle, consult the manual before choosing an alternative. The hottest normal washing cycle is not automatically the correct option for every model.
Remember that a hot cleaning cycle does not necessarily disinfect every internal surface. Its main purpose is to help remove deposits and maintain cleanliness.
If residue remains after cleaning, a second manufacturer-approved cycle may help.
How to Clean a Front-Load Washing Machine
Front-load washing machines are popular because they use water efficiently and generally provide effective cleaning. However, their rubber door seals can hold moisture, hair, and detergent residue.
To clean a front-load washer, begin by opening the door and examining the rubber gasket around the opening.
Gently pull back its accessible folds and look for trapped lint, dirt, or small objects. Use a damp cloth with a little mild detergent, if approved by the manufacturer, to remove visible residue.
Avoid pulling the rubber too forcefully or using abrasive brushes that might damage it.
Next, wipe the inside of the door, including the glass and surrounding edges. Pay attention to the lower part of the gasket, where water often collects.
Many front-load machines also have an accessible drain pump filter near the bottom. Follow the manual’s instructions before opening it because trapped water may spill out.
After cleaning these areas, run the appropriate drum-cleaning cycle.
When the cycle finishes, wipe away remaining moisture and leave the door slightly open in a safe position to improve airflow.
Regular gasket cleaning is especially useful for preventing recurring musty odors.
How to Clean a Top-Load Washing Machine
If you are wondering how to clean a washing machine top loader, the process is slightly different from cleaning a front-load model.
Top-loading machines generally do not have the large front-door rubber gasket that collects moisture. Instead, dirt and detergent residue may gather around the upper rim, beneath the lid, and near the central agitator.
Start by switching off the machine and wiping the inside of the lid with a damp microfiber cloth.
Clean the upper edge of the wash basket, paying attention to areas that regular wash water may not reach. A soft toothbrush can help remove residue from narrow spaces.
If your washer has a central agitator or a low-profile impeller, clean the accessible surfaces gently. Do not attempt to remove these components unless the manufacturer provides instructions for doing so.
Check any removable detergent or fabric softener dispensers and clean them with warm water.
Once the visible areas are clean, run the designated tub-cleaning program with the recommended product, if one is required.
Allow the washer to dry afterward by leaving the lid open when safe.
Cleaning the Detergent Drawer and Fabric Softener Dispenser
The detergent drawer is one of the easiest places to overlook during washing machine maintenance.
Every load introduces detergent or fabric softener into this compartment. Over time, leftover products can become sticky, block small openings, and encourage unwanted buildup.
Start by checking whether your detergent drawer is removable. Many models have a release tab that allows the drawer to slide out completely.
If the drawer comes out easily, rinse it under warm running water. Use a soft brush to clean the corners and remove dried detergent or fabric softener.
For stubborn residue, allow removable parts to soak briefly in warm water, provided the manufacturer permits it.
The space behind the drawer also deserves attention. Wipe accessible surfaces with a damp cloth, removing buildup without forcing water into electrical components.
After cleaning, rinse away any remaining soap and dry the pieces before putting them back.
Avoid placing plastic dispensers in a dishwasher unless the appliance instructions specifically allow it, as heat may damage them.
Cleaning Rubber Seals, Door Edges, and Other Hidden Areas
Some of the dirtiest parts of a washing machine are not immediately visible.
In front-loading machines, the rubber door seal is a particularly important area because its folds can trap water, lint, and small particles.
Open the door and inspect the gasket carefully. Gently separate accessible folds and remove any loose debris.
Use a soft cloth dampened with water and a manufacturer-approved cleaning solution. Wipe each section thoroughly without stretching or damaging the rubber.
If you notice dark marks, check whether they are removable dirt or possible mold growth. Avoid assuming that every stain can be eliminated with ordinary cleaning.
Next, clean the door glass, hinges, accessible edges, and surrounding surfaces.
Top-loading machines also have hidden areas worth checking, including the underside of the lid and the upper basket rim.
Once cleaning is complete, dry these surfaces carefully.
If visible mold persists inside inaccessible areas or the rubber seal appears damaged, professional inspection may be necessary.
How to Clean Washing Machine Filters Safely
Washing machine filters can collect lint, hair, coins, and other small objects. When debris builds up, it may contribute to drainage problems or unpleasant smells.
However, not every washing machine uses the same filter system.
Some front-load models have a user-accessible drain pump filter behind a small panel near the bottom of the appliance. Certain top-load machines have removable lint filters, while others use different internal systems.
Washing machines may also have water inlet screens that catch particles entering through the water supply.
Before cleaning any filter, identify its location and maintenance requirements in your appliance manual.
For an accessible drain pump filter, switch off and unplug the washer as instructed. Make sure the water has cooled, then place towels and a shallow container beneath the opening.
If your model has an emergency drain hose, use it to release trapped water before removing the filter cap.
Gently remove the filter, clear away visible debris, and rinse it with water. Reinstall it securely, ensuring the cap and drain hose are correctly sealed.
Check for leaks when the machine runs again.
Water inlet screens require different precautions, including shutting off the water supply. Avoid removing them unless the manual explains the procedure.
Never force open a filter or remove panels that are not designed for user maintenance.
Washing Machine Cleaner vs Vinegar and Baking Soda
Many cleaning guides recommend using vinegar and baking soda as inexpensive household solutions. However, popular home remedies are not always the safest choice for modern washing machines.
A commercial washing machine cleaner is often a more reliable option when it is compatible with your appliance. These products are designed to help remove detergent residue, grime, and certain deposits.
They should still be used according to the label and the washing machine manufacturer’s instructions.
Vinegar and baking soda as home remedies
People often search for how to clean washing machine with vinegar and baking soda because both ingredients are readily available.
Vinegar can help dissolve some mineral deposits, while baking soda can assist with certain surface-cleaning tasks. However, combining them produces a reaction that does not automatically make the mixture a better cleaner.
More importantly, several washing machine manufacturers advise against using vinegar inside their appliances. Repeated exposure to its acidity may damage some rubber seals and hoses.
Baking soda is also not a substitute for a disinfectant or a properly formulated washing machine cleaner.
For a simple home remedy, warm water and a soft cloth are suitable for many accessible surfaces, with mild detergent used only where permitted.
Never mix vinegar with chlorine bleach. This combination can release dangerous chlorine gas. Bleach should only be used when the appliance instructions specifically recommend it, in the correct amount and compartment.
How to Clean LG and Samsung Washing Machines
Different washing machine brands offer cleaning programs with their own instructions. Understanding these differences helps prevent unnecessary mistakes.
Cleaning an LG washing machine
Many LG washing machines include a Tub Clean function designed to remove residue from the drum.
First, empty the washer completely. If your model requires a cleaning product, use the recommended type and amount.
On compatible LG models, a cleaning tablet may go directly into the drum, while certain liquid or powder cleaners belong in the detergent dispenser.
Select Tub Clean and start the cycle. Afterward, open the door and detergent drawer to allow moisture to escape.
LG also recommends regular attention to accessible seals, dispensers, and filters.
Cleaning a Samsung washing machine
Samsung models may include Self Clean, Self Clean+, Eco Drum Clean, or Eco Drum Clean+.
These programs are designed to maintain the drum without ordinary laundry detergent. Many Samsung models do not require any cleaning product during their routine self-clean cycle.
The exact instructions depend on the model and cleaning program, so avoid adding bleach or cleaning tablets automatically.
Samsung washers may display a reminder when the drum-cleaning cycle is due.
If you need a visual demonstration, search the manufacturer’s official support materials for a cleaning video matching your model number. This is more reliable than following a video showing a different machine.
Removing Bad Smells, Mold, and Stubborn Buildup
A washing machine that smells unpleasant after cleaning may have residue or moisture trapped in areas that the drum-cleaning cycle does not reach.
Start by identifying where the smell is strongest.
If the odor comes from the door opening, inspect the rubber gasket and nearby surfaces. A smell around the detergent drawer may indicate trapped moisture or leftover fabric softener.
Clean these accessible areas carefully, then run the manufacturer’s recommended maintenance cycle.
If the drum contains excessive suds or visible detergent residue, review how much detergent you use during normal laundry loads.
A musty smell can also develop when damp clothes remain in the washer for several hours. Removing laundry promptly and improving ventilation may help.
If water remains in the drum after a wash, check the accessible drain filter and look for obvious drainage problems.
Do not repeatedly use strong cleaning chemicals to cover up persistent odors.
If mold keeps returning, the washer fails to drain, or unpleasant smells continue despite thorough maintenance, contact a qualified appliance technician. The problem may involve a hidden blockage, damaged component, or drainage connection.
Simple Habits That Keep Your Washing Machine Clean
Once you have cleaned your washing machine, a few everyday habits can make future maintenance easier.
One of the simplest changes is allowing the machine to dry between loads. Leaving the door or lid slightly open, when safe, encourages airflow and reduces trapped moisture.
If children or pets have access to the laundry area, follow the manufacturer’s safety advice about leaving the appliance open.
Another important habit is using the correct amount of detergent. More detergent does not necessarily produce cleaner clothing. Excess product can leave residue that gradually builds up inside the washer.
If you own a high-efficiency machine, use detergent designed for that type of appliance.
Remove wet laundry as soon as the cycle finishes. Clothes left inside a damp drum can develop an unpleasant smell that may transfer to the machine.
Wipe visible water from the door seal and clean detergent spills before they harden.
A practical monthly maintenance routine can include inspecting the drawer, checking accessible seals and filters, and running the appropriate drum-cleaning program when due.
The exact schedule should follow your appliance manual, especially if your washer provides automatic cleaning reminders.
These small habits can reduce recurring residue and help keep your laundry routine more pleasant.
Conclusion
Knowing how to clean a washing machine properly is an important part of keeping your laundry fresh and maintaining your appliance.
The most effective cleaning routine goes beyond the drum. Detergent drawers, rubber seals, accessible filters, and hidden edges also deserve regular attention.
Front-load and top-load washing machines have different designs, so the safest cleaning method depends on the model you own.
Always follow the manufacturer’s instructions, choose compatible cleaning products, and avoid potentially damaging home remedies.
Regular maintenance does not have to be complicated. By cleaning the right areas, allowing moisture to dry, and using detergent correctly, you can reduce unpleasant odors and prevent unnecessary buildup.
A little consistent care can help your washing machine stay cleaner and perform reliably for years to come.
Frequently Asked Questions
How often should I clean my washing machine?
Cleaning your washing machine approximately once a month is a useful starting point for frequent use. However, always follow the manufacturer’s recommended cleaning schedule and check the seals and detergent drawer regularly.
Can I use vinegar and baking soda to clean my washing machine?
Vinegar and baking soda are popular household cleaning ingredients, but they are not suitable for every washing machine. Some manufacturers discourage vinegar because it may damage rubber components. Always check your appliance manual first.
What is the best way to clean a front-load washing machine?
Clean the rubber door seal, detergent drawer, and accessible drain filter, then run the recommended drum-cleaning cycle. Wipe away remaining moisture afterward to help prevent musty odors and residue buildup.
Why does my washing machine smell bad even after cleaning?
Persistent odors may come from trapped moisture, detergent residue, hidden mold, or drainage problems. Check accessible seals, drawers, and filters. If the smell continues after proper cleaning, consider professional inspection.
Can I clean my washing machine without a special cleaner?
Yes, you can clean many accessible surfaces using warm water, a soft cloth, and manufacturer-approved mild detergent. However, the drum may require a specific cleaning cycle or product, depending on your machine.
Disclaimer: This article on “How to Clean a Washing Machine” is published by VogueCultures.co.uk solely for general informational and educational purposes. It is not guest-posted, sponsored, paid promotional, or advertising content. We do not promote or endorse any cleaning products, brands, or services. Cleaning methods may vary depending on the washing machine’s manufacturer and model. Readers should always consult their appliance manual and follow official safety instructions before using cleaning products or performing maintenance.
Enjoyed this article? Discover more helpful ideas and fresh inspiration on Vogue Cultures.